We make the ceiling in the bathroom from plastic panels - a detailed description of the installation for beginners. Ceiling in the bathroom and toilet made of plastic panels and dismantling with your own hands How to install ceiling panels in the bathroom
Recently, PVC panels have been used for finishing the ceiling in bathrooms. This material has become widespread due to its low cost. Also, PVC panels have high performance characteristics. Installation of a plastic ceiling is carried out in several stages. First, the base surface is processed and prepared for the installation of the lathing. After that, the frame is installed and paneling.
If you properly prepare the surface for plastic panels, then the structure will be durable and will not deform. First, the base ceiling in the room must be cleaned of whitewash and paint residues. To do this, use a spatula. If the paint does not come off well, dampen the surface with warm water.
Subsequent preparation is carried out in several stages:
- Elimination of cracks and other defects. If the size of the crack is large, then it must first be widened with a sharp object, and then putty.
- Primer. If you decide to use a plastic ceiling for your bathtub, then you need to apply a primer to the base surface in several coats.
- Putty. Apply the putty only after the primer is completely dry.

If you decide to install plastic ceilings, then you need to take care of the routing of wires for spotlights. Remember that the wiring must be firmly attached to the base ceiling, otherwise the panels may catch fire.
PVC bathroom ceilings: advantages and disadvantages
There are many benefits to plastic. However, this material has significant drawbacks. A characteristic advantage of plastic is ease of installation. Even a beginner can make a plastic ceiling with his own hands. In addition, the assembly of the structure is carried out in just a few hours.
The advantages of plastic:
- Low cost.
- Moisture resistance. No mold or mildew builds up on PVC panels.
- Nice appearance. It is advisable to use plastic panels in the bathroom, designed in any style.
- Plastic improves the soundproofing of the room.
- PVC panels do not require careful maintenance.

Remember that plastic panels cannot be used if large pipes pass through the ceiling space. In addition, the PVC ceiling makes it impossible to carry out repair work. To replace pipes or wiring, you will have to disassemble the entire structure.
Disadvantages of plastic ceilings:
- Reducing the height of the room. Plastic ceilings reduce the ceiling height by 10-12 centimeters.
- Plastic is a synthetic material that melts when ignited and releases poison.
- Low strength. PVC panels are deformed under the influence of mechanical damage.
How to make a frame for a plastic ceiling in a brand new bathroom
The assembly of the frame begins with marking. You need to identify the lowest angle in the room, and measure 6 centimeters from it. The resulting point will be the starting point. After that, you need to mark the entire perimeter of the base surface using a level and fishing line. Remember the end and start lines must converge.

The frame is installed in the following order:
- Drill holes and insert dowels into them. To do this, you need to use a puncher. Do not forget to attach a metal profile to the wall beforehand.
- Fix the guide rail to the wall.
- Attach hangers. They need to be positioned in increments of 60-70 centimeters.
- Fix the ceiling profiles to the hangers. In order to fix them accurately, you need to pull the fishing line between the walls. Remember to wrap the ends of the line around the dowels.
The standard length of the metal profile is 3 meters. If your bathroom has a long ceiling, then insert the end of one profile into the other. Use self-tapping screws to fix the product.
Do-it-yourself installation of a plastic ceiling in the bathroom
Installation of panels on the crate begins with securing the starting profile. Alternatively, you can use a special skirting board. The profile must be cut and fixed on the surface using metal screws.

Subsequent cladding is carried out in several stages:
- Cut off the plastic panel. Use a hacksaw to resize.
- Secure the first panel. Make sure that the panel is located strictly perpendicular to the walls.
- The following panels must be fixed by fixing to the profile. It is desirable that there are no large gaps between the panels.
- Secure the last panel in the same way.
- Install lighting fixtures on the ceiling.
After sheathing the frame, you need to fix the ceiling plinth. In order to fix it, you need to use special glue. If there are gaps between the skirting board and the walls, use an acrylic based sealant to seal them.
Ceiling made of plastic panels in the bathroom (video)
Installing a plastic ceiling yourself is a snap. The main thing is to correctly mark the base surface and assemble the crate in the right sequence. Before proceeding with the sheathing of the frame, the plastic must be left in the room for several days. This is necessary in order for the panels to expand slightly. Do not forget to eliminate gaps and irregularities after installing the structure.
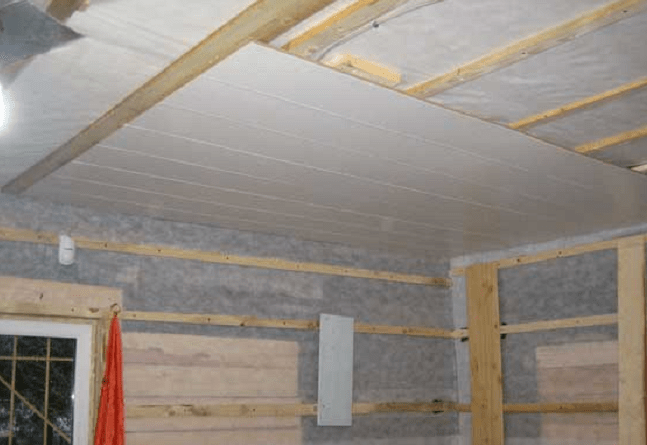
Plastic ceiling in the bathroom (photo)


For a modern person, the bathroom is a kind of cult space, especially for residents of city apartments. We spend a lot of time in the bathroom. Daily water procedures become a kind of ritual for us, and here the main aspects of operation are cleanliness and level of comfort in the bathroom. Such indicators can be achieved only if the interior decoration of the bathroom meets the special conditions that are characteristic of this room.
Considering the high humidity, which is an essential condition for the operation of this type of premises, panels, floors and ceilings are made of materials that are resistant to constant exposure to moisture. Ceramic coatings used for wall and floor cladding are not always suitable for ceilings. For this purpose, it is better to use plastic, which will make the bathroom ceiling panels beautiful, stable and durable. Why plastic in this case becomes the best finishing option and how to make such a structure yourself, we will consider in more detail.
What is the difference between the ceiling in the bathroom
Among all the premises that are present in our apartment or house, the bathroom is in the most extreme conditions. The high level of humidity and frequent use put forward special requirements not only for the state of the interior decoration of bathrooms, but also for their cleaning. Interior trim elements must successfully resist moisture, be practical and easy to maintain. The choice of design options in this case is not as wide as we would like. As for the ceiling, here plastic panels on the ceiling in the bathroom are almost the only solution.
On a note: moisture-resistant plasterboard painted with acrylic or silicate paint is not suitable for these purposes.

Moreover, when it is necessary to obtain a durable, beautiful and moisture-resistant ceiling structure. Ceilings in the bathroom play not only an aesthetic role, but also carry a great technological load. For premises of this type, the installation of ceiling lighting fixtures and forced ventilation elements becomes a prerequisite for operation. Ceiling structures to be installed in a bathroom must meet the following requirements:
- first and foremost, the material from which the ceiling is made must calmly tolerate the effects of moisture, including the presence of 100% moisture (warm steam, water spray);
- strength and resistance of the structure to moisture both from below and from above (direct contact with an aqueous medium);
- ceiling surfaces in the bathroom should be made taking into account the need for constant care (washing, cleaning and disinfection);
- high manufacturability of the design and the presence of aesthetic content.
All of the above requirements are met by the design option when you have a ceiling in the bathroom made of plastic panels. This material allows you to solve the set goals and objectives in a comprehensive manner.

Important! The internal surfaces in the shower room and in the bathroom are subject to constant cleaning and cleaning using antibacterial and detergents containing aggressive chemical components.
The main advantages of plastic. How should you choose the material?
If plastic panels are not always suitable for decorating other rooms, then such material is a real godsend for a humid and warm room. The structure of the plastic is inert to moisture and can withstand minor mechanical stress. Do not forget about the cost of PVC finishing materials. Compared to other finishing options, repairing the ceiling in your bathroom with plastic panels will cost several times less.
Other advantages of this finish option include the following aspects:
- plastic, unlike drywall, does not swell or dry out, constantly retaining its original structure and shape;
- hygiene of coatings. Mold and fungal formations will never appear on PVC panels;
- good reflectivity of PVC panels, allowing you to create a visual effect of increasing space;
- a variety of finished products used for the installation of ceiling structures;
- quick and convenient installation of ceiling structures.
Knowing the advantages of plastic finishing materials, you should carefully consider the choice of materials for the future decoration of the ceiling in the bathroom.

Choosing material for work
Today, the domestic industry and foreign companies - suppliers offer consumers a fairly wide selection of plastic finishing materials. You can always choose exactly the right color that matches the overall tone of the interior decoration of the bathroom. If you wish, you can opt for solid-colored products or make a ceiling in your own bathroom from panels with a pattern or with a specific texture.
Depending on the design features of the room and the design of the ceiling, plastic panels of different sizes are used. Traditionally, plastic is produced in the form of long panels, the length of which is 2.6 - 2.7 and 3 meters. At the same time, the width of the products varies in the range of 240-375 mm, which is very convenient for finishing rooms of various sizes and heights. The panels are 8 or 10 cm thick.
On a note: For small bathrooms with low ceilings, narrow slats are ideal. For bathrooms with large areas and high ceilings, wide plastic panels will look good.
Installation of plastic ceiling surfaces in the bathroom
Before you start working with ceilings in your own bathroom, you need to prepare a rough surface. It's good when you already have a plan for the placement of lamps and exhaust ventilation at your fingertips, there is a sketch or sketches of the future design. Making edits already during installation is a rather problematic task. You must clearly know how many panels you need to use and in what order the installation of the structure will be carried out.

The panel ceiling in the bathroom must be done, knowing exactly all the measurements and parameters. It will be very useful to come to the store with a ready-made working sketch and a tape measure in order to choose the optimal sizes of plastic panels. Cutting during the editing process is inevitable, but you don't really need extra material. The lack of panels at the final stage of work will also be unpleasant.
Note: the length and number of aluminum profiles used to equip the frame of the future ceiling are measured in the same way.
From the tools for work you will need:
- drill or hammer drill;
- crown for mounting fixtures;
- building level;
- screwdriver or screwdriver;
- a hacksaw for plasterboard or for plastic;
- assembly knife;
- liquid Nails.
Almost all of the listed tools are freely available and are often available on your own farm.

Features of the device ceilings in a plastic bathroom
For those who have an idea of finishing work and are familiar with the device of suspended ceiling structures, there should not be any particular difficulties. The main thing is to follow the technology and sequence of actions. It is possible and real to make a plastic ceiling in the bathroom on your own and with your own hands.
For reference: comparing the design of plastic ceilings with the design of the plasterboard ceiling, we can say the following - working with plastic in this regard is easier and less laborious.
The main condition on which the effectiveness of the work depends is the correct location of the frame guides and the precisely calculated number of profiles for the future frame. A plasterboard suspended ceiling requires the creation of a strong and massive frame with a large number of profiles, then a lightweight version is suitable with plastic panels.
On a note: if there are tiles on the walls in the bathroom, the ceiling level can be beaten off with a regular tape measure, without using a level.
The beginning of the installation comes down to determining the required distance from the rough surface. As a rule, for prefabricated structures, such a distance does not exceed 7-10 cm. We orient ourselves by the tile seam closest to the ceiling surface and set aside the required distance.
Important! It is advisable to make the future suspended structure at a distance of 5-10 from the nearest horizontal seam. In this case, the tiles and plastic sheets will look harmonious.
We mark the future lower edge of the new ceiling in increments of 40-50 cm around the entire perimeter of the bathroom.
Making a frame
After the marking work, the direct installation of the guides begins. Aluminum profiles are placed on the basis of your marks and are attached to the panels with self-tapping screws.

On a note: if your tile is laid on plastic mounting crosses with a line width of 1-2.5 mm, then the guides can be mounted without drilling holes in the tile. Self-tapping screws in such a situation are screwed directly into the body of the seam.
In practical terms, the installation of the frame is simplified due to the lightness of the future ceiling structure. To achieve the required strength of the frame, this method of fastening the profiles is quite suitable.
As soon as the guide profiles are installed around the perimeter of the bathroom, you can start laying the stiffeners. This element of the frame is an important component that ultimately ensures the strength and stability of the entire type-setting structure. Stiffeners or bearing profiles are attached to the rough surface with U-shaped brackets. It should be said that the need to install stiffeners arises when installation is carried out in large rooms. For small apartments, where the bathroom is on average 1.5 x 2.5 meters, there is no such need. Plastic panels have sufficient rigidity to withstand the load on their own.
Laying of plastic panels
After installing the frame, we begin to lay the panels. Everything starts from the start profile. Observing the sequence of laying, you can achieve an exact fit of the cut pieces of plastic to each other. The starter profile is attached to a regular profile using textiles.

Which plastic panels are best for your bathroom on the ceiling, wide or narrow, you decide. Starting from the starting profile, the entire ceiling is gradually laid, panel by panel. Each piece fits into the existing groove of the previous piece. At the finish of work, when laying the last piece of plastic, a starting profile is not required.

The set is carried out to the very last guide. Try to make sure that the last panel, which is likely to be cut to its full length, is at the far wall.
Conclusion
Installing plastic ceilings in a bathroom is a fun activity. All work is built on a clear sequence of actions. Each measured piece of plastic is stacked behind the previous one. Holes are made in the plastic at the installation site of the fixtures. A regular mounting knife will easily make a hole of the required diameter. Having installed the lamp, we continue to set the structure further and do so in each case, installing the lamp. Having reached the old wiring, we connect new lighting devices. The connection can be parallel or serial, depending on the functionality of the existing wiring and the number of fixtures in your bathroom.

Before installing and securing the last panel, check that the lighting equipment and ventilation are working properly. The finish of the work will be the installation of the last plastic panel.
When we start renovating a bathroom, we strive to do it quickly, but at the same time not to lose in the quality of the finish. In addition, it often happens that financial difficulties do not allow you to fork out and purchase expensive materials, and you also need to add the cost of wages to workers. If you are faced with a similar situation and do not know how to decorate the ceiling in your bathroom, the best option would be a suspended ceiling made of PVC panels in the bathroom.
What PVC gives
The use of plastic sheets began relatively recently, but they have already gained wide popularity in the construction market due to their good price-quality ratio. They are used for decoration of both residential premises and offices. Ease of installation and attractive appearance allow you to quickly, efficiently and relatively inexpensively arrange any room. In apartments, the material is ideal for decorating the ceiling of the kitchen, and especially the bathroom.
Advantages of PVC panels:
- Excellent moisture resistance, which allows them to be used in rooms with high air humidity (bathrooms, showers);
- Resistance at elevated temperatures, resistance to temperature extremes;
- Ease and speed of installation (installation of pvc panels is possible even for beginners in the construction business);
- Light weight, allowing you to easily transport pvc panels and mount them in the canvas;
- The use of pvc ceiling panels for the bathroom will allow you to close the unevenness of the ceiling, mask pipes, ventilation ducts, hide electrical wiring;
- Installation of a ceiling in a bathroom made of pvc panels will increase sound insulation and reliably protect the ceiling from moisture accumulation and the formation of fungus.
Important ! The plastic cladding ceiling in the bathroom has another advantage. It is not only easy to install, but, if necessary, can be easily disassembled, gaining access to communications requiring urgent repair.

When the necessary work is completed, you can put the plastic sheets back in and your bathroom decor will be safely restored.
Material characteristic
PVC ceiling panels are divided into matte and glossy. Glossy sheets reflect light well, so they are better suited for the ceiling. Although matte options look pretty good too.
The panels are also divided into seam and seamless. Special locks are made in the seam facing for joining into the canvas, and the seams between adjacent panels are visible in the finished canvas. In a seamless version, they form a single fabric due to a very tight fit to each other.
According to the method of drawing, plastic panels are:
- Printed, the pattern is applied to the surface of the panels using a special roller, which is rolled over the surface;
- Film, a special thermal film is used to transfer the pattern, the pattern is transferred from it to the surface of the cladding under the influence of high temperature. Such options are more resistant to abrasion and the use of detergents.
In the assortment of building supermarkets, you will find many options for colors and patterns for every taste. The panels are available in both plain colors and with various patterns. It can be imitation of marble or wood, geometric or floral patterns, even whole paintings. Choosing the color scheme of PVC panels for the ceiling in the bathroom, give preference to light colors.
A classic option is, of course, a white ceiling, it is ideal for any wall decoration, but, showing your imagination, you can choose an interesting color scheme for the ceiling made of PVC panels in the bathroom, as in the photo.

When purchasing plastic sheets for the ceiling, pay special attention to their quality, since any defect or flaw in the material will be especially noticeable on the ceiling. Also check the conformity of the characteristics specified in the accompanying documents, the actual purchased product.
Ceiling panels differ from wall panels in lesser thickness, respectively, their rigidity and strength are lower, this should be borne in mind when you buy, deliver them home and install them. They can be easily damaged by careless handling.
Installation of the ceiling in the bathroom with PVC panels
PVC sheets are attached to a wood or metal frame. For the bathroom, it is preferable to use metal, since it is not subject to rotting and destruction by fungus, thus, it will last much longer.
Preparation for work
In addition to panels, you should stock up on PVC profiles. They are made of the same material as the sheets, and are designed to make transitions in the corners of walls and ceilings aesthetically pleasing and beautiful.

Please note: you need to purchase special ones for finishing ceilings. They are significantly lighter than wall panels due to their lower thickness. The thickness of the sheet is 3mm, while the thickness of the plastic for the walls can be up to 10mm.
Due to their lightness, ceiling panels provide less stress on the fastening. But the disadvantages include the greater fragility of the sheets for the ceiling, they can be easily broken during installation, if you allow inaccuracy in work.
Before proceeding with the installation of a ceiling made of PVC sheets, think over which lamps you plan to hang in the bathroom, what their power will be, how to arrange them so as not to overheat the plastic of the cladding. In the case of installing built-in lamps from the draft ceiling, it is necessary to retreat at least 10 cm, or better with a margin, marking the level of the new ceiling.
To calculate the number of pvc panels, it is necessary to determine the area of the ceiling (multiply the lengths of two adjacent sides), then divide it by the area of the panel indicated on the package, add 20% to the stock and round up to the whole panel.
If the length or width of the ceiling is less than the length of the PVC sheets, you can visually count how many pieces are needed.
For the manufacture of a metal frame, we need two types of profiles: UD-profile 2.5x2.5 and CD-profile 2.5x6cm.
To calculate the required number of metal profiles, we need a ceiling diagram. On it we lay down straight lines parallel to one of the walls, given that the distance between the profiles should be about 40-50 cm. Multiplying the length of the wall by the number of straight lines drawn, you will get the required number of the profile 2.5x6cm. To determine the amount of a 2.5x6cm rigid profile, calculate the perimeter of your bathroom ceiling.
In addition, you will need self-tapping screws for fastening in the bathroom and dowels for attaching metal profiles (with a margin).
It is better not to use wooden beams and brackets for mounting the ceiling frame in a bathroom made of PVC panels, as this will affect the reliability and durability of the structure.
Ceiling skirting board (usually 3 meters) - divide the perimeter of the ceiling by 3 and round up to get the required number of skirting boards.
Installation of panels in the bathroom
Required tools: punch (you can drill), metal scissors, screwdriver, hangers, knife, hacksaw, level, liquid nails (or glue), miter box, rag.
We carry out work in the bathroom in the following order:
- Using a level, along the perimeter of the walls, mark with a pencil or a marker the attachment points of rigid profiles. They need to be attached to the walls strictly horizontally, it will depend on whether your ceiling is even. The horizontal line on the wall will be the level of the new ceiling;
- Along the line along the walls, we fix the rigid profile 2.5x2.5 cm with screws;
- Then we attach a 2.5x6cm profile to the ceiling and wall profile using self-tapping screws, the distance between the profiles should be 40-50 cm;
- We attach the plastic skirting boards to the wall, the joints must be cut so that they fit well in the corners of the room so that there are no gaps;
- The PVC plastic sheets must be cut to fit the ceiling. It is better not to cut off all the panels at once, but to cut each one separately as they are installed;
- Insert the first PVC sheet into the recess in the baseboard, screw it to the ceiling profile with self-tapping screws with a press washer;
- Then we cut the next sheet to the required size, insert it into the recess on the fixed panel, screw it to the profile. This is how all pvc panels are installed, except for the last one;
- The last PVC panel will need to be cut not only in length but also in width. Then we insert it into the recess on the plastic baseboard and move it to the previous panel so that there is no gap. We do not fasten the last panel.
To get a good understanding of all the nuances of work, before starting your own repair, look at the options for installing a ceiling in a bathroom made of PVC panels in the video posted on repair sites.
The choice of plastic in the bathroom for decorating walls and ceilings is not accidental, since the material compares favorably with its positive characteristics. It is resistant to moisture, so no waterproofing is required, it is easy to process. A large selection of offered colors allows you to choose the best option, taking into account the design solution of the room. When arranging the ceiling inside the structure, you can conduct wiring for connecting lamps, ventilation ducts. In addition, the ceiling made of plastic panels will be relatively inexpensive, and all the work is easy to do with your own hands.
Positive aspects of using plastic panels
To install the panels, it is necessary to create a suspended structure from a metal profile, which will reduce the height of the room by a few centimeters. When using ordinary luminaires, about 3 cm will be required for arranging the ceiling, for built-in elements it will have to be lowered by 8-12 cm. Despite this, the technology has many positive aspects.
The advantages of bathroom paneling include the following:
- suspended plastic ceiling perfectly covers any surface irregularities;
- there is no need to dismantle the old coating;
- possible hidden wiring of electrical, ventilation, communication systems;
- ease of assembly due to convenient connection according to the thorn-groove principle, low weight of the material;
- the presence of a metal frame is suitable for soundproofing, waterproofing;
- in case of replacing damaged panels, they are removed, and new ones are inserted in their place;
- polyvinyl chloride is a moisture resistant material, so any dirt from its surface is easily removed, which allows you to maintain a neat appearance for a longer time.
Finishing the ceiling with plastic panels or PVC clapboard is considered an affordable budget option, installation can be done in a few hours, but this method is not suitable for creating complex multi-level structures.
The choice of the method of fixing to the ceiling depends on the characteristics of the base and the tasks set. If the surface is initially flat and does not need correction, then the panels are fixed directly on it. But first, a starting profile is installed on one of the side walls, then, inserting the remaining strips into it, they begin to assemble the ceiling. To securely fix the panels, they are fixed, maintaining a step of 50 cm.

Fasteners should be selected taking into account the characteristics of the floor material... If this is a tree, lining, then you can attach it to carnations, staples from a stapler. With a concrete surface, it is somewhat more difficult, since you will have to drill holes for dowels. Therefore, if conditions permit, installation is carried out using a minimum indent from the ceiling, or on liquid nails. But in the latter case, the structure turns out to be non-separable, which makes it impossible to replace a separate panel.

Main component materials
When making a plastic ceiling in a bathroom, it is necessary to prepare a tool, accessories, and choose the right panels. They must be of good quality, have sufficient thickness, products with a thin section do not have the necessary rigidity and are capable of transmitting light from lamps.
Start profile. The element in the form of a u-shaped bar is installed on the frame along the entire perimeter. It is used to fasten plastic panels from the ends.

Corner (outer and inner). This element is indispensable for installing panels in places where two walls meet.

H-profile. Allows to connect strips along their length if one element is not enough to bridge the distance between the walls.

The ceiling plinth is designed for panel filing, has a decorative border and is also attached to the frame as a starting profile.

Plastic corner. Serves for sealing any joints, which allows you to make the ceiling more accurate.

In addition, you will need to prepare metal guides for the manufacture of the frame, fasteners. Since the bathroom is a room with a high humidity content, all elements must have a protective galvanized coating.
Assembling the frame structure
Step-by-step instruction. They begin to assemble the structure from the guides, setting them in level on the walls along the entire perimeter. For these purposes, it is better to use standard rolled products intended for arranging plasterboard systems.
Since high humidity is always present in rooms such as a bathroom or a kitchen, a galvanized profile with fasteners should be taken. But in dry rooms this is not critical, therefore, for the manufacture of the frame, you can take wooden blocks with a section of 30x30 mm.
Then, using standard hangers, intermediate guides are attached at a distance of 50-60 cm, which are also leveled with a level in the same plane. If the indentation is minimal, just to lay the corrugated hose under the wiring, then the strips are fastened directly to the ceiling. If necessary, alignment along the plane is carried out by placing pieces of plywood and wooden wedges under the profile.

The next step after assembling the frame is the assembly of the panels. Usually the starting profile is installed first, but a ceiling molding is used for the suspended structure. The edges are adjusted at an angle of 45 °, and the length is measured as accurately as possible or with a margin of one millimeter, otherwise gaps may appear at the joints, which will stand out noticeably.

If there is a tile or other solid base on the walls, then the adjusted profile can be glued to liquid nails or screwed with self-tapping screws. The surface is pre-degreased and, applying glue to the bar in a zigzag motion, it is firmly pressed against the wall. Then they are torn off, let the glue dry for a few minutes, until it sticks well, and again put it in place. The bar is checked by level until the glue has seized completely, if necessary, correct.
The profiles are glued on three sides and left to dry for 12 hours. If in the process of work the glue is squeezed out from one of the sides, it should not be touched until it hardens completely, after which it is broken off by prying it off with a sharp knife. Then there will be no traces on the surface, but if you try to remove the glue while it is in a liquid state, it will smear and stain the material.
Installation of plastic panels
The next step is to install the plastic panels. Having measured the distance from one already mounted side plinth to another, add a couple more centimeters to the obtained value. This will be the required length of the panels.
If the room has ideal geometry, then several panels are prepared at once, in other cases - one or two at a time, all the time adjusting the length. Plastic can be cut with a hacksaw for metal, jigsaw, grinder.

The first panel is inserted into the previously installed molding with a spike forward. If the finishing profile is made of soft plastic, which bends slightly and creates difficulties, then its upper edge is additionally attached to self-tapping screws. And when inserting the bar, it is corrected with a narrow spatula, trying to ensure a uniform entry into the starting profile (plinth) along its entire length.
After that, the strip is fixed on each guide using self-tapping screws, and in the case of using a wooden frame - with staples, shooting them with a stapler, which must be galvanized or made of stainless steel.
The following panels are installed in the same way - by first inserting one edge into the side profile, and then the other. Further, eliminating the deflection, the strip is raised in the middle and, tapping slightly along the edge with the palm of your hand, the lock is driven into the groove. The absence of a gap at the joint means that the bar is normal.

At this point, another person may need help to maintain the installed panel. But if the work is carried out alone, then small fragments of double-sided tape should be glued to the longitudinal profile, which will not allow the strip to sag while it is fixed on the screws.
Installation of lighting fixtures
Holes for the lamps must be made during the installation process, using a ring nozzle for this, then they will turn out to be perfectly even, or using a jigsaw. After fixing the strips with lamps, they are connected to the mains and immediately checked for serviceability.... After all, if at the end of all the work problems arise, then in order to eliminate them, the ceiling will have to be disassembled and reassembled.

The sequence of actions for installing lighting elements will be as follows:
- Having prepared the frame, the wiring is passed through it in the direction of the fixing points of the lamps and immediately checked with the device for an open circuit. For safety reasons, the wire should be taken in double insulation, laid in a plastic corrugated hose.
- The panel for the lamps is prepared in advance by making holes of the required size in it.
- Having fixed the lighting fixtures on the strip, it is installed in its place.
- They connect to the wires laid inside the frame and, by screwing in the bulbs, check the operability.
When connected directly to the mains in the bathroom, they often choose 220 V lamps for incandescent or housekeeping lamps. The option with a 12 V step-down transformer is less common, in which case halogen or LED lamps are chosen. But regardless of the type of connection, the system must have a separate machine with an RCD that cuts off the voltage in the event of a short circuit.

During operation, incandescent lamps (even low-power ones) heat up and transfer some of the heat to the plastic, which begins to darken and deform. To prevent this, a layer of any flexible thermal insulation material should be glued to the body.
Taking into account the peculiarities of operation, high requirements for electrical safety when working in rooms with high humidity, luminaires should be chosen with a degree of protection of at least IP44, which guarantees the protection of the lamp body from direct ingress of water. But such devices are expensive, and given their greater weight, additional jumpers will need to be installed at the attachment points.

Halogen, LED lamps are devoid of the listed disadvantages, therefore, the requirements for electrical safety are lower, and the lamps can be mounted on any structure.
To connect 4 lamps from a 220 V network, if the length of the wire leading to each of them does not exceed 2 meters, one transformer is enough, but with a longer length, a voltage drop is observed, as a result, the glow becomes weaker. Therefore, if the dimensions of the bathroom and the distance between the lamps are significant, then the converter is placed inside the suspended structure or an additional device is installed.
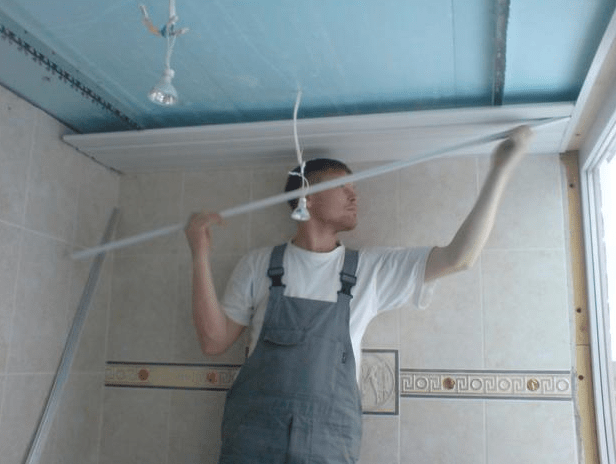
Fixing the last panel
At the final stage, it is necessary to install the last strip, which is not always possible to do correctly on the first attempt. Usually it has to be cut to the width. To do this, measure the actual distance from the previous plank to the starting profile (plinth), subtracting 5–7 mm. But even then, during the installation process, in order for it to go into place, it must be carefully corrected with a spatula all the time.

Another option is to glue the strip on "liquid nails", in this case its size will correspond to the distance from the previous panel to the stop bar. Having applied glue to the strip, as well as to all guides, it is glued according to the technology described above. There is only one drawback of this method - the panel is not removable, so if necessary it will have to be broken.
The last to be installed is a plastic skirting board, after cutting the mounting plate on it, and the side parts at an angle of 45 °. They measure it, and if everything fits perfectly, then the shelves of the plinth, which are glued to the ceiling and wall, smeared with glue, are fixed, pressing them tightly. This completes the installation.

In the event of miscalculations or the choice of material of low quality, over time, cracks may form at the junction of the plinth with the ceiling. Then, to eliminate them, they take a white acrylic sealant and, inserting the tube into the assembly gun, fill all the cracks. Since acrylic sets quickly, the length of the areas to be treated should not exceed 30–40 cm. After filling the seam, it is immediately sealed by passing it over with a soft cloth or finger. The hardened excess can be removed with the sharp corner of the trowel.

Having processed the entire perimeter, it is left to dry. When the acrylic dries, the seam can be pulled in, so the steps to eliminate the gaps have to be repeated. In conclusion, the stains remaining on the ceiling are rubbed with a damp, clean sponge with a soft cloth until shine appears.
As you can see, it will not be difficult to sheathe the ceiling in the bathroom with plastic panels or PVC clapboard, even in the absence of proper experience. The end result depends more on the condition of the ceiling, its curvature, the choice of material, because the better it is, the fewer problems arise in the process of further operation.
The special microclimate of the bathroom requires the use of special finishing materials. When equipping a ceiling in a bathroom made of plastic panels, it is important to choose products with high practical qualities. Plus, don't forget about the aesthetics of space. And how to make the cladding without resorting to the services of professionals, we will figure it out in more detail.
Which panels are best used for the bathroom
In order for the repair to meet expectations, the choice of panels for the ceiling should be taking into account the characteristics of the room:
- Small-format rooms are difficult to lay out with large elements. You need to select panels taking into account the size of the ceiling, the features of the layout scheme.
- The ceiling made of PVC panels in the bathroom must maintain shape stability under the influence of high temperatures, humidity, be resistant to corrosion, rot and mold. Therefore, the lamellas should be chosen with persistent dyes. And do not forget to treat the panels with antiseptics.

The types of panels for finishing the ceiling in the bathroom differ in shape and size:
- Rack and pinion. They are produced in the form of long narrow stripes up to 100 mm wide in a single color.
- Standard. Board material up to 370 mm wide. They come with a frieze that imitates a tiled layout.
- Leafy or seamless. Large format sheet products with a pattern on the front side. Provides quick installation, but sometimes requires trimming.
Advice! Despite the small format and duration of installation, laths are considered the most convenient for use in the bathroom. The material allows you to do practically without scraps and visually adjust the size of the room.
Sheet material has a ready-made design solution, and all other types of products can be combined to your liking.
PVC ceiling installation technology in the bathroom and toilet
Installation of the ceiling in the bathroom can be done both with glue and with crate. Mounting on glue is permissible only with a perfectly flat surface and an established ventilation system. But the crate is suitable for any base. You can make a crate from a wooden bar, a plastic or metal profile.
Room layout and calculation of materials
To mark the space of the ceiling, it is necessary to determine the lowest corner of the room, measure the mounting distance of the battens plus the thickness of the panel and the distance for the base luminaires from the height of the plane - make a notch. Perform the same procedure in all corners. Then connect the marks and draw a straight line around the perimeter of the wall.
Advice! If the walls are tiled, markings are not required. The reference is made along the upper edge of the tile. Otherwise, there is a risk of a visual defect in the ceiling, distortions, gaps between the hinged structure and the wall cladding.

The calculation of the material is not difficult. Having determined the area of space, you need to divide by the size of one panel. The final figure indicates the number of panels for cladding the entire plane. You need to buy materials with a margin for cutting, breakage. For a master, this figure is no more than 1-2%, for a beginner, up to 5% of the total purchase.
Preparing the frame and protecting it from moisture in the bathroom
If a wooden bar is taken as a crate, the materials are pre-treated with moisture-resistant compounds and antiseptics. You can choose Neomid primer, compositions: Antiseptic, Ultra, Pinotex. After impregnation, the bars must be dried for 2-3 days. And then form the frame.
Advice! The metal frame in the bathroom must be factory-protected against corrosion.
When arranging a structure, a number of factors should be taken into account:
- the timber or metal profile on which the panels are installed is located perpendicular to the direction of their installation;
- if it is supposed to mount built-in lamps, there should be a distance of 100-120 mm from the ceiling to the crate;
- parallel line on the walls - the height of the PVC panels installation, the frame lays down taking into account the width of the panels;
- in order to increase the moisture-resistant properties of the timber, it is better to seal the gaps between them with silicone sealant or lay a vapor barrier material.

And now about the installation of a wooden frame. Bars of well-dried wood are taken, treated with soil and an antiseptic, antiprene. The size of the timber is up to 20 cm.
Features of the device of a wooden frame under the ceiling in a toilet made of plastic panels:
- lathing step 30-40 cm;
- fastening to the base on self-tapping screws, on concrete - dowels;
- it is important to keep the timber horizontally, and trimming of wood is used to adjust the level.
As for the arrangement of a metal profile structure under the panels on the ceiling in the bathroom, the stages of work are as follows:
- Fasten profiles of types L, UD along the perimeter markings, and take profile CD for transverse strips.
- Screw the strips onto the self-tapping screws, for concrete - take a dowel, first punch a hole in the concrete, insert the dowel-nails into it.
- Fix the UD profile along the contour so that there are no gaps.
- Mount the CD profiles on the surface, and fix the plastic L-profile on the mounting lamellas.
It is necessary to check the level of the plane so that all metal elements are installed in the same horizontal.
Important! The metal structure is installed in rooms with good ventilation.
After installing the frame under the suspended ceiling, lighting wires are laid. The easiest way is to hide them in a corrugated pipe.
Methods for attaching PVC panels to the ceiling
It is not difficult to make a suspended ceiling in a bathroom with your own hands; you should choose the option of fasteners and layout. Lamellas are mounted on self-tapping screws or glue. Moreover, the glue method is available both on the base without a frame, and on the structure of the lathing. It is extremely important to select a high-quality adhesive composition - with changes in humidity, the mixture may begin to soak and the ceiling structure will collapse.

It is much easier to fix the lamellas with screws or staples. In this case, the hardware is driven into the edge of the element, equipped with a groove. The mount will not be visible, it will be covered by the next panel.
The layout is selected depending on the quality of the final surface. Layout can be longitudinal, transverse, diagonal. The simplest option is longitudinal, along the entire length of the room. However, with a small width of the room, for example, 1.5 m, you can take lamellas 3 m long, saw them in half and do without trimming during installation. The diagonal layout is considered the most expensive, but it corrects well the small shape of the room.
Laying wiring
The wiring must be done before installing the plastic elements.
The work algorithm is as follows:
- cut corrugated pipe and boxes of the required size;
- prepare wires of the shown length with a margin of 10-15 cm;
- tuck the wires into the pipes, then tuck them into the boxes;
- fix the boxes with self-tapping screws and clamps on the ceiling;
- check the system is working.
In some cases, it is allowed to lay wires only in corrugated pipes, especially if the ceiling space does not differ in width.
Requirements for lighting fixtures in the bathroom
Bathroom fixtures must be safe, durable and economical. According to TU, the room is visually divided into 4 electrical safety zones, extending from the floor to a height of 2.25 m:
- The first zone is considered "wet" with a humidity of 100%. This is the bath bowl itself or the space inside the shower stall. It is allowed to mount low-voltage (12V) devices marked at least IP 67 with the expectation of being permanently in water.
- The second one covers the space above the bathtub at a height of 225 cm from the edge. Here, in addition to steam, a direct stream of water can spray onto lighting devices, therefore, lamps are needed at least 45 in terms of IP. The voltage of the lamps is 12-24V.
- The boundaries of the third zone advance 0.6 m to the right and left of the edge of the second zone. This is an intermediate area with a high level of steam, but no direct jets or splashes. Luminaires with an IP 24 rating can be mounted here.
- The last zone is dry, which occupies the rest of the room. There is no danger of steam entering the devices on the site, therefore, the protection index for the first digit does not matter, for the second from unity. In the spacious bathrooms, the fourth zone covers an area plus 300 cm from the border of the third.
Important! When placing shower cabins, the boundaries of the zones are counted from the point of attachment of the shower hose to the mixer.

The best option for lighting devices is halogen or LED lamps. Reliable in operation, the devices store energy well and create the required level of illumination even without the sun's rays entering the room.
Panel mounting
How to hem panels on a wooden frame:
- Work begins with a starter profile that looks like a skirting board. On one side of the profile there is a notch that runs along the entire length, and the first element is inserted into it. The side with the groove is mounted to the lathing on the selected hardware.
- Then all work is carried out in a similar order, and so on until the end of the installation.
- As soon as the penultimate element is laid out, the finishing corner is attached, where the edge panel is inserted without securing along the groove.
Important! The final touch is the installation of a skirting board covering the gap between the panels and the wall.
How to finish plastic trim on a metal profile:
- Measure the size of the panel, cut it if necessary, insert it into the L-shaped profile, securing it with self-tapping screws.
- All other dies are laid out in a similar way, fastened with fasteners or a thorn-groove locking system.
The last lamella is trimmed, installed in such a way that the trimmed side looks towards the wall - the slot will be closed with a finishing corner. Then the ceiling profile is installed, and the plastic ceiling in the bathroom pleases the owner with evenness and practicality.
Important! When inserting in any way, it is necessary to check the evenness of the horizontal lamellae.
Providing ventilation of the space behind the ceiling
In apartment buildings, a ventilation shaft adjoins three rooms: a kitchen, a bathroom, and a bathroom. If the system is working properly, it is enough to install a forced ventilation device directly into the shaft bell. The units must meet the strength indicators, be hermetically connected to the mine window, light in weight and resistant to frost, heat, and aggressive influences.

Construction markets offer ventilation connection kits behind suspended ceiling structures. The kit includes:
- duct fan 100 mm;
- 2 ventilation grilles;
- flexible meter-size air duct;
- connection cable with a timer for 5-30 minutes.
Connecting the device will not cause any problems: one grille is mounted in the suspended ceiling, the other in the central ventilation channel. The air duct is connected to the grille branch pipe, the hose is connected to the fan. Then the device is fixed, connected and the hood is ready. The price of the kit is from $ 10-15.
The option with the arrangement of ventilation may be different. The air duct is brought out to the level of PVC panels, and two ventilation grilles are mounted diagonally of the false ceiling. Thus, the decoration and the ceiling space are ventilated, and the natural flow provides heated and cooled air.
The third option involves bringing the duct to the floor level. In the false ceiling, on the opposite side from the exhaust pipe, a ventilation grill with an area equal to that of the air duct is mounted. An exhaust fan is attached and the entire system is connected to it. During the operation of the device, a vacuum occurs, compensated by the exhaust flow from the room. If the unit is not working, then the air moves due to the draft created by the public ventilation pipe.
How to properly dismantle PVC panels without damage
Often there is a need to make repairs with the replacement of one panel. Complete dismantling of the ceiling is not required, even when replacing the middle element.
 How to install ski bindings
 Daria Domracheva and Ole Einar Bjoerndalen got married
 Ski Pole Walking: Dangerous or Beneficial?