Main ways of alignment of walls with their own hands
Modern types of repairs have become high quality than before and now the need for a flat surface of the walls is a prerequisite for the house or apartment.
True, even a brick house, a new building from aerated concrete, have the wall curves, and the old houses are more so.
In this regard, align the walls under the wallpaper or other finishing materials must be necessary.
How to align the walls in apartments and private houses with your own hands, as well as alignment methods will be presented in the article.
What can be aligned with the wall?
Building technologies are developing rapidly, but the alignment of the walls is carried out with their own hands, as many years ago, using two methods:
- Aligning walls with putty.
- Alignment of walls by plasterboard.
If we talk about plaster, then a lot of her species are sold. The composition is different and it can be made of plaster or from cement, but when installing drywall on the walls, glue for installation, a frame of wooden rails or a metal profile is used.
Some people instead of drywall are used for the walls of dry-fiber sheets (GVL). They contain gypsum material and vegetable fibers, but such material does not hold shocks and other loads, damage can appear even with easy blows. All this led to the fact that GWL is rarely used. In some cases, drywall is replaced by OSB-plates, and used to use Phaneur. True, such materials are not the best alternative to GLC, which in time begins to give cracks on the plane, can swear. A chipboard is also used for an uneven wall or floor, but the material is several times more expensive than plasterboard. Therefore, today to use plasterboard for alignment is best.
Tip! Stucco, putty can also be used. This option is to choose only with the relative evenness of the walls, which have small differences, up to 5 mm. In this regard, there are already smooth walls, in order to get the perfect surface.
Many masters say that it is better to use drywall for independent work. It's easier and more convenient to work with him, the design of the walls is cheap. But if you use the leveling of the wall in the lighthouses, then the work is also not distinguished by difficulties, it will be able to make it a beginner builder, the main thing is to deal with technology and do not rush during the repair process.
Preparation of the surface and primer
Concrete walls or walls of brick and other material before alignment must be prepared. There is no difference, what kind of selected. Preparation lies in the following sequence:
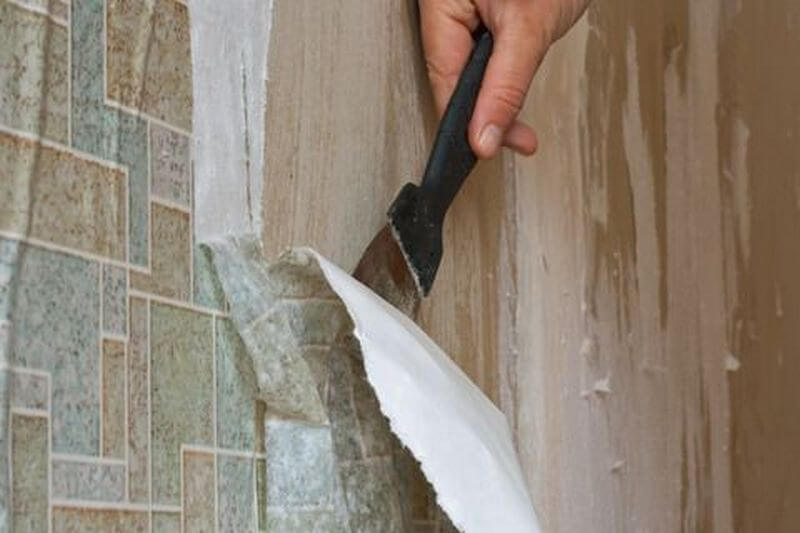
- The old coating on the walls is removed, especially that weakly holds.
- Cracks in the wall need to be sewed, after which it sees and evaluate how much the wall curve. If the protrusion is large and very highlighted, it is removed by the hammer and other equipment.
- In the presence of old plaster, which holds hard on the wall, you can estimate its condition and the need to remove. It is enough to knock on the wall, if there is a deaf sound, between the plaster and the wall of the emptiness, so the likelihood of the wall collapse is high when aligning the wall. It is recommended to beat everything to the very foundation so that the old material does not spoil future works.
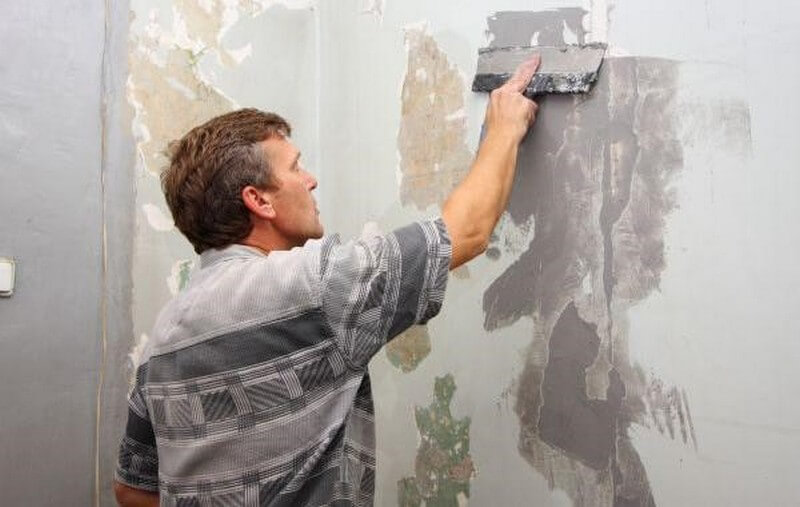
- If there are large depressions, it will be necessary to close them separately. A very thick layer of solution or putty can fall off, due to this, defects are close, and the protrusions are simply knocked down.
- If there are staining of the walls, the paint can be seized or just fall off pieces due to perfect evenness. It will help to solve the problem of primer, namely her species - concrete contact, which makes the surface rough. In this case, the putty is well held and nothing disappears.
- To improve the hitch of materials, use notches on the wall. Previously, they were made by an ax, today they use a grinder. Per 1 sq.m. There will be about 100 notches.
Based on the selection of putty, the primer is selected. The main goal of the soil is to improve the hitch of plaster with the wall. Instructions on the package will make it possible to make the right choice, as well as familiarize yourself with a person with proper application on the walls. Often the compositions are ready, but there are also such that needed in breeding. You can apply primer on the walls with a roller or other device. Preparation is simple, but the technological level of alignment will be more difficult.
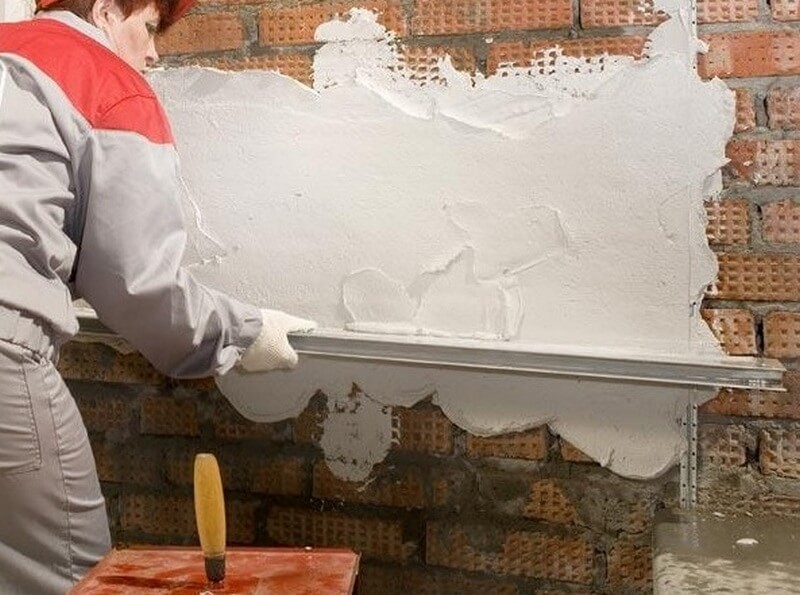
To make a smooth surface curve to make a smooth surface to align the walls. This is a profile that is exhibited in the same plane on the wall, the beacon will guide the plaster in the right places, filling the emptiness and achieving even the walls. The beacon method implies the use of galvanized steel profile, these are T-shaped profiles, although the timber is used as guides.
The metal lighthouse is more convenient in operation than the brusade method, it is easier and more convenient to mount. The layer of plaster will be approximately 8 mm. The minus of the method is in the cost, the absenteeism is not big, but these are extra expenses. In addition, the plaster and steel are badly connected with each other, so when the mixture will dry, lighthouses are extracted, and the holes are closed.
When using wood deeks, the process becomes cheaper, but the smooth bar is more difficult to find. From moisture wood leads, and the layer of plaster is uneven. Some people use a solution as lighthouses. Initially, strips of plaster on the wall are applied, they are leveling under the level, and after drying are used as lighthouses. The method is cheap, but also more complicated other light air species.
Important! From the correctness of montage of lighthouses, the evenness of the walls depends. If you put the beacons smoothly, then the result will be excellent if there is an error, then the required result will not be the best and it may be necessary to redo work.
To install on the wall, several cakes are made from plaster, the profile or bar is inserted into them, it is set to the level to the desired degree, it is possible to use a plumb. When the tortillas dried can continue to work. The width between the beacons is taken from the calculation of the rule that is in stock.
Sketching
The plaster is preparing according to the instructions on the package, after which it takes on the wall. The paper needs a spatula or bucket for painting works. After sketch, the order of work is:
- The solution to start throwing between beacons from the bottom point, closing part of the wall.
- The rule is placed on the lighthouses at the bottom point, leaning on them, the plaster stretches up. Stop the mixture you need easy keyword rules on the parties.
- It is necessary to put the masonry of the solution will not be solid and smooth.
- The plug-in mixture is removed by the spatula and again rushes onto the concrete, the wall.
- The work is carried out to the top. After one strip of beacons, you need to lay the following, and so every square meter, until the room is with smooth walls.
On this, the first part of the work is completed. The starting layer is laid, but it is still necessary to smooth the walls, even visually irregularity is noticeable. Fully align the wall will be more liquid.
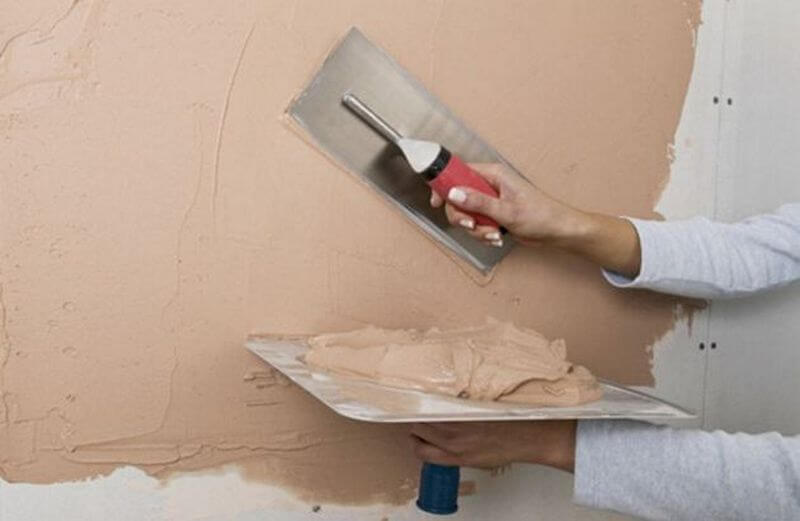
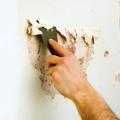
Alignment under the spike
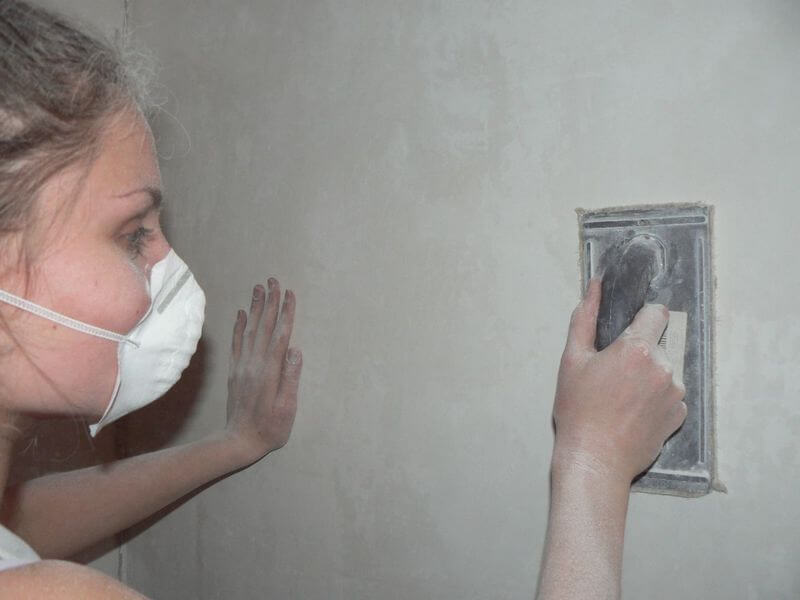
If the first layer began to push, but did not have time to frozen, then it's time to smooth the wall under putty. All defects are maintained by a solution, the consistency must be used for a mixture of Жiy. Application is made in a large spatula and is leveling the rules for lighthouses. Thus, the entire perimeter passes, the layer is better to do thin and the base is obtained close to ideal. This phase is needed that the consumption of putty is minimal.
If the solution is like a thick plasticine, the beacons are getting, driving a screwdriver at the bottom. Next, the seam is filled with a putty and the spatula is aligned with the wall, if necessary, seams can be cut, because it is not completely frozen the mixture, it is perfectly cut.
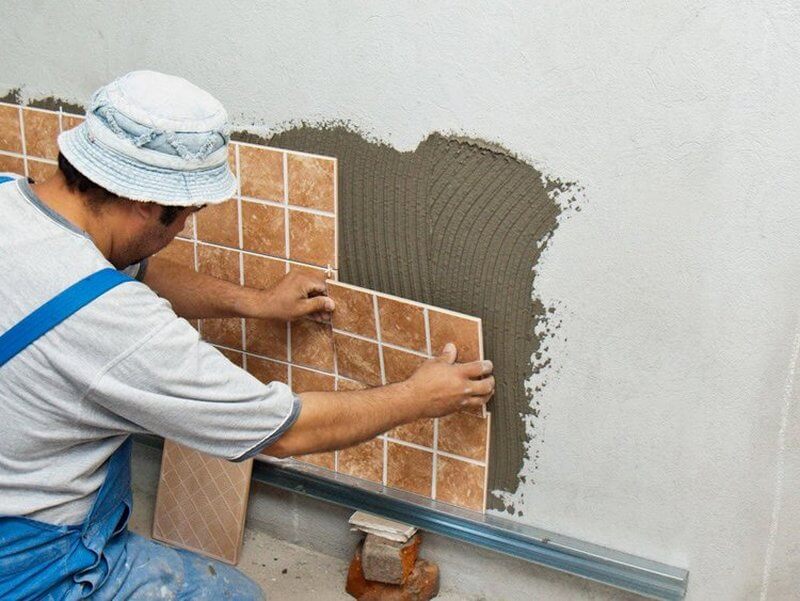
Important! During the alignment, you need to follow, so that the plane remained smooth. On this wall alignment is completed. Further, internal finishing works can be carried out, painting walls in different colors, sticking wallpaper on them, laying of tiles and other finishing materials.
Align the walls with your own hands (video)
What are the types of mixtures
Different dry mixes are used for decoration. All of them possess different compositions and have different characteristics. For surface alignment, dry material is most often used, which is presented in the table:
| Mixture: | Description: |
|---|---|
| Cement: | There are with different sand and cement fractions. Some have lime to improve the plasticity of the solution. Due to this, the cement-sandy solution and cement-limestone are isolated. In the first form, large sand fractions are used, for starting finishes, small sand particles are used on the finishing layer. Lime views are more versatile. |
| Gypsum: | Plaster applies with painting works and is popular. Allows you to apply wide layers, excellent plasticity and fast drying. Additionally, it has heat and sound insulation properties. The plaster has a high absorption of water, so it is better to apply mixtures with small parts. |
| Clay: | Previously, clay was often used, which was applied to the walls, after which she was blown. Today, the material is rarely used and only to create a specific effect. Clay - eco-friendly and regulates the microclimate in the house. |
Pros and cons of cement compositions
Cement solutions are good in that they can be selected for internal works and for external, it is possible to smooth the facade of a private house. A cement-sand dry solution is used or with the addition of lime. On the walls, these materials are perfectly flawed. In addition, the material is cheaper than gypsum-based putter and is great for wet rooms, for example, for bathrooms, basement, garage.
The lack of material before plaster is that the texture is not very smooth. After applying, it is often necessary to grind or applying the finish solution. The disadvantage is also what such plaster matures long, so the wall decoration is delayed in time, as a rule, it will be completely frozen the mixture in 20-30 days.
Leveling the walls under the tile of the beacon method is not obtained from everyone, the process is long, the material will dry for a long time. Faster to align the walls using sheet drywall material. This method relates to a dry type of plaster, and the result is not worse. Walls are smooth, the interior looks worthily and can be separated by a wall with any decorative material. Such technology has some minuses:
- To hang heavy items on the wall, a frame of wood or metal is manufactured.
- Plasterboard material takes a bit of space, which is not good for some types of housing, especially if it is a Khrushchev.
Of course, if you lock drywall on the walls without a frame, then the place can be saved. The size of the room will remain the same.
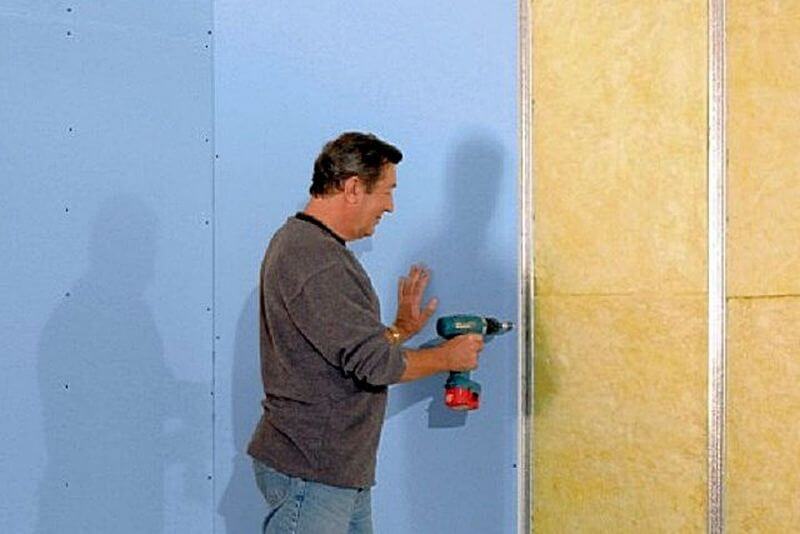
Frame Mount Method
Align the walls on framework technologists with plasterboard can be any, including ceiling, open windows or doors. Initially, a framework is created to be set up by level, it is better to use a laser level, so accuracy will be higher. The assembly is carried out in stages:
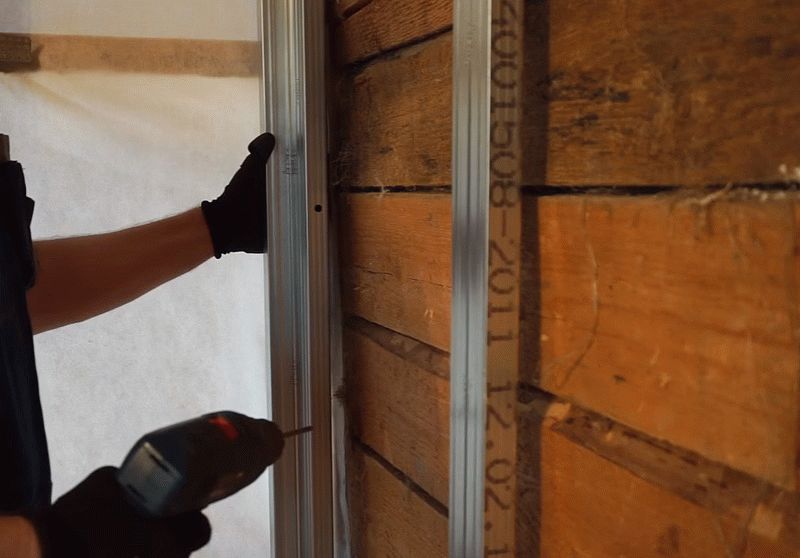
- In terms of gender and ceiling, a guide profile is installed.
- Fastening is carried out by a dowel to the wall.
- On the installed profile, place the installation sites of vertical parts, with a period of 60 cm.
- When it all managed to calculate, the vertical line is carried out, on which the mounting curtain is fixed.
- Carriers are put on the guide parts.
- Everything is leveling in one plane and fastened with veins.
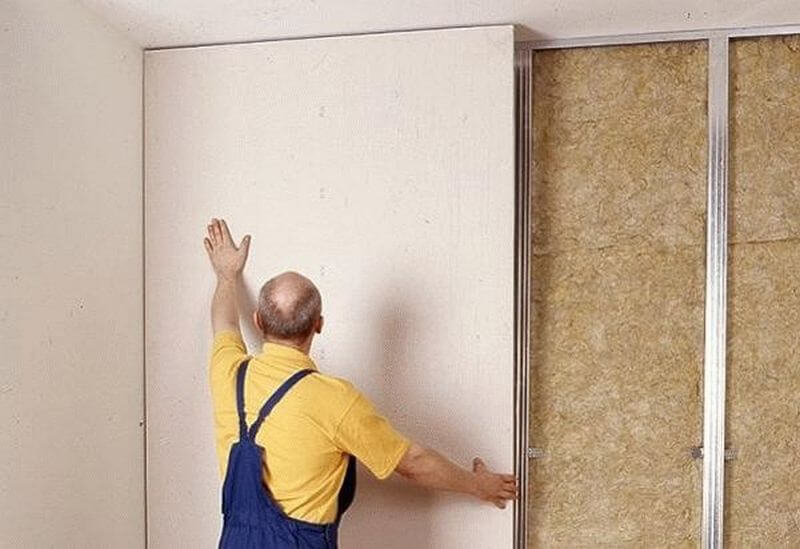
- A plasterboard material is screwed to the mounted frame. Preliminary measurements are made and plasterboard is cut.
- The space between the wall and plasterboard can be inspired using minvatu or foam.
- The mesh is glued to the joints, then it is embarrassed with putty and everything is aligned.
- All holes from the screws are also placed.
As you can see the alignment of the walls by plasterboard is simply done, and the step-by-step lesson will help to understand the essence of the process. At the end, such a wall needs grinding plaster and you can start the finish. Make tiled walls, use any tiled material, wallpaper paste or just paint. It is recommended to use the PVC panel to the windows, and on the MDF doors.
Installation of sheets
Installation of plasterboard sheets is simple, a standard tool is needed for work:
- Screwdriver.
- Line.
- Screwdriver.
- Saws.
Screw the screws at a distance of 20-30 cm from each other. Fasteners caps are inserted into the drywall so that at the end of the wall was smooth, and they did not divert. If there is no screwdriver, you can use a bits drill. If desired, work is independently held per day. After that, the cottage, a house or apartment will be with smooth walls. It is worth considering that aligning the ceiling by plasterboard material, the height of the room will slightly decrease. Aligning the wall at the window, it is better to use a perforated corner on the corners, to impart the right shapes.
Sheet material is easier to use for alignment of walls without a frame. For fixing, plaster, glue or other material applies. A mixture is applied to the wall, how many thickness should be dependent on the walls. Next, the plasterboard is applied to the wall and is set correctly in terms of the plate, in order to the plane. If necessary, the material is attached to the wall, with the help of hands.
Important! When the material stands exactly, all edges are close to plaster. Next, you need to install the following part of the plasterboard. So the alignment of the walls in the house is done. For reliability, you can fasten the material in a day directly to the wall. Visual effect is excellent, kitchen, loggia, bedroom and other rooms will be with smooth walls.
The list of materials for alignment of the walls is large, the choice of materials depends on the skills and preferences. In the course of the work it is recommended to check each section of the wall after alignment, the defects have not begun. Methods of registration can be seen in the photo on the network, and how to make house walls smooth, presented on video:
 Alignment of walls
 Green curtains for calm in the house
 Curtains on the doorway