Laying mdf panels on the walls with your own hands. Interior wall decoration with mdf panels. Frameless method: do-it-yourself plating
Sheathing of walls or ceilings of different rooms, including loggias, is often performed using MDF panels. This material does not require a large number of components, the technology of its installation is quite simple. The assortment is presented by different types of panels, which differ in size, shade and texture.
Learn more about MDF material
In order to make the final decision for yourself which wall cladding is best for DIY installation in certain conditions, you need to study information about the material: structure, properties, scope.
Dimensions, characteristics
MDF is a material that is made from carefully chopped wood (sawdust, shavings and other woodworking waste). Wood dust is exposed to high temperatures and compressed. The bonding agent in this case is paraffin and lignin.
Surface cladding is performed with sheets and panels of different dimensions: length varies from 900 to 3660 mm; width from 150 to 2070 mm; thickness from 1.8 to 60 mm. Most of the formats are non-standard, which allows you to choose the right option.
The standard dimensions in length are 2.6 m. Less often, material with a length of 2.4 m, as well as 2.7 m, is found. The value of the parameter in width varies greatly: from 0.15 to 2.07 m.
Main characteristics:
- Environmental friendliness;
- Excellent strength properties;
- Long-term operation;
- High-quality surface of the panels;
- Soundproofing properties.
Where is it applied?
MDF is used in construction (wall cladding, ceilings, doors), furniture production, and the automotive industry. For laying on loggias, a material is required that is resistant to temperature extremes, moisture and ultraviolet radiation. These criteria are met by MDF, in particular moisture-resistant sheet panels.
Preparation for work
Facing the surfaces of the walls and ceiling of the loggia is carried out in several stages, the first of which is the preparation of the material. The sheet panels are transferred to the balcony so that they acquire the desired level of humidity. This will avoid deformation of the MDF.
Tool
- Hammer;
- Screwdriver;
- Roulette
- Hacksaw for woodworking, scissors for metal;
- Level.
 From consumables you will need wood screws, clamps and galvanized corners. And also, polyurethane foam, sealant.
 Supporting materials
Balcony decoration with MDF panels is carried out using components and materials:
- Any insulation from a number of existing ones (mineral wool, penofol, penoplex, etc.);
- Fasteners (nails, screws, clamps);
- Primers for different materials (concrete, wood);
- Fittings for MDF;
- Wooden beams or special profiles for plasterboard for lathing.
Room measurements and MDF calculation
Decorating the walls and flow with your own hands requires accurate measurements of the room. First of all, you need to determine the length and height of the walls. The number of panels can be determined by drawing a diagram of their best position on the wall.
In this case, you need to form a pattern, and there should be as few seams as possible. The number of bars / profiles for the lathing is determined based on the dimensions of the wall and the sketch, which takes into account the distance between the guides (50 cm). The dimensions of the bars are selected taking into account the surface irregularities (25x40 mm, 40x40 mm, 30-50 mm).
Step-by-step panel mounting technology
The lathing allows you to create a more durable structure. The advantage of this solution is that there is no need to specifically level the surface of the walls. But the crumbling base (concrete, plaster) must be treated with a special compound that will strengthen it. Other means are used for wood - antiseptics.
Step 1: The choice of the type of frame and its installation
There are two types of battens: from wooden planks and a metal profile for gypsum board. The first option is cheaper, but it is susceptible to humid environments. For this reason, it is better to install such a frame on a loggia, which is well insulated. The metal counterpart is stronger and withstands any operating conditions.
 The distance between the two slats should be 40-50 centimeters. The bottom rail is attached at a distance of about 3-5 cm from the floor.
 Procedure for mounting the battens:
- The highest point of unevenness is determined, it is here that you need to fix the first bar;
- On the rest of the wall surface, you will have to put edged material;
- If the wall is flat, the installation of horizontal guides is carried out from below, after which the upper bar is installed, and then the crossbars;
- The distance from the floor and ceiling is 3-5 cm.
The fastening of the wooden frame is carried out by means of dowel-nails, self-tapping screws. For metal, anchors, metal screws are used.
Step 2: Installation of thermal insulation
Insulation is placed between the battens of the crate. Its thickness must correspond to the height of the frame, otherwise the sheet panels will deform. For installation between the lathing guides, almost any insulation is used: mineral wool, penoplex, polystyrene.
 The insulation should be located over the entire surface of the wall, including under the belts of the sheathing. Otherwise, the heat loss on the balcony can be up to 40%.
 The insulation is simply laid into the cells of the frame. If the sheet panels are glued to the surface of the walls, thermal insulation with increased strength is applied.
Step 3: fixing the MDF
Balcony decoration with MDF panels is carried out using different types of fasteners: self-tapping screws, cleats, installation on glue. If an adhesive is used, it is recommended to use moisture resistant materials, which are versatile and suitable for attaching the material to different types of surfaces (concrete, plaster).
 Detailed step by step instructions
 The sequence of actions is as follows:
- Alignment of the walls of the loggia;
- Thorough cleaning and degreasing;
- Primer;
- Glue application.
Self-tapping screws for wood are used to fasten MDF to a wooden frame. They are installed at a distance of 10-15 mm from the edge of the panel. This will hide the caps of the screws under the corners and baseboards.
Step 4: Connection and fastening on clamps
From the side of the thorn, MDF is fastened with self-tapping screws. If the panel rests against a corner of the wall, the connector must be cut off. The next panel is attached not only by snapping into the groove, but also using glue. The connecting element is glued. Cleamers also secure sheet panels securely.
 On the side of the MDF panel, where the groove is located, the clasp is fixed. Further, it is fixed with self-tapping screws on the rail.
 When moving to another wall, the material is cut at 45 degrees (from the groove side), the next panel is cut 45 degrees from the tenon side. The last panel is rounded off from the end.
Slope finishing
MDF is allowed to be installed along and across the slope. The preferred option is determined by its width. For a narrow slope, it is better to choose a transverse installation of the material. For the purpose of finishing the corner sections and cracks, special corners, profiles, skirting boards have been created. With their help, you can hide any leaks. The components are cut and installed using an adhesive.
Thus, finishing the MDF ceiling with panels or other surface (walls, slopes, parapet) is done in different ways: with glue, self-tapping screws, nails and lathing. The first option is the least reliable and requires maximum effort: leveling the walls of the loggia, cleaning, degreasing, priming
Today, the easiest and fastest way to make the walls of your home beautiful and even is to decorate with MDF panels. This solution is, of course, not suitable for all rooms, but for corridors, stairwells, storage rooms and hallways, this material will be almost ideal. We will talk about it in this article, in which, together with the site, we will consider how the installation of mdf panels is carried out in a frame and frameless way with our own hands.
There are two ways to fix mdf panels on the walls - the so-called glue and frame. Both of these methods are good and are used depending on the circumstances. If the wall decoration with MDF panels provides for the hiding of any communications, then the frame method of fixing MDF is used. If we are talking about finishing smooth walls, then the glue method is used.
Wall decoration with mdf panels photo
Installation of mdf panels: frame installation method
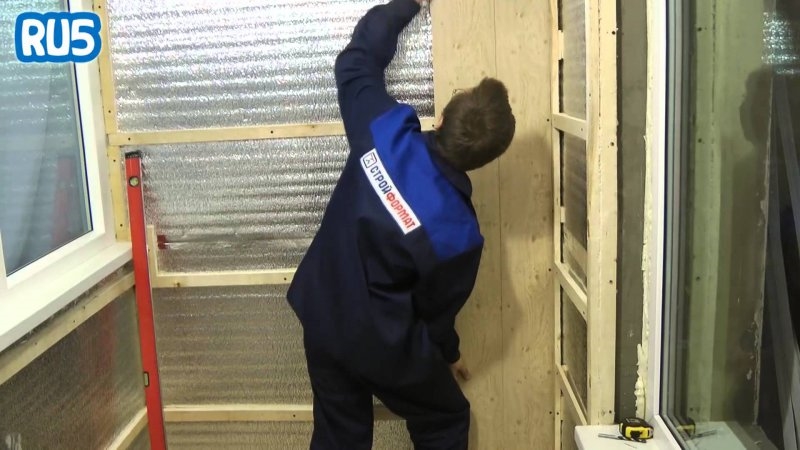
The very name of this method speaks for itself - to implement it, you will need to build a frame, which in some way resembles the structure that is used for. The difference lies only in the position of the carriers - if they are installed vertically for fastening drywall sheets, then MDF provides for a horizontal arrangement of profiles. In this regard, the features of the construction of such a frame also arise.
In principle, at the first stage, everything happens in the same way - the plane of the future frame is beaten off, then guide profiles are attached along the perimeter of the wall, on the floor, ceiling and adjacent walls. This is where the differences begin. In a given plane, the vertical bearing profiles cd are installed not every 600mm, but 3000mm, which is the standard length of the bearing profile.

Installation of mdf panels: frame method
This is done in order to subsequently install between them horizontal bearing profiles cd, the step of which is 500 mm. They are connected to vertical profiles using crab cd-connectors, and are fixed to the wall with the same U-shaped brackets.
The installation of the frame is the main work in the process of installing MDF panels. The fastening itself is an easier process that almost everyone can handle. MDF panels are attached to the frame with clamps (special clamps). The kleimer itself, before being attached to the frame, is inserted into the groove located at the end of the panel, thus ensuring their reliable fixation to the frame. The cleats are designed so that they do not interfere with the insertion of the next panel into the groove.

DIY installation of mdf panels photo
Do-it-yourself installation of panels on glue: installation features
Installation of MDF panels on walls using glue is much easier - the entire installation process is greatly facilitated by the absence of a metal or wooden frame, the construction of which takes a lot of time.

Installation of wall panels mdf photo
Before proceeding with the direct fastening of the panels, first we will deal with the glue that is used for these purposes. Or what kind of glue is not suitable here - you need a composition that has certain qualities.
- Firstly, the glue must be plastic even after hardening - the fact is that MDF panels made of pressed cardboard are highly susceptible to deformation depending on the temperature and humidity in the room. Therefore, an adhesive is needed that can extinguish these very thermal expansions.
- Secondly, the glue used for MDF panels should facilitate their fastening even in places where the walls are slightly curved. That is, the texture of the glue should make it possible to spread it both with a thin layer and with a thick one - in a word, it should be thick enough. Under these requirements, the so-called "", which are successfully used to resolve the issue of how to mount MDF panels, by almost all masters, are the best fit.

Liquid nails for mounting MDF panels photo
The very installation of panels with the help of glue looks quite simple - its technology is almost completely described on a tube with Liquid Nails glue. It is not recommended to violate it. To begin with, the walls covered with panels must be cleaned of dust and dirt - in principle, if you are going to seriously engage in self-repair, then the priming process, which is performed to clean the walls of dust and dirt, and at the same time to improve the adhesion of materials, should enter your a habit. They primer always, everything and everywhere.

Priming the walls before installing the MDF panels photo
After the primer has dried, proceed to the direct gluing of the panels. In the meantime, it dries, you can do other preparations - for example, cut several dozen panels to size.
The glue is applied directly to the panel itself in a dotted manner and in a checkerboard pattern - the glue drops should be large. After the glue has been applied, the panel is pressed against the wall, taps firmly and comes off. This is required by the technology of gluing - you need to tear off the panel so that the glue is weathered and the panel does not peel off the wall under its own weight. To speed up the process and make the installation of MDF panels with your own hands faster, you can immediately, one after another, smear up to a dozen panels, attach them to the wall and tear them off. While the glue is weathered, it is allowed to smoke - after five minutes, the panels can be reattached to the wall and thoroughly slammed.

How to glue mdf panels on a photo wall
It is easy to glue the panels - it is much more difficult to cut them evenly and with high quality. In this regard, special attention should be paid to slopes and similar obstacles that come across in the path of installing MDF panels. It should be understood that the appearance of the room depends entirely on the even trimming of the panels.

Installation of mdf panels on walls
Well, in conclusion, let us dwell on the main nuances of installation, which are characteristic of both methods of fixing MDF panels.
- First, there are the corners. It should be understood that it will not work to bend the MDF panels, so they are simply trimmed as close as possible to the corner, after which the cut edges are safely overlapped with a special corner, which can be used for both outer and inner corners.
- Secondly, this is a frame - the lowest horizontal profile should lie on the floor. In this way, you will ensure that the skirting boards are securely fastened.
- Thirdly, so that there is no distortion in the future, the first panel must be installed in accordance with the vertical level and firmly fixed with self-tapping screws in places where they will subsequently overlap (at the bottom with a plinth, at the top of the ceiling, in the corner with a decorative overlay). It is desirable to check the position of the panels with the level in the future - you should not control everything in a row, but you need to apply it to every fifth panel.
That's basically it. This is how MDF panels are installed. This process is not complicated and not simple, as, in general, any finishing work in which your attitude to the little things plays an important role, which together affect the overall picture of the repair. Simply put, there are no trifles in this matter.
Wooden board becomes more and more expensive every year. Not everyone can afford to decorate and furnish a room from natural materials. The choice usually falls on an inexpensive, practical substitute.
MDF appeared on the building materials market for a long time and quickly gained popularity. MDF has been going on in Russia for several decades. You do not need to be a master of the highest category in order to quickly and inexpensively give a room a new refined look. All that is required from you is accuracy, accuracy, and the initial skills of a home craftsman.
What is MDF?
This building material is produced by hot pressing dry crushed waste from woodworking enterprises. The steam makes the sawdust soft and pliable. The smallest fibers, twisting, are connected to each other even without the interference of the gluing components. As a result, the structure of the panel becomes similar to felt, but compacted with tremendous pressure. How do MDF panels visually look? The photos used in the article will allow you to get an idea about them.
MDF boards do not differ in any super-strong characteristics, but due to the absence of adhesives in the composition, they are completely harmless. Installation of panels can be carried out with any glue for wood.

Tool used
Everything, of course, cannot be foreseen, but the main tool, which you cannot do without, should be at hand:
- Roulette. It is better to use a 5-meter specimen.
- It can be made from a regular bundle with a nut tied at the end.
- Drill attachment. Perfectly replaces the screwdriver.
- Metal bench square with various legs. It is useful for cutting slopes.
- Jigsaw or any fine-toothed hacksaw. It is advisable to have two hacksaws - with a transverse and a longitudinal saw.
- A grinder for cutting metal profiles, if the frame will be assembled from them. The tool must have a protective cover.
- The usual tools that every owner should have: a knife, screwdrivers, a pencil or marker, a set of drills, a hammer, small nails (boot).
Preparatory work
Before fixing MDF panels, you will have to do a lot of preparatory work. It is necessary for the reliability of the fasteners. With wooden surfaces, everything is clear - here the installation process is much easier. Difficulties arise with brick walls.
The first step is to remove the skirting boards. It is better to remove swollen or crumbling plaster completely, to the base. Hidden defects of the main walls will be immediately noticeable, which must be eliminated.

Installation process
Finishing with MDF panels is carried out in two ways:
1) with glue;
2) installation of a rigid frame.
The frame is assembled from wood or from special MDF (this is from thin metal).
It is easier and cheaper to make lathing. Although the entire frame will subsequently need to be treated with a fire-fighting compound. This will also take some time. Wall panels are fastened to the slats with clamps (also called clips). The slats themselves are perpendicular to the wall panels.

Frame method
So, let's look at how to fix MDF panels. Depending on the size of the boards, the number of rows of planks will be different. In a standard room, where the ceiling height does not exceed 2.5 m, 4-5 runs along the entire wall are enough. The main thing is that after installation the panels should stand tightly, and not “play” after any touch.

The upper frame bar is fixed 15-20 cm below the ceiling. The lower plank is fixed at the same distance from the floor. The middle frame battens are placed in equal proportions between the outermost bars. It is desirable that the distance between the planks does not exceed 50-60 cm. Also, do not forget about the fastening of the frame around the perimeter around windows and doors.
Where the groove is located at the panel, a clip is attached. Having tried on the upper and lower elements and making sure that the wallboard is level, the extreme clips are fixed on the slats with self-tapping screws. After that, the rest of the fasteners are added - according to the number of frame runs. The subsequent board is inserted with its spike into the groove of the first panel and is also fixed with clips along all the planks.
Do not forget that the very first panel is rigidly attached to all rails with self-tapping screws from the side of the spike. The edge board, which is rarely intact, is also tightly attached. All traces of installation are usually hidden behind decorative corners. An excellent option in this case is the MDF profile. It will organically fit into the overall design of the room.

Glue method
Another way to fix MDF panels requires a perfectly flat and clean wall. The supporting surface can be any - plywood, concrete, brick or plasterboard. Panels are glued more often on "liquid nails". This adhesive will work on any surface.
This installation method has serious drawbacks. Dismantling the premises is difficult. The board breaks constantly. To level the wall, you have to clean out the remnants of the hardened glue, and this is quite difficult.
Replacing several wall boards with new ones will also entail a lot of problems. The entire remaining wall can heave, lose any harmony, and, accordingly, an attractive appearance.
In addition, the inside of the MDF boards is not treated with a moisture-repellent compound, and if the load-bearing wall gets wet, the panel will swell over time, and it will begin to warp.

Which is the best way?
If the height of the walls is large or it was decided to lay the MDF panels horizontally, along the length of the room, the frame option is better suited. Also, this method provides for wall insulation, however, this will slightly reduce the volume of the room. A similar method is also useful when there is a large uneven surface.
A room with low ceilings and smooth walls is faster and cheaper to "refine" with the glue method. Here, the loss of room size will be minimal.
It is worth deciding on the performers of the upcoming work. Installation of MDF panels consists not only of the direct installation of the boards themselves. Before starting work, you need to decide on the amount of purchased material and fasteners. We must also remember about the existence of certain nuances that an ordinary person, an average person, may not be aware of. In the future, decorating the walls with MDF panels will take time, in proportion to your experience.
Pre-processing and repairing the main walls also requires some knowledge and skills. The decision suggests itself - it is better to entrust the repair to professionals.
Now you have an idea of how to fix MDF panels. There is nothing tricky and daunting in such work, but the master, of course, will make it better and faster. However, it all depends on the thickness of the wallet and the size of your experience in carrying out such work. The choice is yours.
If the issue of environmental friendliness is not an empty phrase for you, then you probably paid attention to mdf panels for walls a long time ago. With their help, you can seriously decorate your interior, make it more expressive and modern, while not completely emptying the family budget, which is so precious in the current economic conditions. In addition, the editing process does not differ in any transcendental level of complexity and is quite accessible for a "mere mortal" to master. Therefore, feel free to arm yourself with a tool and hurry to buy material - today we will talk about how to fix mdf panels to the wall in such a way that when you see the result, you will experience well-deserved satisfaction.

Pros and cons of using in the interior

It is quite logical to inquire about the positive and negative sides of it before the direct installation of this or that finishing material. Moreover, from the point of view of the appropriateness of using mdf panels, they are far from such an unambiguous solution as plastic or drywall. You can read a similar instruction, but for fastening drywall, in the article: "How to fasten drywall to a wall: 2 ways of installation".
+
- already voiced above environmental friendliness;
- the simplest installation;
- good noise insulation performance;
- a wide range of textures and colors;
- elementary care;
- low cost.


-
- flammability of the material;
- irregularities are possible at the joints of the fragments;
- not suitable for outdoor decoration;
- weak indicator of moisture resistance;
- possible deformation due to mechanical stress;
- inconvenient installation of suspended furniture.

As you can see, it is possible to fix MDF panels to the wall surface only in relatively dry rooms with favorable thermal conditions. Be sure to get rid of mold on the walls, if any. In this case, one must take into account the fact that this material is very afraid of any force effect and will inevitably give a crack at any active contact with it. Otherwise, all the negative aspects of using it are safely leveled by its pluses. One of them is a wide selection of various textures and colors, which allows you to decorate the interior in full accordance with your aesthetic needs. 

Tools and supplies

In order to fix the panels, you do not need any specific tools. You need to keep on hand all the same standard set that is used for the installation of any other finishing material.
- plumb line;
- level or corner;
- hammer;
- screwdriver;
- jigsaw or hacksaw for wood;
- construction stapler;
- roulette;
- pencil.
Prepare and consumables:
- nails;
- dowels;
- self-tapping screws;
- wooden slats or metal profiles for the frame (subject to this installation method);
- liquid nails or other adhesive.


It remains only to add the mdf panels themselves - and then there will already be a complete set of everything necessary for high-quality and successful installation. In order to calculate the exact number of them, you need to make the correct markup. 

Substrate preparation and marking

Probably the most tedious and tedious stage, which many masters (both beginners and already professionals) do not take seriously. It's a pity, because a lot depends on the quality of the preparation of the base surface. Especially if you will be fixing MDF panels directly to the base without creating a leveling frame. Therefore, it is better to think soberly and perform the necessary manipulations with the utmost quality and attention:
- as carefully as possible, but without unnecessary fanaticism, remove the old finish (read about how to remove liquid wallpaper from the wall);
- if the paint stubbornly does not want to get out of its "familiar" place, then leave it - it will not interfere with you during further installation;
- eliminate all possible cracks with a primer and repair compound;
- if the cracks are minor, then first make them wider with a hammer and chisel, and then treat them with a deep penetration primer - this will help protect your base surface from mold and mildew;
- after all the processing, decide where and how you will attach the panels to the wall - to make accurate markings;
- lean the level against the wall and determine the upper and lower mounting points;
- draw a horizontal line along the perimeter of the room in which the repair will take place, and then directly under the ceiling;
- we determine the location of the guides based on the optimal step of 50 cm.


All your further actions depend on how you decide to fix the panels on the wall - directly on the glue or through the device of the auxiliary frame. Let's consider both types of installation, noting the features of their use, pros and cons, as well as the specifics of performing various stages. 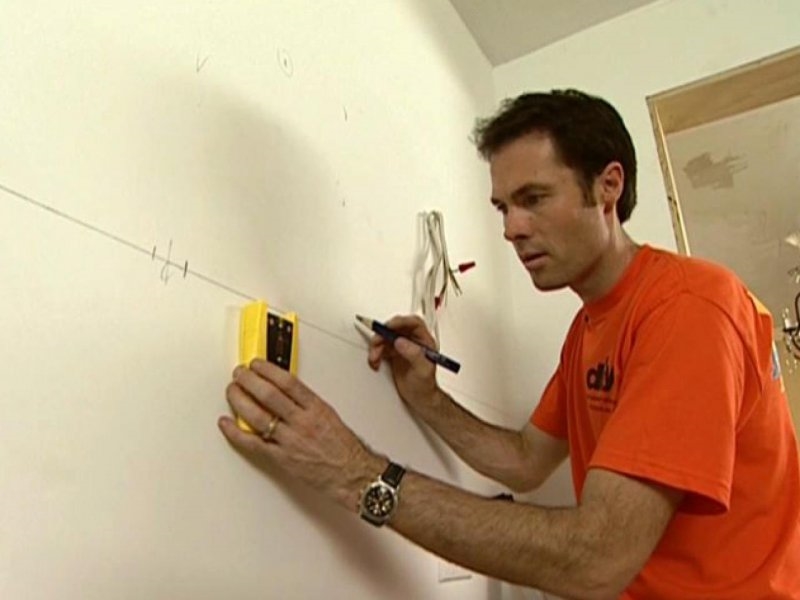


Method one. Installation using lathing

- recommended in cases where the base surface has strong irregularities that cannot be corrected manually;
- for rooms with high humidity, it is best to use metal profiles rather than wooden slats as a base for the frame;
- the method using the lathing is indispensable in cases where additional wall insulation is planned.

The main disadvantage of this option is the need to install the frame, which slightly lengthens the duration of the work. In addition, the frame takes up a certain number of centimeters of free space. Are you ready to put up with such "arbitrariness"? Very often you simply do not have options, because it is far from being possible to achieve the perfect surface every time you need it. 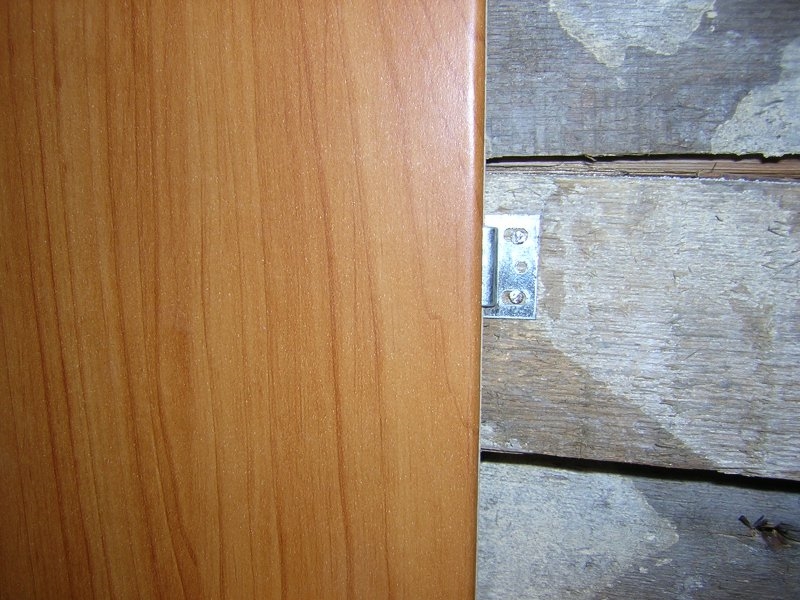
Sheathing device
A very important point is to know how to attach mdf panels to the wall: vertical or horizontal... The nature of the structure of the auxiliary frame directly depends on this.
- horizontal arrangement of MDF panels - vertical sheathing scheme;
- vertical arrangement of MDF panels - horizontal lathing scheme.


As you can see, everything is quite simple - you will hardly be able to mix it up! 


Some points to pay attention to:
- before installation, you should treat the slats with an antiseptic - this way you will protect the wood from the appearance of microorganisms;
- the length of the rail should be at least a few millimeters less than the actual distance from the top to the bottom of the structure.


Subsequence
- no matter what type of frame you are going to design - metal or wooden, in any case, first of all, you need to fix the corner posts, and then the transverse ones and those that will be located in the openings;
- a step of 50 centimeters is optimal for all types of lathing;
- for fixing narrow and wide metal profiles, it is best to use self-tapping screws, since the so-called dowel-nails are less reliable for this kind of fastening.


The whole process of installing the frame is in the next video.
Fixing panels
- cut off the ridge at the first panel and clamp it with the same side to the crate of the adjoining wall;
- we fix it to the horizontal slats with self-tapping screws, do not forget to retreat 1 centimeter from the very bottom;
- each subsequent panel is inserted in the same way into the groove of the previous one and fixed with nails or clamps;
- the most difficult element is the last one: it is cut to the desired size, inserted and fixed on the vertical frame of the frame with self-tapping screws.
A video detailing the key points of the operation is below.
Method two. Installation with glue

- used only in cases where the base surface of the wall is close to ideal;
- not recommended in rooms with high humidity;
- saves valuable space.

Surface preparation and marking with this method practically do not differ from the previous method we have considered. The only difference is that you need to work thoroughly primer in order to exclude the appearance of fungus or other destructive processes.
Otherwise myself algorithm of actions
looks like that:
- prepare mdf panels, cut the necessary fragments with a hacksaw or jigsaw;
- apply the adhesive around the perimeter of the sheet, and draw a line exactly in the middle of it;
- apply glue not in a continuous line, but in dots - this way you will save the composition;
- press the panel against the wall and fix it;
- fix solid sheets first, all corners and fragments last.

As an excellent option for an adhesive composition for mdf panels, we recommend using liquid nails- fast, reliable and very inexpensive. 


How to fix MDF panels to the wall surface with glue, the following video will tell.
Conclusion
Information on how to properly attach mdf panels to walls of any type will definitely not be superfluous. In some cases, this material appears to be almost an ideal solution for decorating a wall surface. In addition, it is quite lightweight and convenient for installation, so it is quite possible to cope with it even alone. The main thing is to clearly follow the time-tested algorithm for attaching mdf panels and not be lazy to work well on the base base, so that afterwards you do not reproach yourself for the fungus that has appeared and other troubles. 


Photo: vk.com
When performing wall decoration, a large amount of time is spent on leveling the surface. Therefore, for those who wish to carry out major repairs or make a new department after the construction of the facility, it is very important to simplify this task. Drywall is considered one of the common materials for leveling. However, it cannot provide high structural strength, and also must be replaced after removing the decorative trim on the adhesive base. A more profitable material in this situation is MDF. It is made with an applied decorative layer or without it, allowing you to create your own colors. Decorating the walls with MDF panels with your own hands is quite simple and does not require special skills or abilities in carrying out facing work.
Installation technology
MDF panels have various shapes in the form of square, rectangular or inlaid slats. Therefore, at the first stage, it is necessary to decide on the most suitable dimensions, as well as the type of decorative finish. If you plan to do the work yourself without outside help, then it is better to choose those that are smaller in size. If it is necessary to reduce the time of the work carried out, large panels are taken.
Before carrying out installation work, it is necessary to lay out the panels in the room so that they can acquire normal humidity. This will prevent the formation of gaps at the joints or the occurrence of mechanical stress. When the temperature changes by 300C, the elongation can be up to 10 mm. The walls must be treated with special impregnations without fail. They destroy harmful microorganisms and do not allow them to develop further.
MDF is mounted on a wooden or metal profile lathing. This allows not only to create a strong and reliable structure, but also to ensure the blow-through of the main wall material. Wooden lathing is more common, since it is similar in properties to MDF, and also relatively cheap. However, if the bars were not dried in a natural way, then during operation they can bend, and the MDF sheet, at best, will move away, and at worst, it can be damaged. Due to the fact that the wall can be dampened, it is necessary to lay a waterproofing layer. As a result, mold and mildew will not form in the niche. Additionally, an insulating layer can be installed in order to increase the energy efficiency of the room. Usually, mineral wool mats or foam are laid.
If the main walls are initially flat, then you can refuse to install the lathing by choosing an adhesive base. The deviation from flatness should be no more than 3 mm / m2. In addition, with this method of installation, it will not be possible to install the heat-insulating layer.
In the case of fixing MDF to a metal profile with your own hands, you will need to purchase additional special fasteners. They are specially shaped limit switches and connectors that snap into place quickly and reliably, as a result of which the panels are securely fixed.
We calculate the amount of materials
The first step is to measure the length and width of the walls using a tape measure. It is worth doing this for each of them, since they may differ slightly in size. After that, you need to calculate the number of battens for the crate. A sketch is drawn on paper in compliance with the scale, and then the slats are evenly placed in a horizontal or vertical position. At the same time, the distance between them is kept the same within 40-50 cm, taking into account the tight fit of the upper and lower planks to the floor and ceiling. Installation of panels is carried out perpendicular to the guides.
The cross-section of wooden battens of the lathing is selected taking into account the magnitude of the maximum unevenness of the wall, as well as the need to ensure sufficient structural strength. Therefore, in the case of wooden bars, the cross-section should be at least 25x40 mm, and the metal profile with a shelf width of 20 mm and a steel thickness of 2 mm.
The number of MDF panels is determined taking into account their size and the most successful location along the walls in order to reduce the amount of excess. However, do not forget about the observance of the pattern in the case of choosing panels with decorative trim. The stock by the amount of material must be at least 20% of the total.

We carry out preparatory work
If construction or dismantling work was carried out before installing MDF panels, then it is necessary to remove dirt, as well as wipe dust from the walls. If there are problem areas on the wall that are peeling or cracking, you need to determine how reliable they are and whether they will not fall off during installation of the battens. To do this, it is enough to knock them with a hammer.
Before fixing MDF wall panels on an adhesive base, it is necessary to determine the degree of deviation of the surface from ideally smooth. The simplest, but inaccurate method is to shine a flashlight from the corners of the wall and determine where the shadows are created. Then, using a tape measure, you need to roughly measure their value. With deviations of more than 4 mm, you will have to perform partial alignment or install the lathing. You will also need to abrade the old finish with an abrasive material.
After that, the surface of the walls is treated with antiseptic impregnations. While they are drying, it is necessary to determine the places for attaching the crate using a laser level, and apply the appropriate marks with a marker. In the absence of a laser level, use a tape measure to measure distances, and using a level to align them relative to the horizontal or vertical.
Wooden lathing must be treated with impregnations against pests and fungi, and then painted. This will significantly extend its service life. It is not worth cutting them in advance, as well as MDF panels, since it is quite difficult to determine their exact dimensions. The material should be prepared as the installation progresses to minimize waste, and the joining seams are free of visible gaps.

Installation of lathing
Installation starts from the floor if the lathing is horizontal or from the wall if it is installed vertically. Take a guide, apply it to the surface of the wall, and then mark the most convex places (one on each side is enough). These will be the zero points. Then equidistant points with a selected value from an interval of 40-50 cm are laid from them. These will be the places of additional fasteners, in which, using a puncher, you will have to drill holes for plugs or dowels. For these purposes, a fastener diameter of more than 4 mm and a length of 5 cm is sufficient. The dimensions of the holes must correspond to them.
Then a rail is applied and a tight fixation is performed at two selected points. At the same time, make sure that it is parallel to the wall, since otherwise the panels will be skewed. Deviation is permissible only if the walls in the room are not parallel and you need to align them or there was a design idea to execute them this way. Since the first guideline sets the initial level, it must be installed slowly, accurately measuring the distances and setting the correct position.
The fastening of the bar at the remaining points is performed so that it retains its position, but at the same time is firmly fixed. That is, in places where the guide does not fit snugly against the wall, it is necessary to install wedges made of wood or rigid steel beacons with the required dimensions. They can be made independently or purchased ready-made, and the dimensions can be adjusted during the installation process to the level of the gap from the walls.
The second is attached to the upper guide. For it, two conditions must be met: it must be parallel to the wall and the lower plank, and also be located in the same plane with the first guide. Therefore, they take a rail and fix it at a point on one side of the wall, but not tightly, but so that it is movable. Then a similar procedure is performed from the opposite side. Using a plumb line, check the location of the guide in the same plane with the already installed one, and adjust their parallelism with the level. After alignment is completed, the final fixing is carried out.
In the same way, all the remaining slats are fastened according to the applied markings. It is not necessary to use careful level checks, since it is enough to attach a flat bar and check the location of the guide in the same plane with the rest. After completing work on one wall, proceed to the rest. In the places where the battens adhere to the window and door openings, it is necessary to mount the guides along their perimeter.

Facing with MDF panels
First, the panel is cut to the height of the room. If you plan to install false ceilings, then the height should be 2-3 cm lower from the ceilings. If the dimensions of the walls are exceeded, an indentation is made from the corners on both sides by 3 mm. This is due to the fact that it is necessary to fasten the panels to each other according to the principle of the spike entering the groove.
The veneering process consists of the following steps:
- A J-element is installed in the corner of the room, if such is provided by the MDF manufacturer.
- They take the panel, put it against the wall and snap it into the lock, and then screw it onto the screws in several places along the spike. If there is no connecting element, then a spike is cut off from the end part of the panel so that it can closely press against the corner. Using self-tapping screws or special fasteners, fixing on self-tapping screws with a distance from the corner of 5-10 mm is performed.
- Finally secure the panel, making sure it is in the correct position.
- Take the second panel, coat the groove with glue and put it on the spike of the already installed one. A spike is screwed onto the self-tapping screws. In the grooves, you can make a connection with clamps, which are a steel bracket that allows you to securely fix one panel to another. In this case, you do not need to additionally fasten, glue or nail panels. Decorations on adjacent panels should fit naturally.
- Paneled the surface to the next corner of the wall. The panel that adjoins the wall must be cut at an angle of 450 at the end of the groove on the side of the groove.
- The next wall begins to be laid out with a panel with a cut for 450, but already from the side of the thorn.
- The last panel needs to be rounded off at the end part so that it can be inserted into the groove that was installed in the first step. Additionally, the panel can be fixed with self-tapping screws along the joint.

Alternative ways of fixing panels
- Glue to the wall surface. The glue is applied to the entire surface of the wall in a wave-like manner so that excess glue does not come out of the panel, but form a uniform layer. Due to the elasticity of the adhesive bond, the panel does not detach from the wall during temperature changes.
- Glue to the crate. It is used in cases where the panels have a decorative coating. The glue is applied to the lathing in an even layer. Due to the small contact area, the panels must be screwed onto self-tapping screws at the top and bottom.
- Fastening a construction stapler with staples or nails to the lathing. A fairly simple and reliable method, but it has a significant drawback - the decorative coating is damaged. Due to the rigidity of the fasteners, resistance to thermal expansion of the panels arises. Therefore, it can be implemented only in cases where the same indoor microclimate is maintained throughout the year.
Conclusion
It is quite simple to install the MDF panel with your own hands. To do this, it is enough to correctly measure, cut them to size and choose the appropriate mounting method. At the same time, it is not required to prepare the surface of the wall, except for cases when it is planned to install the panels on an adhesive base without crate. The most important thing is not to rush when setting the position of the guides and the first panel. As a result, a perfectly flat and smooth wall surface will be obtained without significant financial costs.
 Ox and Monkey - compatibility in love and marriage
 Tarot horoscope for Taurus for December
 Snake Woman: a jealous aristocrat