Harvesting and drying garlic for good and long-term storage. We store “goodies” for future use: how to dry garlic at home to preserve its valuable properties
Almost all varieties of garlic can be dried and stored for the winter. The silver-white variety or Creole is best suited for harvesting. The vegetable crop perfectly retains its appearance, beneficial properties and taste. The plant consists of 40% dry matter. Therefore, there should be no problems with how to dry garlic, but you still need to follow certain rules.
Types of garlic
There are two types of garlic varieties, depending on the time of planting:
- winter;
- spring.
Winter crops include Parus, Dubovsky, Alkor, Yubileiny Gribovsky and others. All of them are planted in winter, that is, in the fall, but with the expectation that before the onset of winter the cloves can take root in the ground. Depending on the region, the landing period falls in September or October.
Spring varieties include Gulliver, Aleysky, Sochinsky 56 and others; they are planted in the spring.
Storage conditions depending on the type of variety
You need to know how to store garlic depending on the type of variety:
- It is preferable to store winter species at low temperatures, in a room with high humidity. The temperature should remain stable at 2-4 degrees.
- Spring varieties, on the contrary, are better preserved indoors at low humidity but high temperature, about 20 degrees.
Where is the best place to plant garlic?
You should never plant vegetables after onions and potatoes. Garlic will grow best where cucumbers, pumpkins and zucchini were previously planted. The plant loves soil that has been amenable to abundant application of organic fertilizers.

Determining the degree of maturity
Even knowing all the rules on how to dry garlic, you still need to collect it on time.
At the time of ripening, spring or autumn plant varieties have a yellowed aerial part, which, as a rule, lies on the ground. Harvesting occurs approximately in the second half of the last month of summer.
Winter varieties may not shoot or, conversely, shoot arrows. The degree of maturation can be determined by the following characteristics:
- the skin of the inflorescences of the upper part of the plant begins to crack;
- the lower leaves turn yellow;
- the scales of the bulbs dry out and become thin.
Typically, the harvest period occurs at the end of July. Harvesting is recommended in dry and warm weather.

If you miss the most favorable time for harvesting, then no rules on how to dry garlic will help. Especially if young roots have already begun to emerge at the bottom of the bulb. Overripe garlic can also be determined by the fact that the onion cloves begin to fall apart and the scales burst.
Harvest
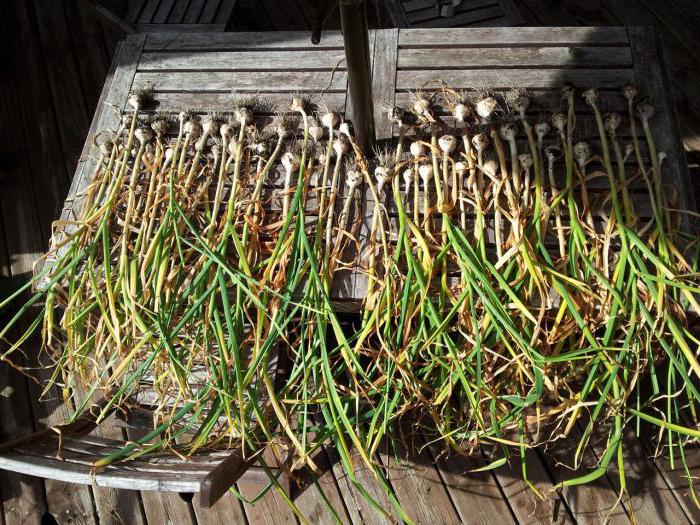
It is best to dig garlic with a pitchfork; in this case, the risk of damaging the bulbs is minimized. After this, the plants are laid out directly on the garden bed to dry. It is necessary to remove the soil from the plant, but do not tear off the foliage.
If the weather outside is warm and dry, then there is no need to hide the garlic anywhere; let it dry right in the beds. Naturally, if the weather is rainy, the plants are hidden under a canopy. If it rains only at night, then during the day the bushes can be taken out into the sun and hidden under a canopy at night. About 5 days are allotted for preliminary drying.
Now you need to clean the garlic from soil and dirt and leave it to dry for another 2-3 weeks. The room where the garlic will be dried should be well ventilated. The readiness of a plant for further storage can be determined by the uniform color of the dried leaves. The main thing is not to cut off the stems and roots until the garlic is completely dry. During the drying period, garlic additionally gains nutrients and increases in weight. Do not knock the heads against each other to avoid damaging them. Under no circumstances should garlic be washed, even if it had to be removed in rainy weather.
These simple rules on how to dry garlic after digging up allow you to prepare the crop for the next winter as well as possible.
Preparation for storage
After the garlic has dried, it must be prepared for further storage:
- Sort through and set aside the one that was damaged during digging.
- Cut the upper above-ground part by 10 cm.
- Trim the roots, leaving about 3 cm.
Temperature
Depending on the type, it must be stored under different conditions. How to properly dry garlic of autumn varieties - at a temperature of 16 to 20 degrees. Winter varieties must be stored in cool rooms, at a temperature of 2 to 4 degrees. You should also know that winter garlic does not store well and is more susceptible to disease and quickly loses moisture. The humidity in the storage area should be 50-80%.
Storage methods
How to properly dry garlic after digging? If all the rules are followed, you can proceed to the immediate preparation of the crop for winter storage. So, what are the different ways?
We weave and store
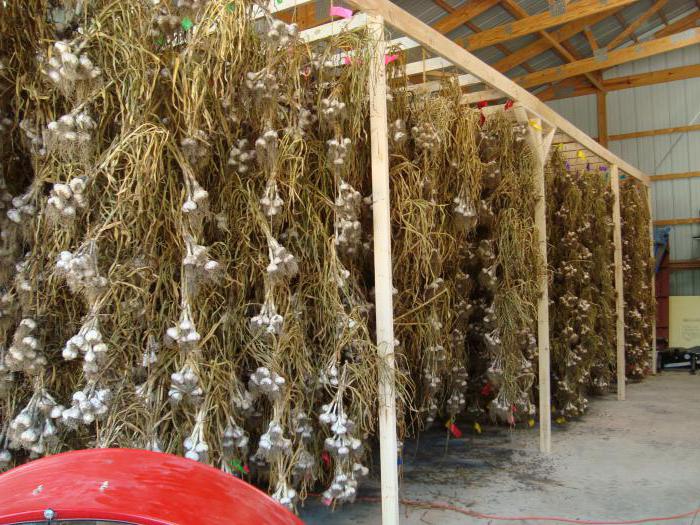
Braids are the most common method that has existed since ancient times. In this case, the leaves are removed, leaving only the false stem. All plants are woven together with twine so that the “structure” for storage is strong. At the bottom you need to form a loop that will allow you to hang the garlic in the basement or cabinet. Using the same principle, garlic can be woven into so-called brooms.
The storage location should be dark, not very damp and always cool.
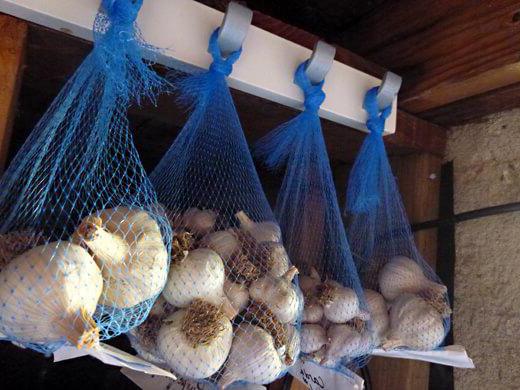
You can store garlic in nets or wicker baskets.
Salt
There is also a storage method - in sterilized jars. For this method, only those crops that have been prepared according to all the rules for drying garlic after harvesting are suitable. The bulbs do not need to be peeled. Glass jars are easy to wash and sterilize. The plant heads are placed in jars and sprinkled with coarse salt. The main feature of this method is that salt prevents the garlic from getting sick. Instead of cans, you can use wooden boxes with low sides.
Fabric bags
Our ancestors stored garlic in linen bags. Depending on the humidity of the room in which the plant will be stored, it is prepared. If the humidity is low, then the garlic is simply mixed with dry husks. At high humidity, vegetables are pre-rinsed in table salt concentrate and dried thoroughly. Only after the bulbs are dry, the garlic is placed in cloth bags. Salt prevents the plant from getting sick and prevents pests from spoiling the harvest.
Under no circumstances should garlic be stored with other vegetables.
What problems may arise during storage?
People often complain that even if all the rules for drying garlic after digging are followed, despite proper further storage, problems arise with the harvest.
However, if mold appears, then this already indicates that the bulbs were not dried well or the crop was frozen. Mold quickly “spreads” if the room has high humidity and is very warm. In this case, we can recommend drying the garlic in direct sunlight, naturally, having first cleaned it of mold.
If the garlic, on the contrary, dries out too much, then it can be dipped in melted paraffin. A thin protective layer is formed on the bulb, which will not allow moisture to evaporate. In addition, paraffin will protect the plant from pathogens.
Since dried garlic cloves are a flavorful seasoning for soups, seafood, meat and poultry, many people are interested in how to dry garlic at home? There are several proven ways to properly dry garlic yourself so that it does not lose its taste and beneficial qualities. Today you will learn about preparing the product for drying, drying without damaging the integrity of the bulbs, in a bunch, storing in powder form, and whether garlic can be dried in the sun.
You can use vegetables of the Kalininsky, Rostovsky, Kirovogradsky, Starobelsky White, Creole, Southern Violet, Ukrainian White and others varieties. In principle, any of the varieties known among gardeners can be dried. A few days before the planned digging, you should stop watering the crop. Since the soil must be dry, it is not recommended to dig up the plant after it has rained. Don't wait for the garlic to ripen. At this point, the foliage becomes characteristically yellow and is located on the surface of the ground.
In the process of digging up a vegetable of this degree of maturity, both the scales and the teeth themselves will inevitably be easily separated from the heads. They can get dirty with soil. It is forbidden to wash the teeth, as they can become moldy. It is also not recommended to dig up an unripe crop. Since its bulbs will have a loose and loose structure, which will make them difficult to dry and store. Garlic should be dried in a cool, dry place. Do not remove the roots, leaves and stem.
Many people practice drying this wonderful product, knowing about all its beneficial qualities.
Garlic improves immunity, exhibits antibacterial and antiviral properties, reduces bad cholesterol, reduces the risk of heart attack and stroke.
But it also effectively fights worms, helps treat joint pain, and is used as an adjuvant in the treatment of liver diseases.
It is an excellent prevention of impotence in men and diseases of the cardiovascular system in any person.
Drying in a bundle
How to dry garlic in a bunch? Its preliminary drying is carried out directly on the site. After digging it up, it is left there for a couple of days. After the roots and tops have dried and the scales have become more closely attached to the surface of the bulb, you can harvest the crop from the area. If there are cold and rainy days this year, the drying procedure should be carried out in a room with a temperature of +30 degrees and last no longer than 8 days. It is customary to braid garlic with tops into braids, which are hung in a dry place where it is somewhat cool.
After digging up mature garlic, you can dry its heads without chopping them. It is required to allocate a room for the product with a temperature of no more than + 10 degrees. Next, the garlic should be laid in 1 layer for several months. The roots should become shriveled and the leaves should change color to brown. It is necessary to remove some foliage and trim the roots. The stem should be cut at a height of about 2.5 cm from the head. Garlic is stored in this form in stockings. A dark and dry place is suitable.
You can dry the vegetable peeled. It is required to sort clean and mature product. After removing its top layer, the garlic should be cut into plates about 6 mm thick, spread on a sieve or baking sheet, after laying it with parchment paper. Next, drying is carried out in the oven or oven at a temperature of +50 degrees. Checking whether the slices have dried properly is not so difficult. Just bend one in your hand and it should break.
Dry garlic can be made into a flavorful powder. The product must be ground using a coffee grinder. This powder will not lose its smell and taste for 1 year. How to do it? To do this, good heads are selected and the husks are removed from them. You can grind it not only with a coffee grinder. Some people like to finely chop the garlic themselves, others use a food processor. Drying in an oven with the temperature set at + 93 degrees is required.
Sometimes this procedure is carried out in a special dehumidifier. Where the product is placed for 2 days at a temperature of about +35 degrees. By chopping dried garlic and passing it through a sieve, you can store the powder for about 2 months.
Can it be dried in the sun?
You can dry garlic in the sun if this is necessary to obtain a large amount of product during the season and sell it. This method cannot be called justified for self-drying. Since laying the vegetable out in the sun significantly reduces its shelf life in the future. Under the influence of scorching sunlight, the top layer of the vegetable cracks. Which does not have the best effect on the quality of the bulbs.
If you still want to use this method, place the dug garlic in the shade. Then its taste and aroma will not be affected. And you can add your favorite seasoning to various dishes to suit your taste and enjoy their unique taste. It is also recommended to dry in the sun those plants that you plan to plant before winter. This should be done within 3 days.
Video “Drying garlic”
From this video you will learn how to properly dry garlic and store it in the form of garlic powder.
You can say about garlic the same way as about onions - it is “from seven ailments.” But garlic not only helps to avoid many diseases and cure existing ones, but is also a vegetable that improves the taste of a dish and increases appetite.
Garlic can be stored well at home. But if there is a lot of it, for example, you have your own garden with a garlic bed, but there is nowhere to store it (although there may be other reasons), then the garlic can be dried. After all, this is not such a labor-intensive process as it seems at first glance. Dry garlic also takes up little space and is very convenient to use.
How to prepare garlic for drying
The following varieties of garlic are suitable for drying: Kirovogradsky, Starobelsky White, Southern Violet, Bronitsky, Ukrainian White, Kalininsky, Rostovsky, Creole and others.
If you are harvesting your own garlic, do not water it for several days before digging it up, since the soil must be completely dry. For the same reason, they do not dig immediately after rain.
The garlic must be ripe. This is evidenced by the leaves themselves, which turn yellow and fall to the ground.
If you dig up garlic that is not yet fully ripe, its bulbs will be loose and loose. They will be poorly stored and dry.
But overripe garlic is also not very good, since when it is dug up, the scales are easily separated from the heads, as are the cloves themselves. This makes further processing difficult. After all, the cloves can become stained with soil, and it is not recommended to wash garlic that is going to be dried. Such garlic will take a very long time to dry and may simply become moldy and spoiled.
Only healthy, clean, undamaged and fully formed garlic is suitable for drying.
Garlic is dried by taking it into pieces, cutting it into slices or making powder out of it.
How to dry garlic in a bunch
Immediately after digging, the garlic needs to be dried. Primary drying is carried out directly in the field. To do this, it is pulled out of the ground and left to lie there for several days. During this time, the tops and roots will dry out and the garlic will ripen. The scales will also dry out and press tightly against the bulb. In rainy or cold weather, drying is carried out in a warm room at a temperature of about 30°C for six to eight days.
When the tops dry, they are cut off, leaving a small stump. But most often, garlic and tops are braided into braids and hung by them in a dry, cool room.
How to dry garlic without destroying the bulbs
Garlic is peeled from the upper hard scales without destroying the bulb itself.
Then the garlic is cut into pieces 5 mm thick.
Place on sieves or baking sheets lined with parchment and dry in an oven or oven at a temperature of about 50°C. To avoid steaming or uneven drying, the garlic should be stirred periodically.
Garlic can also be dried in the sun, spread out in a thin layer. But this method is inconvenient because you need to make sure that moisture from rain or dew does not get on the garlic.
Garlic is considered dried when the slices no longer bend and break easily.
The crushed garlic is well cooled by placing it on a cloth or on the same sieves.
The garlic is then winnowed by hand to separate the slices from the flakes.
Ready garlic is packaged in boxes, paper bags, hermetically sealed glass jars and stored in a dry, dark, cool room for about a year.
How to dry already peeled garlic
Garlic heads are disassembled into cloves and completely peeled. The root collar of the cloves is cut off. Check that the cloves are free of damage and brown spots.
Some people advise grating the garlic, but this method releases a lot of juice, which makes drying the garlic almost impossible. You can chop the garlic using a food processor, but the slices should not be very wet. Therefore, the best cutting method is still manual. That is, armed with a sharp knife, the cloves are cut into thin slices and immediately laid out on a baking sheet covered with parchment.
This garlic is dried in an oven or electric dryer at a temperature of 50-60°C.
The chopped garlic is periodically stirred with a spatula and ventilated, occasionally opening the door. This must be done so that the raw materials do not steam and dry evenly. Drying continues for several hours.
Method 2. Garlic is disassembled into cloves, peeled and the root collar is cut off. The cloves are cut in half. They are laid out in one layer on a baking sheet lined with parchment, cut side up. Dry in an oven or oven in the same way as in the previous case.
The drying time depends on the quality of the garlic, the degree of grinding, the drying temperature and the choice of drying unit.
Ready dried garlic breaks easily.
It is cooled in air and packaged in paper bags or hermetically sealed glass jars.
How to Make Garlic Powder from Dried Garlic
Well-dried and cooled garlic slices are ground in a coffee grinder or blender until powdered. Then sift through a sieve so that the resulting powder is homogeneous. You can chop the garlic to coarse crumbs, then the prepared topping will taste good in the dish.
If the garlic cloves do not chop well, it means they are not dried enough. You need to additionally dry them in the oven, cool again and grind.
Store garlic powder in glass, well-closed jars. Shelf life is about a year.
Good day to all! I would like to introduce you to a popular seasoning that you can prepare at home, like I did - dried garlic! For many years I bought it in stores and markets, packaged in bright bags, and overpaid a lot of money, in addition to the fact that I bought not so much the seasoning, but monosodium glutamate in addition to it! Therefore, back in the summer, I firmly decided to make dried garlic at home, fortunately the dacha allowed me to grow several kilograms of excellent fresh garlic by September.
So, to prepare dried garlic, prepare 1 kg of garlic heads - even if you buy it, it is inexpensive during the harvest season!
Peel each head, disassemble it into slices and peel them. Then rinse each clove in water to remove dirt. On the board, cut the cloves into slices, but not across, but vertically - this way they look more attractive.

Cover a baking sheet with parchment paper and place all the garlic slices on it. Place the baking sheet in the oven and dry the garlic with the door ajar for about 1 hour, stirring occasionally.

Finished dried garlic slices look like this! Be careful not to overdry them, otherwise you will get a bitter aroma floating throughout the kitchen. The slices should break when pressed.

I always separate 1/4 of the entire dried mass and leave it in this form - then I stuff it into pieces of beef, pork and veal when baking.

I grind the bulk of dried garlic in a blender to dust - this product is added to soups, sauces, seasonings and rolls.

Dried garlic must be stored in containers with tight-fitting lids, otherwise all the garlic flavor will “run away” from you. I will be glad if any of you find my recipe useful. This mass lasts me for a whole year, until the next garlic harvest season!

Garlic is one of the most valuable products, the demand for which never falls. Today, crop cultivation is carried out both by private individuals who have their own plot of land, and by small and large farms. In the process of this production, the problem arises of how to keep the harvested crop safe and sound.
You can find out whether it is possible to dry garlic in the sun and how long it should be done, and what ways to preserve garlic for further use in food by reading this article.
When to dig up garlic?
Before you figure out how to dry garlic, you should know the best time to dig it up. To ensure that the efforts invested in growing crops are not wasted, you need to determine exactly when to harvest the crop, since incorrect timing can negatively affect its storage.
All gardeners know that there are 2 types of garlic - winter (winter) and spring. It is clear that the first type is planted in the fall, and in winter it is in the ground, and the spring type is planted in the spring. It turns out that their ripening periods are different.
How to decide on the collection time? When the shoots grow on the winter variety of garlic (late June), these shoots should be removed so that the plant can devote all its strength to the growth of the fruit. Only on some of them you need to leave them, since they are a guideline for the onset of the cleaning period. When the garlic is fully ripe, the arrow straightens and the seed pod cracks, revealing bulbs. You can find out how to dry garlic below.
The spring variety is dug up later than the winter variety (2-3 weeks). In this case, the degree of maturity can be judged by the lower leaves of the plant. They should be yellowed around the edges, but with a greenish tint in the middle.

Mandatory rules for harvesting garlic
To prevent the vegetable from rotting during storage, you need to prepare for harvesting in advance. Approximately 30 days before the digging date, watering should be stopped. It is important to note that in winter it will be better to store garlic that has finally ripened. To speed up the process, about 12 days before harvesting, you can remove a little soil from each plant. It is best to harvest garlic in warm, dry and sunny weather.
Is it possible to dry garlic in the sun? It is important to remember that it is not advisable for garlic heads to be exposed to direct sunlight for a long time. Otherwise, the vegetable may get a little baked, resulting in short storage.
It is better to harvest the crops using a fork to prevent damage to the heads. The garlic is dug up, removed from the soil and gently shaken from the ground. Until the entire harvest is harvested, the dug up fruits can lie in the garden bed. The vegetable should be dug up only in dry weather (it is advisable that there has been no rain in the previous two days).

The dug up garlic will need several days to dry. In dry and warm weather, you can leave it right in the garden all day, but if the weather is damp and cloudy, you can leave it in a well-ventilated area (in the attic or basement). You can also take the harvest outside every day and bring it into a warm room at night. After complete drying, the vegetables must be freed from soil and stems. The length of the remaining trim depends on the storage method.
Knowledge of how to dry garlic is important for the preservation of vegetables. Usually the plant is laid out in one layer on a flat surface in a dry room. Its upper part needs to be cut off only after 3 weeks of drying. By that time, the stem transfers all the remaining nutrients to the head of garlic. It is recommended to trim the roots immediately.
After complete drying, the harvest must be carefully sorted, removing garlic that is affected by the disease and has various mechanical damage. Sprouted crops should also be discarded.
Garlic for storage in a bundle
How to dry garlic in a bunch after harvesting? During the drying of the dug up crop, the roots and tops of the plant dry well, and the garlic, oddly enough, ripens. The scales dry out and press tightly against the bulb.
If the room temperature is about 30 °C, such drying should be carried out for approximately 6-8 days. After complete drying, the tops should be trimmed. For braiding or forming bundles, it is advisable to leave stems up to 20 cm long, after which the finished bundles are hung in a cool, dry room.

How to dry garlic without destroying the bulbs
For use as food in winter, garlic is dried in a variety of ways. In this case, it is carefully cleared of the hard upper scales, without destroying the bulbs. Then it is cut into pieces about 5 mm thick and laid out on a baking sheet covered with parchment. Dry in the oven or oven at a temperature of 50 ° C. To prevent steaming or uneven drying, the garlic should be stirred periodically.
In this form, the garlic, spread out in a thin layer, can be dried in the sun if the weather is good. Slices of well-dried garlic stop bending and break easily.
Then, after cooling, the garlic slices should be separated from the scales in the dried mixture, and the finished product should be packaged in resealable jars, boxes or paper bags.
Drying peeled garlic
How long does it take to dry peeled garlic?
The heads are divided into cloves, which are completely peeled. The root collar of the cloves is cut off. All teeth should be free of any stains or damage.
You can grate the garlic, but this releases a lot of juice, making drying it almost impossible. You can also use a food processor, but this will make the slices very wet. Therefore, the best way is hand cutting.

Thin slices are laid out on a baking sheet with parchment. The garlic is dried in the oven (or in an electric dryer) at a temperature of about 60°C. The mass is periodically stirred and ventilated by opening the door (to prevent steaming). All this is done within a few hours.
For such drying, garlic can also be cut in half. Drying time depends on temperature, degree of grinding, quality of garlic and drying temperature. And in this case, ready-made, properly dried garlic should break easily.
Lastly about Garlic Powder
How and where to dry garlic to obtain powder from it? Garlic slices dried using the methods described above can be crushed either in a blender or in a coffee grinder until a powder is achieved. The resulting mass is sifted through a sieve to achieve a homogeneous state. The aroma of garlic, crushed to coarse crumbs, is better felt in dishes.
After all of the above methods of drying garlic, the finished products are placed in sealed jars, paper bags and boxes and stored in a cool, dry and dark room for a year.
 How to correctly highlight suffixes in words
 About France and the French language
 Russian language. What kinds of dictionaries are there? In the world of dictionaries Famous dictionaries of the Russian language and their authors