How to ring the heating elements for a breakdown. Checking the heating element of the washing machine. What is important to know when planning site drainage
A tubular electric heater (TEH) is an electric heating element in the form of a metal tube of arbitrary shape, in which a spiral of nichrome or fechrome wire with leads at the ends is placed. To isolate the coil and transfer heat from it, the tube is filled with quartz sand. The heating element does not have polarity, therefore it does not matter which output to connect the phase and zero to.
Practically in any modern electric heaters, such as, for example, an electric kettle, an iron, an automatic washing machine, a heater, heating elements are used as a heat source.
If there is no heating in the electrical appliance, this does not mean that the heating element has failed. It is possible that the cause of the malfunction may be a switch, thermostat or other controls. But usually, first of all, they check the heating element, since its verification is not difficult. Any home master, having read this article, even without experience in dialing and replacing the heater, can easily cope with this task by choosing the most affordable way to check.
The device of a tubular electric heater (TEN)
As can be seen from the drawing below, the heating element is a metal tube made of copper, stainless steel or iron, in the center of which a nichrome spiral is laid, twisted in the form of a spring.

The tube inside is completely and densely filled with sand, which makes it possible to efficiently remove heat energy from the coil and exclude its contact with the tube. The ends of the spiral are welded to contact rods, which are fixed inside the tube with ceramic insulators. To supply voltage at the ends of the contact rods, threads are cut or contact plates are welded.
Tubes for the manufacture of heating elements are used in different diameters and, depending on the purpose, give them various shapes up to a spiral. A good example is an electric heater.
What are the malfunctions of heating elements
Most often, heating elements fail due to a break in the thread of the nichrome spiral, which occurs due to the melting of the nichrome thread due to its overheating. Overheating occurs if a thick layer of scale has formed on the heater or the heater, designed to work in a liquid medium, is turned on without it. The spiral may burn out due to the initial low quality of the heating element.

The spiral in the center of the heating element tube is held due to its dense filling with sand. If, when filling sand, it was poorly compacted or the spiral shifted from the center to the wall of the tube, then over time, due to vibration, the spiral can move and touch the inner surface of the tube.
If the spiral touches only at one point, then if the RCD ground wire is not connected in the apartment wiring, the heater will not lose its operability and the electric kettle or any other heating device will continue to work. But at the same time, there is a possibility that the phase will get on the body of the product, and if it is metal, then the probability of electric shock to a person when touching the body.

If the electrical appliance is grounded, then as a result of shortening the spiral, the generated power will increase significantly, and if the circuit breaker does not work, the spiral will melt and the heating element will fail completely.
If the spiral touches the tube at the same time in two or more places, as in the photograph, then in the absence of grounding and RCD, if the circuit breaker does not have time to operate, the spiral will immediately burn out.
Thus, heating elements can have one of two malfunctions - a break in the nichrome spiral or a short circuit to a metal tubular sheath. Any of these failures cannot be eliminated and the heating element must be replaced.
In modern electric kettles, multicookers and irons, the heating element is welded to the body of the product and when the heating element fails, you have to buy a new electrical appliance.
How to check-call the heating element
Depending on the availability of measuring instruments, the heating element can be checked in one of the following ways. Measure the resistance of the coil and the resistance between the coil and the tube using a pointer tester or multimeter, ring with a phase indicator or an electrician's control.
Checking the heating element
using a dial gauge or multimeter
To check, you need to turn on the device in the minimum resistance measurement mode and touch the leads of the heating element with the ends of the probes of the device.

If the spiral is broken, then the dial gauge will show resistance equal to infinity, and the multimeter will show “1” instead of real resistance, which is equivalent to infinite resistance.
It is enough to enter in the calculator windows the voltage for which the heating element is designed and its power. Usually these values are stamped on the tube. You can use information about the power consumption of the appliance. For example, the resistance of a heating element of an electric kettle with a power of 2000 W will be 24.2 ohms.

If the spiral is intact, then you need to touch one end of the multimeter probe to any of the leads of the heating element, and the other to the metal tube. If there is no short circuit between the spiral and the tube, then the dial tester will show infinite resistance, and the multimeter will show "1". If the device shows a value different from the specified value, then there is a short circuit and such a heating element is not subject to further operation.
Checking the heating element
with LED and battery or power supply
If there is no tester or multimeter available, or a Krona-type battery has run out in the multimeter, then in the presence of any LED, and they are in almost all household electrical appliances and any battery, even a dead one, with a voltage of 3 V to 12 V, you can successfully check any heating element, including an electric kettle.

In the photo you can see how it is possible to check the integrity of the heating element coil using a dead Krona battery taken out of the multimeter (the voltage at its terminals was only 5 V instead of 9 V), a 51 Ohm resistor and an LED. Just keep in mind that the LED is not a light bulb and it must be connected, observing the polarity. Since the heating element itself has resistance, when checking the spiral when using an old battery, you can do without a resistor.
If the LED is on, then the spiral is intact. To check the insulation resistance, you need to disconnect the circuit from any of the contact rods of the heating element and touch the tube of the heating element. The LED should not light up.

If there is no battery at hand, then it can be successfully replaced with any AC or DC power supply, any charger, for example, from a cell phone or laptop, will also work. In this photo, using alligator clips, the supply voltage is supplied from a constant voltage source. The LED confidently shone when the voltage changed from 2.5 to 12 V.
Checking the heating element with a phase indicator
Attention! When checking the heating element with a phase indicator and an electrician's control, care should be taken. Touching exposed parts of a circuit connected to an electrical outlet may result in electric shock. In other words, it is unacceptable to touch the body of the heating element and its terminals after connecting to the outlet.
If you have an electrician's phase indicator at hand, then with it you can also check the health of the heating element. In this case, the insulation resistance (between the nichrome spiral and the tube) will be checked with greater reliability, since when checking with a multimeter, a voltage of no more than 9 V is applied, and when checking with an indicator, more than 220 V.

To check, you must first determine where the phase is in the outlet (according to the rules it should be on the right) and then connect one of the contact rods of the heating element with a piece of wire to the phase terminal, as shown in the photo.
If, when you touch the opposite terminal of the heating element, the indicator light does not glow, then the spiral is broken, and if it glows when you touch the tube, then there is an insulation breakdown (the spiral touches the tube).
Checking the heating element using an electrician's control
Almost everyone can check the heating element with the help of an electrician's control, since no measuring instruments are required. The essence of the test is to sequentially turn on any light bulb with a heating element spiral, followed by connecting the circuit to a 220 V household electrical wiring.
To prepare for the test, it is necessary to take a plug with a cord and connect one end of it to any contact terminal of the heating element, and the other end to an electric cartridge. Further, an additional piece of wire is connected to the second terminal of the cartridge. Any light bulb rated for 220 V is screwed into the cartridge.

First, the free wire from the cartridge is connected to the free end of the heating element, as shown in the diagram above. The plug is then inserted into the socket. With a good spiral, the light bulb should shine brightly. If it does not shine, then the spiral in the cliff can not be checked further, since the heating element is not subject to further operation.

Next, the plug is removed from the socket and the output from the cartridge, right according to the diagram, is connected to the heating element tube, as shown in the photo. The plug is inserted into the socket, if the light does not shine, then the insulation resistance between the spiral and the tube is large and the heating element is working. If the lamp starts to glow, then there is a breakdown of the insulation and it is unacceptable to operate such a heating element.
Non-standard methods for checking heating elements
If it is not possible to check the heating element in one of the above ways, then you can connect the wires from the cord with the plug directly to the terminals of the heating element and insert the plug into the socket for a few seconds. If the heating element starts to heat up, then the spiral is intact. Carefully, when checking the heating temperature of the heating element, do not burn yourself with your hand.
To check the insulation resistance, one of the ends of the cord, with the plug removed from the socket, must be disconnected from the output of the heating element and connected through a fuse rated for a protection current of not more than 5 A to the tube of the heating element. Then insert the plug into a household electrical outlet. There is no time limit here. If the fuse does not blow immediately, then there is no short circuit between the coil and the body and the heating element is working.
It is simply unrealistic to give all possible ways to check the heating element. The heating element can even be checked using a stationary telephone by including it in the gap of one of the wires with which the phone is connected to the network. If, after connecting, there is a signal in the removed tube, then the heating element is working. You can even not pick up the phone, but call from a mobile phone to him. The presence of a bell sound will confirm the integrity of the heating element coil.
The temperature regime in the washing machine is set by a special automatic device based on a Tubular Electric Heater - a heating element. If it deteriorates, the machine will lose a significant part of its advantages. Next, we will talk about how to prevent the mentioned, or to understand the breakdown, if it did occur.
If the heating element is no longer heating
Inexpensive cars are not supplied with control elements of the circuit elements. For this reason, the heater in such a model may deteriorate, but there will be no noticeable signs of a problem. However, according to the results of washing, especially in cases where a program with a temperature of 60–90 degrees Celsius is selected, the user will undoubtedly suspect something is wrong. Since the machine drains the waste water, it will remain cold in the event of a burnt-out heating element or in the event of a failure in its control system. This is a completely accurate signal that repairs are needed.

Repair of household appliances is the bread of many individuals and legal entities. Unfortunately, not all representatives of this group of figures are respectable. Some conscientiously fix the problem, others conscientiously fix the problem, but voice a more expensive option, and still others fix the problem, but make sure that after a while something breaks again, and the client is “addicted” to their service. Therefore, if the user has certain skills, we recommend that you independently check the heating element of the washing machine.

The very fact of the integrity of the heating element is fundamental. The fault can be either in it or in its temperature control circuit. TEN is very simple. To get a visual representation of its structure, you can take a burnt boiler with a power of 1.5–2 kW. This is the same heater, but its design does not provide for hermetic embedding in a container of water, as is done in a washing machine. Inside the metal tube is a refractory spiral in a ceramic insulator.
The easiest way to verify the performance of the heater on the meter.
In each of them there is an indication of power consumption. For example, in some models, the LED indicator flashes more frequently, the more power is consumed. Comparing its work in the position of the switch of the machine at the minimum and maximum temperatures, it immediately becomes clear whether everything is in order with the machine.

We check the heating element with a multimeter
The coil breaks inside the tube if worn or overheated. The heating element cannot be restored, and is only replaced with a new one. It must be found in the machine and checked with a multimeter. In any model of the washing machine, the back cover is easily removed. And the heating element is commensurate with the boiler and must be surrounded either by a considerable volume of water, or located near the laundry drum. Therefore, having removed the cover, it is difficult not to notice this container or the heating element itself. But it may also be that it is mounted from the front of the machine. In this case, it is necessary to consider its terminals using the reflection in the mirror, and correctly identify the wires connected to the heating element.

You can trace them back to the control circuit, and then decide where to disconnect one of them. To check the heating element, it is not necessary to disconnect both wires. Only one thing is important - this wire directly connects only the contact of one of the tester probes with the heating element terminal. You need to measure the resistance not only of the spiral, but also relative to the body. To assess the state of the spiral, it is quite enough to compare the readings of the device with the calculated resistance at a power of 2000 W. If
U*I = 2000 W,
replacing I with U/R, we get
220*220/2000=R= 24.2 ohm.

But this is the resistance value of the heated heating element. In a cold state, the resistance is somewhat less, but more than 10 ohms. If in doubt, take a working boiler and connect the probes of the appliance to its plug. The measurement results should be similar. At the same time, evaluate how safe your boiler is. Connect one terminal of the tester to the tube, and the other to one of the pins of the plug. For residual current devices and differential automata, the operating current is set to 30 mA, i.e. 0.03 A.
According to the formula
we get
R \u003d 220 / 0.03 \u003d 7333.33 ohms.

Therefore, the resistance must be significantly greater than 8 kOhm. If this is not the case, then the coil is poorly insulated, and over time, due to temperature changes, the insulation resistance will decrease even more. Similar resistance measurements for the heating element, if it is in good condition, are approximately the same. Therefore, the problem is in the control scheme of it, and this is a rather complex issue that only a trained user or service representative can deal with. But then it will become known what the essence of the problem is, and what are the costs of repairs.
If the malfunction of the heating element itself is obvious, it can be safely dismantled. If the owner of the machine understands how to do this and is able to dismantle it, he will thereby save money. It is better to buy a new product in the original packaging. An unscrupulous service representative may supply a used product. If the user is confident in the success of self-installation of a new heater, then it makes sense to perform it. But after replacement, it is necessary to check the tightness of the heating element gasket.
And it's not that easy. Water is supplied to the machine through valves that open only when connected to the mains. And at the stage of verification, this should not be done. It is recommended to tilt the machine towards the removed rear cover so that the heater gasket is visible and accessible to touch. The machine in this position is securely fixed (it must be shaken back and forth, and it must be stable). Then, from the side of the cover, more hot water is poured through the hose. By running a dry cloth over the gasket, the tightness of the installation is checked. Drops of moisture on a napkin will indicate that adjustments need to be made.
In this case, the water from the tank must be drained to the maximum through the siphon hose and try to correct the situation. If it didn’t work out the second time, most likely, it’s more correct to call the master. If everything is fine and the napkin remains dry, the water is drained, the machine is put on the floor, the wires are connected to the heating element, then the back cover is installed, put in place, connecting everything necessary, and checked in operation.
When the washing machine suddenly stops heating water, this becomes a real problem, as it significantly affects the quality of the wash. In cold water, it is impossible to remove stubborn stains, moreover, the washing powder does not dissolve well, and the laundry after such washing sometimes acquires an unpleasant, musty smell.
There may be several reasons why heating does not occur. Most often, the matter is in the breakdown of the program module or heating element - a tubular heating element. As practice shows, the most common reason is the latter. The heating element often becomes unusable due to plaque, which occurs under the influence of hard water or low-quality household chemicals.

We will tell you in detail about how to independently diagnose a heating element and about preventive measures in today's article.
How to evaluate performance?
We find the heating element
In order to check the health of the heating element, you must first gain access to it - and for this you will need to disassemble the washing machine. For most modern models, the heating element is located either in the front or in the back of the case. Finding it is pretty easy in three ways:
- compare the front and rear walls of the unit - which one is larger, under that one the heating element is usually hidden;
- turn the washer on its side and find the heating element by removing its lower part;
- unscrew the top cover and, turning the machine to the side, find the heating element.
Having found the heating element, you can immediately dismantle it, but experts advise you not to rush into this until you are convinced of its malfunction. Therefore, to begin with, simply disconnect the wires going to the heating element.

We measure resistance
The most affordable way to diagnose heater problems is to measure its resistance. In order to determine it, we need to find the value of all elements of the formula:
R \u003d U² / P, where R is resistance, U is voltage, and P is power.
The voltage that is supplied to the heater is equal to the mains voltage: it is usually 220 volts. You can find out the power of the heating element in the corresponding section of the manual for the washing machine. If this information could not be found there, there is data on the Internet regarding all existing models. Most often it is 2000 watts.
Now we substitute the found values, calculate, and get the desired value. According to our values, R = 220² / 2000 = 24.2 ohms.
Check with a multimeter
The resistance obtained as a result of the calculation is an indicator at which the heating element can function normally. In the event of a malfunction of the heating element, the resistance may change, resulting in interruptions in water heating. You can check the resistance with a multimeter - a device that allows you to measure various indicators of electric current.

Before you start measuring, make sure that the washing machine is unplugged.
Then set up the multimeter: start the resistance measurement mode, and set the value to 200 ohms. Attach the probes to the terminals of the heating element. The measurement result should appear on the screen of the device.
If the resulting number is equal to or close to the one we found using the formula, then everything is in order with the heating element. The number "1" means that there was a break inside the heating element. The number "0" is displayed in case of a short circuit. In both cases, the heating element will have to be replaced.

Do not forget to check the heater body itself for integrity. How to do this, see the next video.
Is it possible to check the serviceability without a special tester?
If you do not have a multimeter at hand, you can test the heating element of the washing machine in other ways. The first of them does not require disassembly of the unit. To make sure that the heater is functioning properly, run the wash at the highest temperature setting. Then carefully monitor the rotation of the electric meter wheel - if it starts to gain momentum, then the heater is most likely working.
The second way to diagnose a heating element is a visual inspection. If cracks or black spots are found on the body of the device, the heating element must be replaced.

- In the process of installing a new heating element or returning the old one to its place, carefully check the connections - they must be completely tight, otherwise the lifetime of the heater (and, possibly, the entire washing machine) will be very short.
- You can extend the life of the heating element by arranging periodic maintenance for it. The most affordable remedy is citric acid. Just run the wash with an empty tank, adding a couple of tablespoons of citric acid instead of powder. But do this no more than once a year, otherwise you can damage the metal elements of the washing machine.
You can learn about other preventive measures by watching the Ukrainian program "Everything will be kind."
Practically all heating devices and devices known today function due to the operation of tubular electric heating elements, which are briefly referred to as heating elements. As a rule, heating elements are simple in design and have a long service life, however, if used improperly or if they are defective, they fail - the most common causes of device malfunctions are coil breaks and short circuits.
Before throwing away faulty equipment, it is recommended to check the heating element with a multimeter. Perhaps the problem is not in this part at all, and the breakdown is much more serious. So, how to check the heating element using an ordinary tester?
A tubular electric heating element contains one or more spirals, which are characterized by high resistance, due to which they heat up when an electric current passes through them. To avoid short circuits and other problems associated with electric current, the spirals are placed in insulated metal tubes.
Before checking the heating element, it is necessary to determine its normal resistance. This is necessary so that when testing you have a standard with which to compare the readings of the device. Thus, you can easily determine how much the value measured by the multimeter differs from the calculated one, and how much these values diverge.
R=U2/P
Where P- the power indicated on the body of the equipment. So, if an electrical device operates at a voltage of 220 volts, and its power is 1000 watts, the resistance calculated by the formula will be 48.4 ohms. As you can see, calculating the value is very simple!
Checking an ordinary heating element
Now that you know how to determine the resistance of a heating element and why you need to do it, you can proceed directly to the testing itself, which is performed in several steps.
Before checking the heating element with a multimeter, disconnect the heating element from the power supply.
In further actions, follow the instructions below for correct verification:

- The resistance is equal to the calculated one - the serviceability of the device and suitability for work.
- The scoreboard shows a value of 0 - a short circuit of the spiral inside the tube.
- The display shows a value of 1 (or infinity) - a break in the heating coil.
After completing the verification procedure, it is necessary to start ringing, which allows you to determine whether an electrical breakdown occurs on the device case. Calling is also carried out using the tester as follows:

If at the moment the probes touch the contacts, the buzzer starts emitting high-frequency signals, then an electrical breakdown occurs on the device case, which can lead to electric shock with serious consequences for health and life.
Checking the heating element of the water heater
If you didn’t know until this moment how to check the water heater heater with a multimeter, the good news is for you - it practically does not differ from the example considered earlier and does not cause any difficulty even for inexperienced users. The procedure for testing is completely similar to that described above, since the design of heating elements in various equipment is practically the same. The only addition is that it is recommended to check the thermostat.
In the normal case, during testing of the heating element of the water heater, the tester shows the resistance value, which in most cases takes values of 0.37 and 0.71.
It is also necessary to check the element for a breakdown on the device case. You already know how to ring the heating element with a multimeter - this was discussed above. Put the tester into buzzer mode and touch the contacts one by one, listening to the signals emitted by the multimeter.
Checking the heating element of the washing machine
Before you check the heating element of a washing machine with a multimeter, you still need to find it - many people have certain difficulties with this, which is especially true for modern models of machines with a tricky internal device. In most cases, the heater in the washing machine is located slightly below its tank, closer to the back cover.
 In some models, it is installed on the side of the front cover. Top-loading washing machines can be equipped with elements located on one of the sides.
When checking, you should know which contacts of the heating element you need to connect to. The fact is that the tubular electric heating element of the washing machine has three outlets, of which only two are needed for testing. As a rule, a ground contact is located in the center, while the two extreme ones (zero and phase) are necessary to check the terminal.
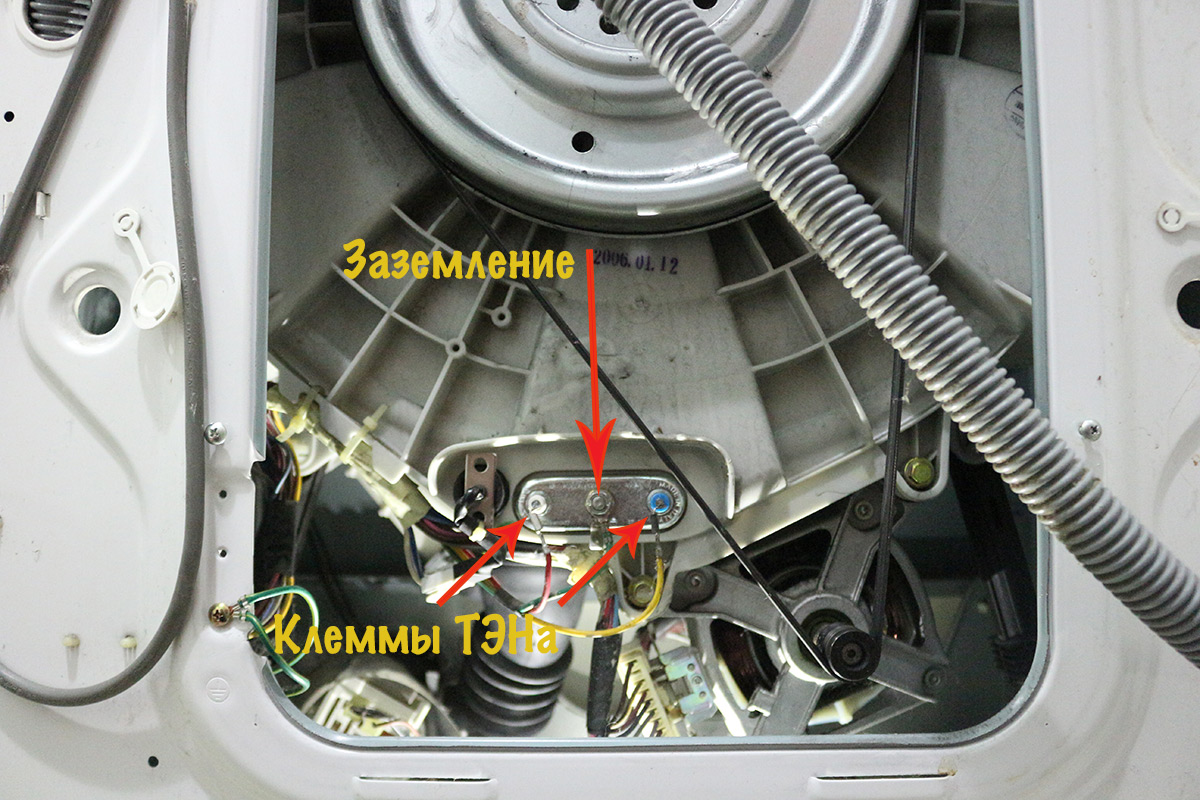 To test the heating element of the washing machine, you must follow the instructions given earlier. The normal resistance value for the heating element of a standard washing machine varies between 25-60 ohms, small deviations are possible.
. How to measure the power of a heating element with a multimeter. How to find out the power of the heating element with a multimeter
Instructions: how to check the heating element of a washing machine with 4 methods. How to find out the power of the heating element
How to check (ring) the heating element with a multimeter?
In this article, we will take a closer look at how you can check the health of the heating element - the heating element with your own hands.
Currently, water heaters are widely used in everyday life. These are washing machines, electric kettles, electric stoves, boilers, and other appliances.
In all these devices, water is heated using a heating element - a tubular electric heater.
Inside the heating element there is a wire spiral with a high electrical resistivity, which heats up when an electric current passes through it.
The space between the coil and the body of the heating element is filled with an electrically insulating filler with high thermal conductivity, which conducts heat well.
When electric heaters stop heating water, most often the reason for this is the failure of the heating element.
So, how to check the heating element?
Knowing the power, we calculate the current flowing through the heating element - this is the ratio of power to the mains voltage (220V):
I=P/U, Amp.
After calculating the current, we determine the resistance: the ratio of voltage (220V) to current:
Suppose we have a heating element with a power of 2000 W (2 kW), the mains voltage is 220V, substituting these values into the formula, we get:
R=220²/2000=24.2 ohm.
Those. We substitute the voltage in Volts, the power in Watts - we get the resistance in Ohms.
2. Now we proceed directly to checking the heating element with a multimeter (tester).
Before taking measurements, it is necessary to disconnect the electrical appliance from the mains supply and disconnect the wires from the heater connectors.
We transfer the multimeter to the resistance measurement mode with a range of 200 ohms.
We touch the probes of the multimeter to the terminals of the heating element:
If the heater is working, then the device should show a resistance close to the calculated one.
If it shows zero, it means that there is a short circuit inside the heating element and it must be replaced.
If it shows 1 (one) - a break in the heating element and also a replacement (the pointer tester will show ∞).
3. After that, we check the breakdown of the heating element on the body.
We switch the device switch to the "buzzer" dialing mode. We connect one probe of the device to the output of the heating element, the second to the body of the heating element (it is possible to connect the ground connection on the heating element).
If there is no breakdown on the case, the multimeter buzzer should not beep.
If the buzzer beeps, then the heating element has a breakdown on the body and needs to be replaced.
In such a simple way, you can check the serviceability of a tubular electric heater - a heating element using a multimeter.
4. But it is also possible that the insulation of the heating element begins to deteriorate over time and a leakage current occurs on the case. In this case, a megaohmmeter is needed to measure the insulation resistance of the heating element.
If an RCD is installed in the circuit with a heating element, then in the event of deterioration or aging of the insulation, the leakage current can reach a value sufficient to trigger this RCD. As I explained in detail in the course on protection devices, the RCD can start to trip, starting from half the value of the rated residual breaking current: - from 5 mA for an RCD with a setting of 10 mA; - from 15 mA for an RCD with a setting of 30 mA.
The multimeter will not show this, since there is no short circuit to the case.
You can also see how to check the heating element in video format:
Subscribe to my YouTue channel and be the first to get access to new electrical videos.
If the video was helpful to you, don't forget to hit the LIKE button.
Do-it-yourself boiler repair.
Boiler connection diagram.
Washing machine - do-it-yourself replacement of a heating element.
elektrik-sam.info
| Modern manufacturers in a wide range produce electric water heaters used in apartments and private houses. However, it often becomes necessary to equip a water heating system using home-made devices in a country house or summer house. In this regard, it is necessary to calculate the power of the heating element so that do-it-yourself water heaters work as efficiently as possible. How to calculate the power of a heating element with a calculator onlineThe calculation of the power of the heating element using an online calculator is carried out taking into account the volume of the tank of a self-made water heater. In addition, the initial and final (required) water temperatures are taken into account, as well as the estimated heating time. The accuracy of the results is influenced by the actual voltage of the electrical network and the design features of this heating element. All these initial data are entered into the online power calculator. The basis of all calculations is the formula that determines the mathematical indicators of power: P \u003d 0.0011m (tk-tn) / T, where:
The calculator allows you to calculate the power of the heating element without taking into account heat losses, which differ in accordance with the design of a particular container. In addition, heat loss is affected by ambient temperature and other factors. When calculating the heating element, it is necessary to take into account the indicators of the actual voltage of the electrical network, which differ significantly from the expected nominal value. For example, reduced voltage can lead to a decrease in the calculated temperature of the working surface of the heating element. Therefore, it will take much more time to heat the same volume of water. During calculations, the value of the mass of this water can be inserted in the calculator window "Volume of heated water", taking into account its specific gravity, which is 1 g/cm3. It is not uncommon for cold water for heating to come from municipal water supplies. In these cases, its initial temperature is provided, which is recommended in summer about 5-8 degrees, and in winter - 13-18 degrees. The end result of the calculated power P in the formula is suitable not only for one heating element, but also for several elements connected in parallel.
|
for serviceability with a tester, ring the resistance, check with a multimeter
To check the heating element for performance, you need to know how to call it and what data we need to focus on. In modern washing machines, heating elements are one of the main elements. They are responsible for heating the water, and the implementation of the specified washing program depends on their correct operation. If the machine stops heating water, it becomes necessary to check the nodes responsible for this - the software module and the heating element. In most cases, it is the second option that turns out to be faulty.
The device of the heating element and how it works
The cause of the breakdown is often limescale formed on the tubes, which is a natural consequence of the use of low-quality detergents and increased water hardness. As a result of the formation of an excess layer on the heating tubes, the energy spent to heat the water increases, and the device begins to wear out, as a result of which it breaks. Other breakdowns of the washing machine include a breakdown of the UBL (lid lock), a failed control board resistor, a malfunction of a voltage stabilizer, such as se110n or an amplifier, for example, tda2003.
 Ten is a heating element. Its task is to heat the water to the required temperature in the washing machine
Correctly, as well as in a timely manner, to determine the malfunction of a household appliance, such as a washing machine, will save money on
xn----7sbeb3bupph.xn--p1ai
How to measure the power of a heating element with a multimeter. How to check the heating element of a washing machine: with a multimeter, tester, without a device
How to check ten in an electric stove, electric kettle with a multimeter
The most common cause of failure of household electrical appliances is damage to the heating element. A tubular electric heater is present in almost all household appliances. Teng is a tube, inside of which there is a spiral, with high resistance. In this case, heating occurs due to the flow of current through the tube. The inside of the component is filled with a conductive substance that retains heat.
The heating element has its own technical characteristics, by which it is possible to determine the condition of the device. These characteristics can be measured with a multimeter. To do this procedure, you need to know some aspects of how to check the heater with a multimeter.
Where are heaters used
Heating components are used in mechanical engineering, in the food industry, in the chemical industry, as well as in medical production. For industrial purposes, heating elements are capable of heating solids, gases, bulk and liquid materials. In addition, these electrical appliances are used to melt ores, copper, alloys, steel and aluminum.
The following heaters are used in everyday life: for greenhouses and greenhouses, for saunas and baths, for electric heaters, for kettles, for washing machines, for irons, for baths and saunas.
How to check the heating element in an electric kettle
 Prior to the production of the measuring procedure, it is necessary to calculate the resistance that corresponds to the measured electrical appliance. In this case, you should know its power. This indicator is indicated in the data sheet of the equipment or on the case. To calculate the resistance, you must first calculate the current passing through the heating element. This is achieved by dividing the power by the voltage of the electrical network - 220 volts.
After that, the mains voltage follows - 220 volts divided by the received current strength. In this case, a value equal to the resistance will be obtained. This value should appear on the display of the measuring device as a result of the diagnostics of the heating device.
To examine the heating element with a tester, it is necessary to switch the device to the resistance measurement area. Then touch the rod with one tester wire. If an incorrect value appears on the multimeter display, this indicates a break in the thread located in the middle of the tube.
The resistance in a 2000W electric kettle should correspond to a value of 25 ohms. If there is no discrepancy from the inside of the tube, then you need to touch the rod with one probe, and the metal pipe with the second. In this case, an infinite designation of the resistance indicator should appear on the scoreboard. If the indication on the scoreboard is a certain value, this means that a short circuit has occurred.
How to check the heating element in the dishwasher
For this test, you need a multimeter. You can use the simplest measuring device. The switch should be set to the range that measures ohms. In this case, the probes of the measuring device are applied to the contacts of the heating element.
If the electrical appliance is in working condition, then its resistance should correspond to a value of 21-22 ohms. If the heating element is in a faulty state, then the display will show an infinite value. If no deviations from the norm are found, then at the next stage of diagnostics, current leakage to the housing should be determined.
In this case, you need to switch the relay of the measuring device to megaohms. Then, with one probe, you need to touch the power contact, and attach the second wire to the ground or to the surface of the electrical appliance. If the heating element is in working condition, the results will be equal to infinity.
To achieve more accurate results in the production of measuring measures, the outer side of the heating element must have a dry surface. Otherwise, the tester will not display resistance equal to infinity.
How to check the heating element in a multicooker
 To do this, it is recommended to disconnect the appliance from the power supply. In addition, the conductors connected to the heating element connectors must be disconnected. The following is the process of diagnosing the heating element of the multicooker. This procedure is similar to the above, only you need to calculate the resistance corresponding to this device.
In this case, if the heating element is in working condition, then the multimeter will demonstrate a value close to that obtained as a result of calculations. If the indicator is zero, this means that a short circuit has occurred from the inside of the heating element and it should be replaced with a new one. If the result corresponds to one, this means that the heating component has broken, and the heating element needs to be replaced with a working one.
Check for current leakage. In this case, you need to connect one wire of the multimeter to the surface of the electrical appliance, and the second to the contact connections of the multicooker. As a result of this, the measuring device should show a value that will equal infinity.
How to check the heater in the electric stove
A multimeter is used to diagnose the heating elements of an electric stove. In this case, such an indicator as resistance is checked. The value of this characteristic corresponds to several hundred ohms. If the resistance value is underestimated, this indicates the occurrence of a short circuit in it. When the indication is equal to infinity, it will be clear that the element has broken. These situations described above involve the replacement of a defective heating tool.
Electric stove burners have four leads. At the same time, they contain two heating components. These components have different sizes of power and resistance.
The heaters should not be interconnected with the body. For such an examination, you need to switch the multimeter switch to the range that corresponds to the buzzer. One of the probes is connected to the output of the heating element, the second conductor is connected to the surface of the appliance. If the dialer beeps, then a current leak has occurred. Such a component also requires replacement with a serviceable one.
We check the heater with a multimeter - step by step instructions
- Breakdown - such a
xn----7sbeb3bupph.xn--p1ai
How to find out the power of a heating element by resistance. How to check the heating element of a washing machine: with a multimeter, tester, without a device
How to check ten for serviceability with a multimeter
At the heart of many household and industrial appliances, a tubular electric heater, abbreviated as a heating element, is used. This is a ceramic, glass or metal tube with a coil heated by electric current. Inside the tube is filled with electrically insulating and heat-conducting material. The reason for the failure of the heating device is often a breakdown of the heater. How to quickly check the heating element for serviceability with a measuring device with a multimeter is described in this article.
What devices use heating elements and how does it work
The range of application of TEN is very wide. The life of a modern person requires the use of a variety of techniques that help save time, make life convenient and comfortable. Washing and dishwasher, electric stoves and ovens, electric boilers. Irons, kettles and kettles. Warm floor. Here is a far from complete list of household appliances that use electric heaters. This is not counting the unimaginably greater number of devices that are used by the industry.
Regardless of the appearance and model, all heating elements have the same device and principle of operation and design.
When an electric current passes through the spiral of a tubular electric heater, it heats up very strongly. The filler of the tube, which is the body, protects against electric shock and effectively transfers the received heat to the environment, ensuring its sufficient heating. To ensure safety and increase the comfort of use, many electric heaters are protected from overheating by means of a thermal sensor that turns them off when the set temperature is reached and is connected to the power supply circuit of the device in series with the heating element.
Knowing how to properly use a multimeter for performance testing and repair will help in identifying the problem.
How to check the heating element with a multimeter
It is imperative that all troubleshooting work be carried out with the device disconnected from the power supply. Failure to do so may result in electric shock and personal injury. In order to ring the heating element for operability, it is necessary to know the nominal value of the electrical resistance (R) of a particular heater. It is easy to calculate using the elementary formula from Ohm's law. Knowing the value of the supply voltage (U) and the power consumed by the device from the network (P), according to the formula R \u003d U squared / P. For example, the device is powered by a 220 V network, its power is 1.5 kW (1500 W). Then the resistance of the heating element is 220 squared divided by 1500 and is 32.27 ohms. For practical application, we accept the value of the electrical resistance of the heating coil of about 30-35 ohms.
To check the heating element for integrity, we act in the following sequence. After making sure that the device is disconnected from the power supply, we disassemble it in order to gain free access to the terminals of the heating element, and disconnect them from the rest of the device, having previously marked the wires.
Marking will ensure correct connection during reassembly.
Having set the required resistance measurement range on the multimeter, we connect the probes to the heater contacts.
The tester readings in the region of the calculated figure (30-35 ohms for the given example) clearly indicate the absence of a break or short circuit in the spiral. If the heating element is multi-pin, you need to check the integrity of each part of the spiral in turn, touching all the pins in pairs.
Next, you need to make sure that during operation the insulation of the tube filler has not been disturbed and measure it for a breakdown. To do this, select the resistance measurement mode at the highest possible limit. Having installed one probe on a metal case, with the second we touch all the heater leads in turn.
If the device shows any resistance of the heater, then there is a serious malfunction that requires replacement of the heater. Continued use may be hazardous to health.
How to check the water heater temperature sensor
The boiler is structurally provided for the presence of a thermal relay, a device that turns off the water heater when the water heats up to the desired temperature. After the water cools down a little, the boiler provides re-start for heating. First you need to check the heating element, making sure that it is working. Remove the thermostat from the boiler body and disconnect the wires. Having turned on the dialing mode or measuring the minimum resistance, with one probe of the multimeter we stand on any terminal, and with the second we touch the remaining one.
The device should show the presence of contact between the terminals.
To check the performance of the regulator, you need to connect a multimeter to its contacts. After making sure on the device that there is a working circuit, lower the regulator rod into a container with very hot water. A click of the contacts and an open circuit on the multimeter will indicate the operation of the temperature sensor. When removed from hot water and cooling down, the sensor should click again and the circuit will be restored, which will definitely indicate that it is working.
The water heater is powered by a 220 V mains, therefore, as when checking the heating element tube, it is necessary to check the sensor for a breakdown. To do this, we check the absence of contact of any terminals with the metal elements of fastening the sensor to the body.
How to check the heating element of a washing machine
You can check the heating element and the temperature sensor of the washing machine using the already described methods of electrical verification, not forgetting the obligatory disconnection of the 220 V voltage from the mains.
After removing the wall of the machine, behind which the heater is located, disconnect the wires and, if necessary, remove it from the housing. In order not to confuse the wires, pre-mark or photograph their original location. Then you need to ring the heating element of the washing machine for the integrity of the spiral and the absence of breakdown using the appropriate measurement modes.
The temperature sensor of the washing machine, depending on the model, can be of a different design and have different verification methods.
Test Methods for Other Instruments
Checking other devices using heating elements does not have fundamental differences in the methods and methods used in their repair.
How to check the heating element of a water heater with a tester, multimeter, using a light bulb, without a tester, for performance or breakdown?
There are several ways to check the water heater heater with a tester and without it. First of all, you should calculate the resistance for your boiler. Calculation formula: R=U*U/P. U is the voltage, which is equal to 220 V, P is the power of the device.

For example, the resistance for the Ariston BLU R 100V model with a power of 1500 W will be calculated as follows: R \u003d 220 * 220 / 1500 \u003d 32.3 Ohms. And for a Termex ER 200V water heater with a power of 6000 W, the resistance should be: R=220*220/6000=8 Ohm. The power value is written in the instruction manual and on the factory sticker at the bottom of the tank.
First of all, the device is disconnected from the mains. After that, the protective cover from the bottom of the water heater is removed. To do this, the screws are unscrewed with a Phillips screwdriver, and it is pryed off to open the latches. The insulation is removed from the connection to the tubular electric heater, the wires are disconnected and you can start checking.
There are the following ways to test the heating element for serviceability:

xn----7sbeb3bupph.xn--p1ai
How to check the power of the heating element. Is it possible to check the power consumption of a water heater (heater) in kW with a tester.
How to check the heating element? - Diodnik
How to check the heating element of the kettle?
How to check the heating element with a tester?
How to check the heating element? - Diodnik
TEN - one of the key elements of most heating devices. When it fails, it becomes impossible to use the equipment, and sometimes dangerous. As we know, often service centers fight for three hours for repairing a washing machine or boiler in which the heating element has failed. This article will answer the question of how to check the heating element, and we will also try to tell as much as possible about the pitfalls that occur when replacing the heating element yourself.
There are several ways to check the heating element on a water heater or washing machine. The simplest ones are dialing with a control light and checking with an ohmmeter.
How to check the heating element on a water heater or boiler?
The very first step is to check the integrity of the heating element thread with an ohmmeter. Often, heating elements have a resistance of several tens of ohms. To do this, you need to get to the heating element and measure the resistance at its terminals. At hand there is a heating element from an old boiler, using its example we will conduct a check.
To check the integrity, it is not always necessary to remove the heating element completely, just connect the device to the contacts.
If the spiral is working, then the next step in the test is a breakdown test. If the heating element penetrates the body, then it is already dangerous to use it.
If there is no digital or pointer multimeter at hand, the heating element can be checked using a test light by connecting it in series to the heating element.
How to check the heating element of the kettle?
Checking the kettle is carried out by analogy with other heating elements. It is enough just to measure its resistance. If the heater of the kettle is faulty, most likely such a kettle cannot be repaired.
How to check the heating element with a tester?
When there is no digital multimeter at hand, you can use a dial tester. The principle of verification is similar. By the deviation of the arrow, it is enough to simply determine the health of the spiral. For clarity, we check the dryer with a tester. Alas, the heating element of this drying, as we see, is non-working.
If you decide to replace the ten yourself, you must follow a few rules:
- Replace the heating element only with a similar one in shape and power. It is very difficult to change the shape of the ten.
- Heaters and boilers are connected to the network only when the heating element is immersed in water.
- All heating elements, even new ones, should be checked for breakdown on the body.
- In washing machines and boilers, hermetically pack the place where the heating element is attached to the tank; it is unacceptable for water to enter the contacts and terminals.
- After repair, be sure to check the normal operation of the thermostat. A faulty thermal relay sometimes leads to overheating of the heating element and provokes its failure.
In contact with
Classmates
Comments powered by HyperComments
How to ring (check) the heating element of the washing machine? in photo
How to ring (check) the heating element of the washing machine? in photographs.

How to evaluate performance?
We find the heating element
In order to check the health of the heating element, you must first gain access to it - and for this you will need to disassemble the washing machine. For most modern models, the heating element is located either in the front or in the back of the case.
Having found the heating element, you can immediately dismantle it, but experts advise you not to rush into this until you are convinced of its malfunction. Therefore, to begin with, simply disconnect the wires going to the heating element.
xn----7sbeb3bupph.xn--p1ai
We check the heater with a multimeter - step by step instructions
A tubular electric heater is an effective means of heating. But its malfunction is a common problem. Especially often they buy a new heating element for a boiler. In the event of a breakdown of household appliances, it is important to make sure that the source of the breakdown is this particular part.
Multimeter and heater - how to check
Any heating element can fail. But most often, malfunctions occur with tubular electric heaters, which are affected by water from the water supply. Checking the heating element using a multimeter includes the following steps:
- Visual Inspection - An external assessment of the condition of the part is important. In some cases, it is noticeable by visual signs that the heating element is faulty. To inspect the element, you need to turn off the device, disassemble the body of the equipment and remove the heater.
Before making a conclusion on external signs, clean the surface of the heating element.
- We determine the resistance value - if the part is in good condition by external signs, then before checking it is necessary to calculate its resistance. To do this, we take the voltage in the network (squared) and divide by the power of the heating element (the value is indicated in the product passport): R = U2 / P.
- We check the resistance - in the multimeter we select the mode for checking the resistance and touch the contact terminals. A normal working heating element has a resistance value above 20 ohms. If the device shows "0" (short circuit), then the heating element needs to be changed. Sometimes it happens that during the verification process a network break occurs - then the multimeter shows the value "1" or tends to infinity.
- Breakdown - such a test is carried out in the buzzer mode. One probe - on the contact output, the second - on the body of the heating element. If there is no sound signal (squeak), then the heating element is working.
A multimeter is a multifunctional device that any of us can use. Without this measuring device, unfortunately, it is impossible to reliably state that the tubular electric heater is faulty. Then is it necessary, for example, to look through the catalog of heating elements for washing machines.
Basic knowledge and a multimeter will help you quickly and easily test any tubular electric heater.
When do you need a new heating element
In the online store "Refrozen" you can buy a variety of spare parts, including the heating element of the dishwasher. Contact us - we do not disregard any of the calls!
refrozen.ru
How to check the heating element? - Diodnik

TEN - one of the key elements of most heating devices. When it fails, it becomes impossible to use the equipment, and sometimes dangerous. As we know, often service centers fight for three hours for repairing a washing machine or boiler in which the heating element has failed. This article will answer the question of how to check the heating element, and we will also try to tell as much as possible about the pitfalls that occur when replacing the heating element yourself.
There are several ways to check the heating element on a water heater or washing machine. The simplest ones are dialing with a control light and checking with an ohmmeter.
How to check the heating element on a water heater or boiler?
The very first step is to check the integrity of the heating element thread with an ohmmeter. Often, heating elements have a resistance of several tens of ohms. To do this, you need to get to the heating element and measure the resistance at its terminals. At hand there is a heating element from an old boiler, using its example we will conduct a check.
To check the integrity, it is not always necessary to remove the heating element completely, just connect the device to the contacts.

If the spiral is working, then the next step in the test is a breakdown test. If the heating element penetrates the body, then it is already dangerous to use it.

If there is no digital or pointer multimeter at hand, the heating element can be checked using a test light by connecting it in series to the heating element.

How to check the heating element of the kettle?
Checking the kettle is carried out by analogy with other heating elements. It is enough just to measure its resistance. If the heater of the kettle is faulty, most likely such a kettle cannot be repaired.

How to check the heating element with a tester?
When there is no digital multimeter at hand, you can use a dial tester. The principle of verification is similar. By the deviation of the arrow, it is enough to simply determine the health of the spiral. For clarity, we check the dryer with a tester. Alas, the heating element of this drying, as we see, is non-working.

If you decide to replace the ten yourself, you must follow a few rules:
- Replace the heating element only with a similar one in shape and power. It is very difficult to change the shape of the ten.
- Heaters and boilers are connected to the network only when the heating element is immersed in water.
- All heating elements, even new ones, should be checked for breakdown on the body.
- In washing machines and boilers, hermetically pack the place where the heating element is attached to the tank; it is unacceptable for water to enter the contacts and terminals.
- After repair, be sure to check the normal operation of the thermostat. A faulty thermal relay sometimes leads to overheating of the heating element and provokes its failure.
Comments powered by HyperComments
diodnik.com
How to check the heating element of a washing machine: with a multimeter, tester, without a device |

When the washing machine suddenly stops heating water, this becomes a real problem, as it significantly affects the quality of the wash. In cold water, it is impossible to remove stubborn stains, moreover, the washing powder does not dissolve well, and the laundry after such washing sometimes acquires an unpleasant, musty smell.
There may be several reasons why heating does not occur. Most often, the matter is in the breakdown of the program module or heating element - a tubular heating element. As practice shows, the most common reason is the latter. The heating element often becomes unusable due to plaque, which occurs under the influence of hard water or low-quality household chemicals.

We will tell you in detail about how to independently diagnose a heating element and about preventive measures in today's article.
In order to check the health of the heating element, you must first gain access to it - and for this you will need to disassemble the washing machine. For most modern models, the heating element is located either in the front or in the back of the case. Finding it is pretty easy in three ways:
- compare the front and rear walls of the unit - which one is larger, under that one the heating element is usually hidden;
- turn the washer on its side and find the heating element by removing its lower part;
- unscrew the top cover and, turning the machine to the side, find the heating element.
Having found the heating element, you can immediately dismantle it, but experts advise you not to rush into this until you are convinced of its malfunction. Therefore, to begin with, simply disconnect the wires going to the heating element.

The most affordable way to diagnose heater problems is to measure its resistance. In order to determine it, we need to find the value of all elements of the formula:
R = U² / P, where R is resistance, U is voltage, and P is power.
The voltage that is supplied to the heater is equal to the mains voltage: it is usually 220 volts. You can find out the power of the heating element in the corresponding section of the manual for the washing machine. If this information could not be found there, there is data on the Internet regarding all existing models. Most often it is 2000 watts.
Now we substitute the found values, calculate, and get the desired value. According to our values, R = 220² / 2000 = 24.2 ohms.
The resistance obtained as a result of the calculation is an indicator at which the heating element can function normally. In the event of a malfunction of the heating element, the resistance may change, resulting in interruptions in water heating. You can check the resistance with a multimeter - a device that allows you to measure various indicators of electric current.

Before you start measuring, make sure that the washing machine is unplugged.
Then set up the multimeter: start the resistance measurement mode, and set the value to 200 ohms. Attach the probes to the terminals of the heating element. The measurement result should appear on the screen of the device.
If the resulting number is equal to or close to the one we found using the formula, then everything is in order with the heating element. The number "1" means that there was a break inside the heating element. The number "0" is displayed in case of a short circuit. In both cases, the heating element will have to be replaced.

Do not forget to check the heater body itself for integrity. How to do this, see the next video.
Is it possible to check the serviceability without a special tester?
If you do not have a multimeter at hand, you can test the heating element of the washing machine in other ways. The first of them does not require disassembly of the unit. To make sure that the heater is functioning properly, run the wash at the highest temperature setting. Then carefully monitor the rotation of the electric meter wheel - if it starts to gain momentum, then the heater is most likely working.
The second way to diagnose a heating element is a visual inspection. If cracks or black spots are found on the body of the device, the heating element must be replaced.

- In the process of installing a new heating element or returning the old one to its place, carefully check the connections - they must be completely tight, otherwise the lifetime of the heater (and, possibly, the entire washing machine) will be very short.
- You can extend the life of the heating element by arranging periodic maintenance for it. The most affordable remedy is citric acid. Just run the wash with an empty tank, adding a couple of tablespoons of citric acid instead of powder. But do this no more than once a year, otherwise you can damage the metal elements of the washing machine.
You can learn about other preventive measures by watching the Ukrainian program "Everything will be kind."
 What are welding fixtures?
 Hardening the cutting edge of a knife with graphite How to harden a knife yourself
 What is the ideal option?