Paper snail. DIY paper toy for children Snail. Master class with photos Edible snails without snails
Making a paper snail will not take much time, as it is done very easily and quickly. The only slightly difficult part of the work is the maple leaf. But the template of any sheet can be printed on the Internet or redrawn, and then used as a homemade stencil.
What will you need for the craft?
- Brown and green colored paper;
- Moving eyes, if there are none, you need very little white and black paper;
- Scissors, a simple pencil, a glue stick.

How to make a snail out of paper?
Prepare a maple leaf stencil, trace it on green paper and cut it out.
Depending on the size of the leaf, cut a strip of brown paper and cut out tendrils on one side. I have a large stripe, 3 cm wide, and 22 cm long, including the mustache.
You will also need two black circles, which will be located at the tips of the antennae. If there are no eyes, make them from white and black paper: cut out two circles or ovals, the black ones are smaller than the white ones. Glue the black pupils inside the white circles and you will get great eyes.

Once all the components are ready, start assembling them into a single whole.
Roll a strip of brown paper into a loose roll. Make a smaller ring inside and secure it with glue. You also need to glue the area of the neck or head with a large ring so that the roll does not unwind.

After this, glue the eyes of the snail, black circles on the tips of the mustache, and attach the snail itself to the maple leaf. Depending on where you place the bonding point, a paper snail can look sadly down, surprised up, or thoughtfully forward. A green maple leaf, which may well be autumn yellow, needs to lift the tips up a little to create unevenness. After all, this is already a fallen leaf, it shrinks a little, crumples.

Crafts for the garden made of cement can be very beautiful and bright. The main thing is to carefully make the blanks and choose the right paint.
How to make a craft for the garden
Rainbow snails are relatively small crafts, but you shouldn’t make them small either - in this case they won’t look so impressive. The approximate diameter of the “house” of such a snail, that is, the shell, is about 30-40 cm.
- In order not to sculpt the product entirely from cement (it will be heavy), we will make an insert inside - for example, from a piece of polystyrene foam wood, etc.
- We wrap the insert with a piece of metal plaster mesh.
- We make a solution: cement/sand, water. The ratio of the first two ingredients is 1:3, water - how much the mixture will take so that the mass turns out to be of medium thickness. If it's too liquid, it won't mold; if it's too thick, it will crack when it dries.
- We sculpt a snail figurine, “spreading” the cement-sand mixture in layers. The form is simple, so there shouldn't be any difficulties.
- We make the lower part of the garden craft flat - for stability. Level the bottom on a board or table.
- Smooth the surface well.
- We place a film lubricated with oil (drying oil, machine polish, etc.) under the snail and place it in a shaded place. You can’t put it in the sun - the cement mortar should harden, not dry. If it is hot outside, it is advisable to periodically wet the surface of the figurine. You can cover it with plastic wrap, but do not wrap it so that air can still reach the workpiece.
- After 2-3 weeks, we polish the surface of the garden figurine and remove any unevenness. We use coarse, then medium, then fine sandpaper.
- Remove cement dust with a brush and wipe with a damp cloth.
- We apply a primer to the workpiece - preferably a mineral-based one, but acrylic is also possible. You can find your way around the store - on the cans that contain the primer compositions, it is usually indicated for which surfaces they are intended. Look for recommendations “for concrete” or under/for plaster. We treat the workpiece with a primer 1-2 times.
How to paint a cement snail
Painting a snail is elementary.
We paint the garden craft in the base color.
We are waiting for the paint to dry.
We draw two spirals - on one side and the other.
We select the right colors. Suitable:
acrylic paint, epoxy, polyurethane, water-based cement paint.
After the coating has dried, it is worth covering it with acrylic varnish - the snail will become even brighter, its “house” will sparkle under the sun.
Leave your review |
|
Have you ever watched snails? No, the question is not whether they were seen. Were they actually being watched? Believe me, it is a special pleasure to watch how gracefully they move, how slowly and smoothly they overcome obstacles, how they rise and fall along leafy branches. it is beautiful! So beautiful that it fascinates and surprises. It’s so beautiful that you want to join this world, do something with your own hands that will resemble the movements and lines that you want to admire. Craft snail with children- a simple way to prolong the pleasure received on a walk or on a picnic. Be sure to find time to do something amazing and wonderful with your son or daughter - something that will bring you even closer to your child, give you moments of joy and happiness, and remind you of the miracle that you observed in nature. DIY snail- a great idea for shared leisure time!
How to make a snail - 5 master classes:
1. Snail made from toilet paper rolls

Children's crafts are a positive thing in all aspects, except for one thing: as a rule, these are short-lived things, the creation of which often requires expensive materials. Nothing is a pity for children, no one argues, however, if there is an opportunity to save on consumables for children's creativity, why not do it?
2. Stone snail

Crafts made from natural materials are a special pleasure: they seem to breathe Life! Try making this funny and charming snail from stone and cardboard - it will not leave either you or your child indifferent. Simple and inexpensive, joyful and fun - what else is needed to make the time spent with your child remain in the memory for a long time?
3. Snail from... snail

In autumn, in the steppe, in the forest, in the meadows you can find abandoned snail “houses” - shells. It's a sad sight, isn't it? Collect them with your child and bring them home. After washing and drying, you can add details to the empty “houses” that will enliven the picture and turn abandoned “dwellings” into new funny snails. Will you try it?
4. Snail as a diaper holder

Do you think your child won't be inspired by this idea? And you invite him to make a gift for your niece or godson, little brother or funny neighbor girl - surely this snail craft will be perceived from a completely different angle! The result will be a fun and interesting thing that will be not only beautiful, but also functional.
DIY paper crafts for children 6-9 years old
DIY paper toy "Snail". Master class with detailed description.
Berdnik Galina Stanislavovna, primary school teacher at the Laryak correctional (special) comprehensive national boarding school of the VIII type.
Description: This master class presents the step-by-step production of a paper snail toy. The finished work can be used as interior decoration or a gift. The snail can be used as a role-playing game.
Purpose: The master class is intended for children of primary school age, educators, primary school teachers, technology teachers, class teachers, additional education teachers, and creative parents.
Target: Making a paper toy with your own hands.
Tasks:
1. Develop fine motor skills of the fingers, precision of hand movements, and eye.
2. Develop imagination and encourage creative initiative.
3. Cultivate accuracy, perseverance, and independence.
4. Develop interest in arts and crafts.
5. Develop visual-figurative thinking and creative abilities.
6. Development of the ability to draw a precisely specified segment.
Materials and tools: Colored double-sided paper, velvet paper, glue, pencil, ruler, scissors.

The most interesting thing about snails.
The snail is a herbivore. Herbivore means one that eats grass and other plants. The snail eats the green foliage of various plants. On the snail's tongue, like on a file, there are hundreds of small teeth, with which the snail cuts and grinds food.
The snail is moisture-loving. In dry weather, the snail hides under stones, in the shade of plants or in damp moss. Usually it spends the day hiding in its shell and comes out to feed at night. The snail is most active during the night and after a rainstorm. In hot, dry summers, the snail becomes lethargic, inactive, and falls into torpor. During this period, the snail climbs into the shell and covers the exit with a thin transparent film. As soon as the rains come, she comes out of hibernation.
In the fall, when it gets cool outside, snails bury themselves in the soil for the winter. In the spring, when it gets warmer, they awaken and leave their winter shelter.
The snail does not have only antennae horns, but two pairs - two and two. One small pair is the antennae that the snail uses to sniff. The second large pair are eyes. The antennae horns of snails are very sensitive: if they accidentally touch any object, the snail immediately removes them inside. Remember this. Some children love to poke the snail and watch it hide its horns. Never do this! No one can like being poked in the eyes.
The entire lower part of the snail’s body is a solid “leg”! When a snail crawls, a sticky liquid flows from its leg, which helps the snail move and stay on the surface.
Stages of completing the craft:
In this master class we present the step-by-step transformation of paper strips into a “Snail” toy.
1. From double-sided colored paper, cut 5 strips 1.5 cm wide. For our craft we chose orange, yellow, red, and brown colors.

2. Now you need to determine the length of each strip.
Strips of the following lengths: 8 cm, 12 cm, 16 cm, 20 cm, 20 cm.

3. Roll the four strips into a ring and connect them with a drop of glue.

4. We collect rings according to the “Matryoshka” or “Pyramid” principle. Connect one by one with a drop of glue. You will get this detail.

5. From the remaining 20cm long strip we will prepare a head-tail. Let's start with the tail. We cut the end of the strip on both sides.

6. For the head, round the strip in the direction of the tail and fix it with a drop of glue.

7. We connect the resulting parts as follows.

8. We decorate the face of our toy. Glue on eyes, antennae, mouth.

9. To give the snail something to rest on, we prepare for it a green sheet of velvet paper in the shape of a heart.

10. Make the snail more comfortable. The work is ready!

A snail crawls along the path
He carries his house on his back.
Crawling quietly, not in a hurry
Always looking around.
But, when you get very tired
And she wants to rest,
It can quickly collapse
And turn into a round ball.
Sometimes, in order to make an original craft from scrap materials, it is not at all necessary to make titanic efforts of creativity and manual skill. There are a lot of simple and interesting solutions. And if you need to make such a craft with your baby, then a paper snail is perfect for this purpose.
Below we will provide step-by-step photo instructions on how to make a paper snail with your own hands, with a full description of the technological process. All you have to do is stock up on scissors, paper and glue!
Look what a cutie we have at the finish line. It can become an independent craft or part of a large beautiful composition or panel. Literally fifteen minutes and we will repeat it.
We will need six strips of different sizes as blanks. See the photo below for the ratio of their lengths - this is the basis of the future paper snail. The size of the strips can be changed depending on what kind of craft you want to get in the end.

Set the longest strip aside. We glue the edges of the remaining five to form rings. Next, glue these rings together, as shown in the figure - one inside the other. We got a shell - a snail's house.


Now let's start making her face. Take the remaining strip. Cut out a piece on one side as in the picture. We get antennae, draw eyes, a nose and a smile with a felt-tip pen. Note. That eyes can be glued on from a cut out piece of paper or made from decorative materials.

We bend the resulting strip with its muzzle outward and glue the previously made shell on top. That's all, your homemade paper snail is ready.

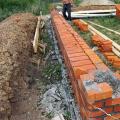 DIY brick foundation: strip and columnar
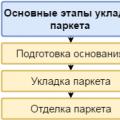 How to lay parquet: methods, necessary tools and step-by-step process for proper installation
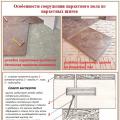 How to lay parquet: methods, necessary tools and step-by-step process for proper installation