Sheds attached to the house: photos, varieties, installation stages and design features. Construction of a shed with a pitched roof: step-by-step analysis of construction work How to make a beautiful large shed for your house
Reading time ≈ 13 minutes
We can say that the private sector is a vast field for home-grown craftsmen and designers, so the question of how to make a canopy for a house with your own hands, also quickly and cheaply, is quite relevant and important for many residents. Such a structure not only decorates the home - it protects it from precipitation, therefore, it increases the service life of covered structures, as a rule, a porch (terrace) doors and windows. A visor will also come in handy in hot sunny weather - in the shade you can simply sit down and relax in the fresh air.
Simple wooden shed attached to a house
What is needed for this
Since we are talking about simple and inexpensive canopies, first of all, all the elements from which the protective and decorative structure will be assembled must meet these criteria. But, despite the supposed low cost, you can always make a choice, since different materials can be used for the roof, rafter system (sheathing) and support posts, and their price will remain almost the same. You also need a certain set of tools, without which such an assembly is impossible and on which the quality of construction work also depends.
What materials can be used to build a canopy?

Metal tiles can be of different colors
This list lists the main materials for building sheds, which are relatively inexpensive, and also gives their brief characteristics:
- Metal tiles and corrugated sheets are sheet coverings with a large margin of mechanical strength. Powder painting on metal does not react to ultraviolet radiation (sunlight), therefore, does not lose its original color. The service life here is practically unlimited.
- – it can be cast or cellular, but for canopies it is better to use the first option (my opinion). In terms of mechanical strength, its performance is 200 times higher than that of glass of the same thickness and 100 times higher than that of acrylic. Sheets can be completely transparent, matte or have many other shades according to the RAL table (color table).
- Asbestos-cement slate - the name of the material indicates what it is made of, that is, from asbestos and cement. Sheets can be flat or wavy. The second option implies the presence of 5, 6, 7 and 8 waves (for roofing work it should be the same). In production and operation, corrugated asbestos-cement slate must comply with GOST 30340-95, and flat slate GOST 118124-95.
- Fiber cement slate - sheets consist of cement and mineral fillers, which are reinforced with cellulose fibers (fiber). This is a very durable material that can withstand heavy mechanical loads, such as a blow from a branch. At the household level, it is used very rarely as a roofing material.
- Lumber – timber, boards, timber, moisture-resistant plywood, OSB. For vertical supports, a board of 50×100 mm, 50×70 mm is usually used, or it can be a beam of 100×100 mm. For the Mauerlat (load-bearing beams) and rafter legs, boards of 50×100 mm and 50×70 mm are also suitable. Bars of different sections are often used to create fencing, and plywood and OSB are used as roofing.
- Metal profile – a hollow profile of round, square and rectangular cross-section can be used. For support posts, as a rule, a pipe with a diameter of at least 60 mm, a square with a cross-section of at least 60×60 mm, and a rectangle with a cross-section of at least 70×40 mm are used. For rafter legs, a 20x50 mm profile mounted on an edge (50 mm in height and 20 mm in width) is suitable.
- Fasteners - self-tapping screws for wood and metal with and without a press washer, bolts with nuts and washers, steel angles and plates.
What tools may be needed

Electric hand-held circular saw
The following tools may be needed for work:
- A hand-powered circular saw, but you can also use a wood saw.
- Angle grinder (grinder) with cutting disc for metal.
- Electric or cordless drill with a set of drills and attachments.
- Hammer with a set of pobedit drills.
- Electric welding of direct or alternating current.
- Measuring tools - levels of different types of action, plumb line, tape measure, construction square, chokeline, pencil.
The basic design principle of all awnings

The simplest frame design for a canopy
In this case, we are not talking about free-standing canopies, but about structures that are adjacent to the wall of the house, that is, one edge of the roof is against the wall, and the other is on supporting pillars. Most often, the connection is made to a horizontal beam, which is screwed to the wall with regular or anchor dowels, but in order to attach a canopy to the house, it is not necessary to make holes in the wall. In some cases, vertical posts are installed close to the building and the support beam is fixed to them - if the overhang from the roof is properly installed, this method is almost justified, it eliminates any leakage.

Simple matte polycarbonate canopy
Since we are talking about how to make a canopy for your house with your own hands quickly and cheaply, it is quite natural that it will be a single-pitched straight roof, as in the photo above. But if we talk about canopies as architectural decorations, they are sometimes made rounded, and sometimes even double, in the Chinese style. But in this case it is better to focus on speed and ease of execution.
General stages of shed construction. Sequence

The principle of assembling a wooden frame adjacent to the house
If we talk about the construction of canopies near a house with wooden frames, then all work can be divided into the following five stages:
- Attaching a load-bearing beam to the wall, which can be a board or even a 50x50 mm block.
- Installation of vertical supports at the required distance from the building, taking into account the already installed load-bearing beam.
- Installing the Mauerlat on support pillars - this beam is mounted so that it is strictly parallel to the first beam, and is also located lower to create a slope.
- Fixing rafter legs or sheathing under the roof. Performed using different methods.
- Attaching the roofing material to the finished frame.
Note. The assembly of a frame from a metal profile differs only in the execution technique. That is, if lumber units are assembled using corners, overlays and self-tapping screws, then electric welding is used for this purpose. But fastening the profile to the wall, both wooden and metal, is carried out in the same way, using ordinary or anchor dowels.
Canopy over the front door
It should also be noted the importance of another type of work, on which the method of installing the canopy frame directly depends - this is the construction of a porch or terrace. The fact is that the base of the support pillars can simply be filled with concrete screed and this is an excellent fastener, but in some cases the pillars have to be mounted on the surface of the porch or terrace, using reinforced steel corners. In this case, the mechanical strength of the fixation is also good, but at the same time the aesthetic indicators are somewhat reduced, although if desired, the corner can be decorated with a wooden or plastic plinth.
Assembling a wooden and metal frame

Attaching a horizontal support beam to a wall
As mentioned in the first step of the instructions above, first of all you need to attach a load-bearing beam to the wall on which the rafter system or the roofing material itself will rest. In some cases, home owners do not want to make holes in the wall for fasteners, citing the fact that the cladding of the house will be damaged, but personally I think this approach is unfounded. Firstly, if a canopy is installed over a terrace or porch, then it will last for a long time, if not forever, and, secondly, if necessary, such holes can be easily sealed with a material identical to the cladding.
The only option when attaching a load-bearing beam directly to the wall is impractical is to decorate the house with siding of any type (metal, vinyl, acrylic), since there is emptiness underneath and the panels themselves are soft. In such a situation, the support beam is mounted on racks that are installed close to the building. But even here you cannot do without fastening to the wall - firstly, you need at least one anchor per pole to maintain a strictly vertical position and at least one anchor per horizontal beam for rigidity. It will not be possible to not attach a wooden frame to the wall at any point - wood is not such a mechanically strong material to make it into a completely autonomous structure on four supports - to avoid play, you will have to install jumpers according to the triangle principle, and this is unnecessary trouble.

One of the types of fasteners for wooden supports
Often or are made by pouring concrete into the formwork, so the vertical posts can either be concreted by pouring their base, or special metal brackets (see photo above) on which the pillars will be held can be concreted. But this is not the only way to install brackets. Firstly, a threaded pin can be screwed into a plastic dowel, which is very easy to install in a concrete screed by drilling a mounting hole under it with a hammer drill. Secondly, it is easy to make such a bracket yourself for any cross-section of the support: to do this, bend a steel strip in the shape of the letter “P”, drill mounting holes on the sides and in the center and attach it to the screed with an anchor dowel.
Note. If you use a homemade bracket, then you will need to drill a hole (sunk hole) under the head of the bolt in the support, and use a chisel to select a shallow groove under the strip so that the base of the post completely sits on the screed.

Perforated reinforced steel angle for fastening
In cases where a wooden support needs to be installed on a plank flooring or on a terrace board (this is WPC - wood-polymer composite), then reinforced steel corners are used as fasteners - they are quite sufficient for the rigidity of the installation. As a rule, corners are screwed along the terrace or porch on two sides of the post, but sometimes, for insurance, such a corner is also screwed on the inside of the post. The distance between the supports should not exceed two meters so that the Mauerlat beam does not bend when there is an excessively large layer of snow.

Ready-made steel supports with flanges for fastening
In the top photo you see ready-made steel supports with flanges for fastening, manufactured at the factory - such profiles are very convenient to use. The flange has four mounting holes through which the stand can be fixed with regular or anchor dowels, placing a washer under the head of the self-tapping screw or anchor bolt so that the head does not fall inside. In some cases, a porch or even a terrace can be made of sheet steel, and then electric welding is used for fastening without any dowels or anchors. The flange is simply welded around the perimeter and this is the most reliable fastening.

Installing the rafter leg on the supporting beam using special steel fasteners
After installing the supports, you can proceed to attaching the front load-bearing beam (mauerlat) and rafter legs, which also act as sheathing for the roofing material. It is most convenient to fix the front beam using steel reinforced angles or even long bolts with nuts and washers, however, this does not matter, the main thing is that the units fit well together and there is no play.

Special fasteners for rafter legs
For perpendicular joining of wooden profiles (rafter legs and load-bearing beam), it is very convenient to use special steel fasteners, like what you see in the top photo. But if suddenly there is no such fastener, then it can be replaced with reinforced corners on both sides of the rafter leg - this is your private property and in such situations no one has the right to regulate anything.

This is what a simple assembled lumber frame will look like
If you used lumber (timber, board) to assemble the frame, then you seem to be dooming your structure to fragility in advance - the wood will quickly rot, and before that it will lose its attractiveness (it will turn black). To get rid of such consequences, supports, beams and sheathing should be treated with an antiseptic, and to maintain attractiveness, coated with clear or tinted wood varnish. Often the timber is first opened with stain and then topped with colorless varnish.

Shed with steel frame
If you decide to build a simple canopy with a metal frame, then it is assembled in the same way as a wooden one - without bends or decorative overlays. All the same straight lines, only electric welding is used to join the nodes, and sometimes bolts with nuts and washers. But if we are talking about speed, then, of course, it is better to use welding.
Roofing installation

Installation of polycarbonate on the roof
Either cast or cellular polycarbonate is used as roofing. Personally, I prefer the first option, but my opinion cannot be categorical - some people prefer honeycomb sheets, especially since transparency is not needed for the roof, otherwise it will not protect from the sun. In any case, if these are cast plates, then it is better to choose tinted ones (yellow, green, blue, pink) - the sun's rays do not penetrate through them so much.
Polycarbonate canopy for $84
Polycarbonate sheets are attached to the sheathing using self-tapping screws with a press washer, which completely covers the hole, eliminating any leakage. The PC is joined using a special split profile, and at the edges for the cellular version, an end profile is put on, which is best placed with glue.

The principle of installing corrugated sheets
Corrugated sheeting, just like , is laid overlapping and fixed with special self-tapping screws with a press washer. Since the press washer in this case has a rubber gasket, the self-tapping screw can be screwed in not only along the wave crest, as on slate, but also between the waves - the rubber gasket prevents leakage. The screw heads are matched to the color of the roof.

The principle of laying slate
The slate is laid overlapping, starting from the bottom row, it is attached to the sheathing with slate nails through the crest of the wave, but they are not hammered in completely, leaving a 1-1.5 mm gap for thermal deformation. It is strictly forbidden to bend nails from the inside of the slope - due to thermal deformation, this will cause cracking of the slate. If you still want to get rid of the sharp protruding ends, then simply cut them off with a grinder.
Conclusion
We have now figured out how to make a canopy for your house with your own hands, quickly and cheaply. The most expensive option of all those discussed above is a metal tile roof and a metal profile frame, and the cheapest is a slate roof and a lumber frame.
Polycarbonate canopies are elegant and durable, serving for relaxation and protection from bad weather. Do-it-yourself construction does not require any special skills, but you should know some nuances.
How to choose the right cellular polycarbonate?
Cellular polycarbonate is one of the modern materials from which you can build a canopy with your own hands. Panels made of several plastic layers are firmly connected by vertical stiffeners. They have high quality characteristics: durable, easy to install and bend, giving the shape of an arc. The special structure of the material creates protection from ultraviolet radiation.
Honeycomb panels require special handling:
- 1. After purchasing, we do not store them in the light. If there are suspicions that the seller has violated this condition, we refuse to purchase from him.
- 2. When purchasing, we do a spot check of several plates: with the help of another person, lightly tighten them with a screw. Panels with defects crack.
- 3. We remove the protective film after completion of construction. Standard fasteners allow you to do this without problems.
- 4. We install quickly, preferably within one day. If we don’t have time, we remove the protective film and resume work in a few days. We do subsequent installation carefully: the slabs without protection are easy to scratch.
- 5. Place on the UV-resistant side. It is marked on the film.
These precautions are due to the fact that the UV protection consists of a thin layer, reminiscent of glue on tape. When the sheets are left in the light, a reaction begins, the protective layer becomes unusable, and it becomes impossible to separate it. In addition to the fact that the canopy does not protect from ultraviolet radiation, the strength of the slabs decreases. When choosing a material, we focus on the purpose and type of the future structure. We take into account the characteristics of the climate zone: wind strength, amount of snow falling. A wise choice will help you avoid unnecessary expenses. Thin sheets will require more frequent lathing, while sheets that are too thick will make the structure heavier and cost more.
The sheets are marked, which consists of numbers and letters. The number in front of R indicates how many longitudinal sheets are in the panel, the letter X indicates that the stiffeners are located diagonally. The larger the number in the designation, the thicker the material; a larger bending radius is allowed. For carports, depending on their area, wind strength and amount of snow, we use panels with the number 2 or 3. For carports we use the 3RX brand, which is also suitable for conventional structures. In areas with heavy snow and strong winds, 5R is recommended, but be aware that this X grade is very tough.
Types of structures – which roofing scheme should you choose?
The canopy can be given almost any shape, but the most popular are arches with one or two slopes. Arched canopies attract with their graceful shapes. They can be made in the courtyard of a private house as a shelter for vehicles, they are used to create transitions between buildings, and they serve as a porch at the entrance.

This shape creates special resistance to weather conditions. Snow does not stay on the surface, rain flows down on both sides, and it is difficult for the wind to damage the structure due to the downward oriented sidewalls. The arched canopy above the front door looks attractive. When making it yourself, only one problem may arise related to bending the profiles.
Arches can be built in the form of a cascade. They are used in places with a large roof slope, for example, above a high staircase leading to the front door. If you build a canopy of one arch over such a large space, it will have to be given a strong forward slope. Rain streams will pour not only on the sides, but also on the first steps, hitting people. The cascading arrangement of individual elements will eliminate this drawback. The structure looks very beautiful, but it is more difficult to build than a simple arched one.

Construction of a simple pitched roof is very easy. There is no need to bend profiles and panels; sheets of any thickness will do. No rafters are required, you can get by with longitudinal and transverse beams. But that's where all the advantages end. Firstly, such roofs look very simple. That is why they are used as protection from the sun and rain, or somewhere in the backyard as an extension to a garage, household. room. Secondly, the slope is small, a lot of snow accumulates.

A gable roof is more difficult to manufacture, but much more practical to use. The slopes go down on both sides, providing much better protection from wind and rain. The slope becomes greater, snow almost does not accumulate. The gable canopy is rigid and withstands even strong winds. The application of such a design is the widest: parking lot, barbecue shelter, barbecue, porch, pavilions in the yard for transitions.

Design – we calculate the dimensions and quantity of materials
When starting construction, we first find out for ourselves the size of the building and its location. We take into account climatic influences: snow cover thickness, wind strength and direction. In order for a building to fit into the overall design, its shape and color must be in harmony with the main buildings. The required technical characteristics of all materials depend on the listed factors.
Having decided, we proceed to making the drawing. On it we accurately indicate the dimensions, shape of the roof, materials of supports and frame. We calculate the required amount of all materials and fasteners. We take into account that for panel thicknesses up to 8 mm, a distance between frame elements of 600 mm is sufficient. For sheets of greater weight, select a longitudinal pitch of 700 mm, and a transverse pitch of 1 meter. The height of the canopy is based on ease of use: it should be at least slightly higher than a person’s height.

Please note that the panels have standard sizes. We place the sheathing so that the joints fall on it. We place the rafters in increments that are a multiple of the total width - 2.1 m or parts of the whole. We place the purlins at a distance exceeding the pitch between the rafters by 1.5 times.
We calculate support posts using the following indicators:
- the minimum size of metal pipes for supports and rafters is 40×40 mm;
- wall thickness – 2 mm;
- make the foundation base 10 mm wider, more is possible;
- the depth of the pits for supports is at least 0.5 m;
- for side rafter trusses we take a profile of 20 mm or more, for diagonal grids - 15 mm.

In addition to metal, wood is used to build a canopy. The rigidity of polycarbonate allows the use of beams with a small cross-section: 100×60 mm as the main ones and 60×40 mm for the auxiliary ones. The properties of polycarbonate are close to metal, but not wood. In combination with a wooden frame, it is similar to slate or ondulin.
If the roof area exceeds 8 m2, accurate calculations are required taking into account the load of wind and snow. They do this independently, using climate maps and special tables and formulas. Errors may result in deformation or collapse. You can contact a specialist or use a ready-made project.
Making a frame - from foundation to sheathing
It is advisable to use metal for the frame under a polycarbonate roof. It is durable and does not require particularly precise calculations; average ones can be used. For load-bearing elements, the optimal profile is steel pipes of square section, the corners of which are rounded. They are very easy to install, durable and inexpensive. Round ones are inferior only in ease of fastening.
We install support pillars on the marked area. There are quite a lot of options. For large-area structures that create a large load, the best option would be screw piles of a suitable diameter. We wrap them 1.2 m deep. They will cost no more than concreting, but can withstand a very heavy load. But if we decided on concreting, then we do the foundation correctly. Be sure to use anchors to which the pole, wooden or metal, is attached. This is how concrete blocks for the foundation are made. If you do them yourself, you can save a lot:
- we dig holes: 30 cm in diameter and 80 cm in depth;
- install fittings;
- pour concrete, cover with polyethylene and leave until completely set;
- We screw the support posts to the anchors.

At their tops we install jumpers that will connect the structure. We secure everything with electric welding. It is recommended to use rectangular or square pipes: round ones do not have enough area for a reliable welding connection. If the polycarbonate canopy is adjacent, we attach it to a special beam. We attach it to the wall with anchor bolts, and then attach the rest of the parts to it. To install it, draw a horizontal line at the desired height. We drill several holes for the anchors along it. We pull the beam towards the house, tightening the bolts well.
For a wooden canopy, we dig into the ground up to 1 m. This is better than installing beams in sections of pipes. First, soak the end of the wood well with hot bitumen or waste oil. Then we wrap it in roofing material and bury it in the ground. We attach timber along the top, which acts as beams, and rafters to them. We use boards for purlins and braces. Connections are made using metal corners.
The question arises about the required number of supports. The distance between them is permissible from 1.7 m to 6 meters. It all depends on the area of the canopy and the load it puts on the structure. Risers on a concrete foundation can withstand any amount of snow; strong winds are worse for them. For this reason, not only the maximum permissible distance should be taken into account, but also the minimum. The step between the supports should not be less than 1.7 m, otherwise in a strong wind it will be perceived as a solid wall.
For arched canopies at the dacha, you will have to bend profiles. There are several methods available at home:
- 1. We use a pipe bending machine. The purchased one is expensive, but you can make it yourself using the principle that can be seen in the photo.
- 2. We make cuts in the profile to a depth of 5–8 mm, bending them in the direction opposite to them. We apply patches to the resulting holes and weld them.
- 3. Fill the pipe with sand and heat it up. Smooth curves emerge, the walls do not flatten.

We continue assembling the frame, carrying it out on the ground. We assemble the trusses and weld them parallel with braced slats. We start from the edges, gradually moving towards the center. We install the finished structure on the longitudinal profile and grab it pointwise. We check the correct location and finally weld it. We install and weld purlins across the rafters. Let's check again. Minor deviations are possible: the metal “pulls” during welding. We correct in such places with a sledgehammer.

A wall-mounted canopy requires sidewalls. Using anchor bolts, we vertically attach a profile pipe to the wall opposite the outer trusses. From it we extend pipe sections to the point where the rafters connect to the outer supports. If necessary, we extend another profile pipe, placing it horizontally. We weld vertical jumpers between them. For all load-bearing elements of the frame it is permissible to use pipes with a side width of 40 mm; for auxiliary elements (purlins, braces) we use half-size profiles.
Laying roofing sheets – does durability depend on installation?
Once all the frame parts are in place, it's time to install the polycarbonate panels. If their dimensions need to be adjusted to the dimensions of the canopy, we resort to cutting. There is hardly a special machine in the house - professionals use expensive tools. Cutting with a regular circular saw or jigsaw is cheap, but leads to the formation of microcracks.
The best option is to use a circular hand saw. They are usually used for cutting laminate flooring. A special wheel is used with fine teeth that have a special profile and are not set. The saw must have a system that removes sawdust. Then the cut will come out clean, without chips. As a last resort, we use a mounting knife, but cutting with it is long and tedious.
The most common method of fastening polycarbonate is with thermal washers. The special fastening includes sealing and plastic washers and plugs for them. Everything is tightened with self-tapping screws. Attempts to replace thermal washers with conventional ones do not lead to anything good. In this case, the coefficients of thermal expansion do not match, the sheets warp, and the strength of the flooring weakens.

We maintain a distance of at least 30 cm between the fastening points. More frequent weakening of the panels makes them less durable due to the many holes. We install 3 fasteners per run. It is especially important to adhere to four points:
- screw the screws in strictly vertically;
- we tighten the fastenings moderately: over-tightening spoils the polycarbonate, and insufficient tightening does not provide the necessary strength;
- We place the holes for the screws at a distance of at least 4 cm from the edge of the panel;
- their diameter is 2–3 mm larger than the size of the screws.
In addition to thermal washers, fittings are used for fastening: end and split profiles and punched tape. The detachable one includes a base and a lid. We attach the base to the frame with self-tapping screws, and fasten the lid to it with a special lock. It is used at the junction of sheets. To seal the ends we use punched tape. We glue it along its entire length, then fix the end profile on it. It is needed not only for beauty, to give the structure a complete look, but also serves as a protection for the channels. Moisture and dirt do not enter the internal cavities, and the transparency of the material is maintained.

We maintain thermocompression gaps between the sheets, which are 3–5 mm. When the temperature changes, the sheets move without damaging the mount.
In order for a polycarbonate canopy at a country house to delight you with its beauty and convenience for a long time, you need to choose the right materials and adhere to installation technology. Easy care: wash with plain water without detergents.
It is difficult to imagine a modern country house without a canopy. This architectural structure serves two important functions. Firstly, it protects the building from rain and sun. Secondly, it is an excellent means of decorating the facade of a house. Hardworking and inventive owners of summer cottages have come up with a lot of ways to create an additional roof over their heads, which can be made from scrap materials and have a wide variety of shapes.
Types of canopies
The classification of canopies is extensive. Depending on the design features they are:
- inclined (double or single slope);
- straight;
- multifaceted (in the form of curved arches, domes, pyramids, polygons, arcs).
Depending on their location, canopies are divided into:
- free-standing, erected away from the main building (carports, landscape sheds);
- attached. They are erected above the entrance to the house or above the open veranda;
- built-in They are an integral part of the architectural ensemble. Most often they are built into a barbecue area or into an existing building;
- decorative. Serve as decoration for garden compositions.
If we talk about materials, canopies can be made of stone, wood, polycarbonate, or combined.

A wooden canopy is the most popular type, because it is easy to implement and does not require any special expenses for arrangement. Anyone can build such a structure if they have the desire.
DIY wooden canopy
Are you puzzling over the problem of how to build a wooden shed and don’t know where to start construction work? The first step towards realizing your cherished goal is developing a project.
Project development
Wooden shed designs are designed to analyze existing conditions. Especially if the structure will be attached to an already finished building. Information about the foundation and facade wall of the house is extremely important, as well as climatic conditions (wind load, snow thickness in winter, cardinal directions in the location chosen for construction).

In addition, it would not be amiss to think about decorative elements, types of roofing materials that are preferable in a particular case, and choose the shape and size of the canopy. The more detailed your project is, the easier it will be to put it into practice. Accurate numbers will help you correctly calculate the amount of required consumables. The easiest way is to make a wooden canopy over the porch that will be reliable and stable.
When developing a project, you should take into account the working dimensions of roofing materials. Lay the slate sheets overlapping on the ground across and along the waves. Only after receiving the exact dimensions of the clean roof can you begin.
Installation of racks
The design of a wooden canopy can be made from any wood, but pine will best cope with its responsibilities. It is beautiful, durable, light in weight and can fit seamlessly into any exterior.
The tree can be freshly cut, the main thing is that there is no bark on the beams. The recommended cross-section is no less than 75x75 mm. The part of the beam installed on the ground is treated with bitumen mastic before installation, which protects against the negative effects of moisture. The pillars are installed at a distance of a meter from each other so that the roof hangs over the front by at least 200 mm, on the sides (along the waves) - by 50-100 mm.

Using a hand drill or shovel, we prepare wells located along the same line, 500 mm deep. Do not forget to check the diagonals of the canopy - they must be the same. Using a plumb line or a building level, we install the slats. Strictly vertical. For fixation we use auxiliary bars, which can then be removed without any problems.
The free space is filled with concrete or crushed stone. The second option is more profitable. Crushed stone costs nothing, does not require complex mixing, and “holds” just fine. After installing the pillars, they must be cut in height with a bevel corresponding to the slope of the plane so that the rafters lie on the upper ends of the beam. Using a tapping cord or hydraulic level, we get a horizontal line.
The height of the racks at the bottom of the slope should not be lower than 1800 mm. However, if you are planning a rack or table in this part, then this indicator can be made smaller.
Installation of rafters
Next, the installation of a wooden canopy proceeds to a simple, but requiring extreme care, stage - installation of the rafter system. Rafters are beams with a section of 150x50 mm. This strength will be quite sufficient to cover a 6-meter span. Subject to the slope and calculated weight, of course.

The distance between the rafters is about 1 meter. One side is attached to a wall or support board, mounted in advance, and the other is placed on the racks, passing the line at the site of the planned overhang strictly perpendicularly. Wood screws or steel angles are used to connect the components of the rafter system. Fastening to a mineral base, for example, a brick wall, is carried out using corners, consoles, dowels or metal anchors.
We carry out the sheathing
The sheathing is made on top of the rafters (perpendicularly). It is better to use edged boards with a width of 160 mm and a thickness of 30 mm. The boards are distributed along the axes at a distance of 900 mm.
The boards must fit under the joints and the middle of the slate sheets (size 900x1800 mm). The last and first lines should be along the edges of the slope. Screwing must be done using self-tapping screws.
Laying slate
The wooden shed for the dacha is almost completed. You can begin laying the roof covering. The slate is screwed onto the top of the wave using galvanized self-tapping screws equipped with a countersunk head. Experts advise placing special plastic washers under the heads. An average of 11 screws are required per sheet. If there are no washers, then they can be replaced with “Ranilov self-tapping screws” or fasteners with a press washer.

Slate manufacturers often complete their products with trapezoidal or round spacers, which allow them to securely fasten the screws without disturbing the wave shape. Slate sheets are mounted from bottom to top. The rows overlap each other by 100 mm. For reliability, it is better to keep the front and side overhangs minimal (50-100 mm). If necessary, slate is cut with a regular grinder with a diamond wheel.
Important nuances of work
Wooden elements require treatment with compounds that protect against precipitation, mold, mildew and create a decorative effect that is attractive to the eye. Impregnation can be either colorless or tinted.
Now you know how to make a wooden canopy. There are only a few points that require immediate consideration. Pay due attention to the floor. A simple backfill of coarse crushed stone, plank flooring, sandstone cladding, concrete screed - the choice of how to create the “soil” is yours.

Make sure there is light and a couple of outlets under the canopy. The functionality of the finished structure will be added to the grill, hob, and barbecue. Decor variations will depend only on your preferences - you can age the wood, decorate it with climbing plants, wooden shelves, and handmade vases. Think, try and make your dream of a corner of coziness and comfort in the lap of nature come true.
Wooden canopy: photo


Wooden canopy: video
Having a canopy next to your home is a very practical solution. It can be used as a parking space, under its roof you can grill shish kebab in inclement weather or sit with a friendly group over a cup of tea.
Erecting a canopy with the right choice of materials does not require large financial expenditures. This review will tell you how to build a good canopy, relying solely on your own strength.

To build a reliable and inexpensive structure, it is necessary, first of all, to choose high-quality material.

Canopy base materials
Wooden structures
One of the simplest and most reliable options is to build a wooden canopy. Such a structure is easy to maintain; in addition, its construction does not require expensive construction equipment, such as a circular saw or welding equipment.

Edged timber is ideal as a material for supports, rafters can be made from edged boards, and the sheathing can be easily assembled from obapol.

Almost anyone can afford to assemble such a canopy, and with the help of special solutions you can greatly increase the durability of the wood, which will allow you to use the canopy for many years.

Metal constructions
Another popular material for making canopies is metal. The metal canopy differs from its predecessor in strength and durability.

It is easy to assemble such a canopy with minimal skills in working with a welding machine.

Only a radius profile can be classified as complex parts, but this part with the necessary bend can be manufactured at your request in any welding workshop.

Brick or stone structures
The construction of support pillars from brick or stone allows you to give a stylish look to your canopy. In this case, the rafters can be either wooden or metal.

Such a canopy is reliable and strong, but you should remember that it will not be possible to build it quickly due to the characteristics of the building materials.

Structures made of asbestos-cement pipes
This material is characterized by wear resistance and a long service life. In addition, the pipe can be easily sawed with a regular hacksaw if you immerse the desired area in water for two hours before cutting. Any rafters are suitable for such a canopy.

Choosing roofing material
The next stage is the choice of material for the roof itself. Below we will discuss in detail the most suitable materials for this.
- The most popular roofing material is polycarbonate. Its technical characteristics allow you to give the visor absolutely any shape;
- In addition to polycarbonate, roofs are often made from corrugated sheets. This material differs from others in its low cost, as well as simplicity and durability;
- A roof made of metal tiles will cost more than a similar one made of corrugated sheets, but will give your canopy a stylish look;
- In addition to all of the above, bitumen can be used as a roofing material. However, it should be remembered that bitumen requires a continuous sheathing, therefore, it can only be used if it is done in the same style as the house.

Choosing the right location as a means of saving on supports and roofing
There is a simple way to save significantly on the construction of a canopy structure, namely, build a canopy close to the house. Technically, the question of how to build a shed adjacent to the house is solved by installing two or three support pillars.

The number of pillars is calculated based on the dimensions of the cross beam and available building materials. For example, if a beam with a cross-section of 75x75 mm is used, then the gap between the posts should be about a meter. In this case, you can do without a cross beam, using the pillars themselves as support.

In the case where the beam has a cross-section of 150 cm or more, two corner posts are enough for support. A transverse load-bearing beam is attached to them, and then the rafters are attached to it. On the reverse side, the rafters are attached to a support beam, which is attached to the wall of the house ahead of time.

For greater reliability, additional supports are installed under the beam.

In addition to the simplicity of the design, a shed that is built close to the house is not as susceptible to wind as a building standing apart.

If it is decided not to attach a canopy, it is necessary to calculate the direction of the air flow in advance since the lower edge of the pitched roof should be located on the leeward side, which in turn can cause a number of inconveniences, in particular if the canopy will be used as a parking space.

Building a gable roof can solve the wind problem, but it will require a more complex rafter connection.

Building a lean-to shed
A lean-to canopy is a universal design, under which both tea parties and the owner’s iron horse can easily stand. To assemble such a canopy you need to do the following:
- install support pillars;
- install the rafter system;
- install the roof;
- lay out paving slabs.

Installing racks for the future canopy
Before installing the posts, you need to dig holes for the posts. The depth of the hole is 1.5 meters, the diameter should be 10 cm greater than the diameter of the pillar. The depth and diameter of the holes do not depend on the material of the post.

The bottom is laid out with sand or crushed stone to a height of 20 cm, then it is necessary to water the hole in order to compact it better.

If the pillars are wooden or metal, then they need to be treated with bitumen or wrapped with roofing felt to protect them from moisture penetration. After this, it is necessary to install the racks in a vertical position and fill them with concrete.

In the case when asbestos-cement pipes are used for the construction of supports, it is necessary to place reinforcement inside the pipe and pour concrete along the entire height of the pipe. When pouring the concrete mixture, it must be stirred regularly to avoid the formation of air voids. Pins are embedded in the upper part of the pillars, onto which the upper trim will be attached.

The next step is to secure the support beam to the wall of the house. It must be positioned slightly higher than the posts to provide the necessary slope so that snow does not accumulate on it, but falls freely down.

Self-tapping screws are suitable for fixing a beam on a wooden wall, but in order to fix a beam on a brick wall, you need to insert dowels into pre-drilled holes.

The nuances of installing a rafter system
The distance between the rafters is calculated taking into account the selected roof. It is best to use special programs for this purpose.

One edge of the rafter leg must be attached to a support beam on the wall. This can be done in two ways: the first is to prepare several grooves in the beam itself and insert the rafters into them, and then secure them with metal corners. The second option is to use special fasteners.

The second edge of the rafter leg is attached to the top trim of the posts. Since the roof weighs little, they can also be secured using metal corners. If the soil under the canopy is heaving, then it is better to use a movable connection of the rafters with the strapping to avoid subsidence of the racks.

We arrange the roof
The canopy does not require insulation or waterproofing. With rare exceptions, any roofing covering is attached to a sparse sheathing. Only soft tiles require continuous sheathing and waterproofing of OSB sheets.

In turn, corrugated sheeting can be laid directly on top of the rafters themselves. The sheets are laid across the rafters with an overlap and secured with self-tapping screws.

Modern construction technologies allow a person with almost any budget to build a canopy, so the answer to the question of how much it costs to build a canopy depends entirely on the desires of the buyer and his imagination.

This article discussed in detail all the stages of constructing a canopy. Now all that remains is to take the knowledge gained and begin building this practical and stylish part of the backyard landscape.
Photo ideas for beautiful awnings for a summer residence


Sooner or later, any homeowner needs to build a wooden canopy for their home. Many people are afraid to start building a wooden canopy for their house with their own hands, thinking that this process is complicated and time-consuming. But there is nothing complicated in the arrangement of this structure.
Design and decoration of a wooden canopy for the house
Let's look at several ways to attach a canopy to a building. Having understood the essence of the design, you can modify and build it yourself.
Wood is an environmentally friendly, affordable material, reliable and safe for humans, which is the main factor why this material has been in demand for many years; it is distinguished by its warmth, naturalness, and color. These factors allow this material to bring in uniqueness and beauty.
Of course, wood does not have high strength coefficients, unlike stone and iron structures. Wooden structures are subject to rot and attacks from insects and mice. But this can be avoided if done correctly and with fixing solutions. The varnish also has its own profound effect, and the varnished wood itself looks gorgeous.
 Wooden canopy design option
 When it comes to wooden sheds, some people think that they are simple, nondescript structures. But everything will depend on the imagination, the desire of the average person to correctly draw up a project. You can decorate the designs with filigree carvings, and. At the same time, take into account the image of the garden where the canopy will be located, next to the house or separately.
Important! The entire structure should look proportional and interesting. This is the only way a canopy attached to a wooden house will please you.
What types of canopies are there?
They are classified according to design features, and are:
- single-pitched;
- inclined;
- straight;
- multifaceted.
Canopies can be divided according to location:

The material can also be different:
- stone;
- brick;
- combined;
- tree.
The most popular among ordinary people is a wooden canopy. This is not surprising, since the design is very simple to implement and does not require much effort or significant costs. Such work as making a canopy can be done by almost every homeowner. The first step is the project.
Project development
The design for the structure is mandatory, as it solves the main problems in analyzing the conditions of the structure. Especially if the device is attached to a finished building. Data about the base and wall of the house are extremely important, as are acclimatization conditions (wind load, amount of precipitation in winter, location relative to the cardinal directions in the location chosen for the construction).
 Scheme with dimensions of the canopy for the house
 In addition, it would not be superfluous to take care of the decorative details, types of roofing that are preferable in a particular situation, and select the roof shape and size. The more detailed the project, the easier it is to implement. Competent digital calculations will help you find out the amount of materials and mandatory construction costs. The easiest way.
Installation of supports
The first thing you need to take care of is what the canopy will stand on near the wooden house. Some craftsmen advise placing a canopy on simple wooden logs and making a sheathing and roof on them. This is a possible construction option, but it may happen that after a while there will be heavy rain, and then the canopy may simply move away from the building. And if the ground is loose, then the canopy can become very skewed. Don't forget to take this into account when you design your project.
 Scheme for installing canopy supports
 For this reason, the canopy should only be installed on, this will guarantee that no bad weather will harm the stability of the canopy. This will be a kind of foundation, and therefore its arrangement needs to be considered step by step.

After this, all that remains is to install decks with a diameter of 30 centimeters, along which the primary piping will go.
Support beam with vertical posts
Action plan:

Support posts can be installed in several ways:
- fasten the beam directly to the formwork;
- install the thrust bearing in the formwork, and then attach the timber to it;
- fixing the thrust bearing directly to the wooden or concrete base.
The mounting option is selected based on the specific weight of the structure. If you plan to build a small canopy, then the first method will be an excellent option. If the specific gravity is large, you need to choose the second or third option.
Installation of rafters
The rafter system requires care and precision. For rafters you need to take 150x50 mm timber. This section is taken for a span of six meters. In this case, it is necessary to take into account the specific gravity of the structure and the minimum slope. The step between the rafters should be no more than one meter. One side of the beam needs to be firmly secured to the support beam, the other is laid on the rack. The rafters must be positioned strictly perpendicular.
There are several ways to secure the rafter system:

The rafters should lie at the same level so that there is no distortion in the roof.
Lathing:
- You need to make markings on the rafters to cut out the grooves.
- Cut small grooves 4 cm deep.
- Insert the boards into the grooves of the supporting rafters.
- Once the sheathing is installed, you need to secure the entire system with corners.
Once the sheathing is assembled, you can begin attaching the roofing material.
Roof installation
Roofing material can be different, starting from ordinary slate and ending with polycarbonate.
 The process of installing a canopy roof on a house
 Let's look at how to cover a wooden canopy with the latest material. For installation, you need to prepare self-tapping screws with thermal washers, a trim profile, and connectors.
Procedure:

Interesting! Some owners of houses with a canopy do not cover the roof with roofing material, but simply plant it around the canopy, growing to form a natural and beautiful awning. Video about making a wooden canopy with your own hands.
Canopy over the porch
When starting to build a wooden canopy over the porch, carefully calculate everything and make a drawing. It is necessary not only to decide on the length of the beams, but also to calculate the angle of inclination. This is necessary so that during the construction process there is no large distortion.
There are no standard sizes for this structure; you need to calculate it individually based on the size of the porch. The height of the structure should be comfortable for residents.
The tallest person should stand quietly on the porch without touching the roof. The tilt angle cannot exceed 35 degrees. Advice. If you don’t know how to make calculations, then lay out the material on the ground with which you plan to cover it, the resulting rectangle needs to be measured - this will be the size of the canopy over the porch.
 Design and decoration of a wooden canopy over the porch
 Tools and materials
To build a canopy over the porch with your own hands, you need the following material:
- beam 150x150 mm, for the rafter system and supports;
- a wooden block 7.5x7.5 cm for sheathing and a board 2.5 cm;
- As soon as the concrete hardens, you need to cut the beam to the desired height and attach a second beam for support.
Advice. You need to try to make the roof so that the snow does not cake on it; to do this, for every 1 meter of roof length we make supports 10 centimeters below the support beam attached to the wall.
Lathing:

Roof installation:
- as soon as the sheathing is ready, it needs to be treated against mold and rot;
- installation of roofing material begins from the free edge;
- secure with nails or screws;
- ready to decorate the canopy.
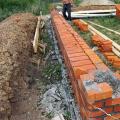 DIY brick foundation: strip and columnar
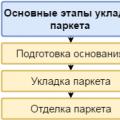 How to lay parquet: methods, necessary tools and step-by-step process for proper installation
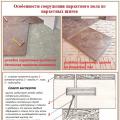 How to lay parquet: methods, necessary tools and step-by-step process for proper installation