The design and components of a metal tile roof. Installation of a metal tile roof - laying technology Installation of a metal tile roof - rafter sheathing technology
The use of metal profiles or metal tiles as a roofing material today can easily be called the most optimal and balanced choice, especially in comparison with ceramics or soft coverings. It is quite possible to install a metal tile roof on a roof with your own hands, but, like most roofing work, it will require care and careful preparation for work. Metal tiles are many times lighter than slate or ordinary tiles; with the proper quality of galvanizing and polymer coating, the service life of the metal can easily exceed 30 years. The main thing is that thanks to the profiled structure of the surface, the roof can easily withstand loads from snow, wind and storm water flows.
Metal roofing
The principle of use and design of the coating is not much different from other roofing materials, but has its own characteristics. The design of a metal tile roof is clear from the drawing. The roof structure consists of the main components:
- Load-bearing frame made of rafters, sheathing and, if necessary, counter-lattice;
- Eaves elements, ridge strips and roof valleys, groups of auxiliary protective linings, known as additional elements for metal roofing;
- Waterproofing and thermal insulation systems;
- Sheets of metal tiles laid in a strictly defined order.
Important ! Unlike metal profiles, metal roofing requires high-quality frame construction. The difference between the diagonals of the imaginary quadrangular plane of the rafters should not exceed two millimeters.
Installation of a metal roof, preparation for work
Preparatory work for the device begins with carefully leveling the plane formed by the upper edges of the rafter beams. Most brands of metal tiles require very precise framing. Otherwise, during installation, you yourself will not notice that even if you follow the roofing technology with millimeter accuracy, each subsequent sheet in the row will seem to deviate from the vertical. As a result, the closing corner sheet will simply be impossible to join in a vertical and horizontal row, video
In some cases, leveling is easier to do using a counter-lattice.
It is better to transport the purchased metal tile material on a truck with a body of suitable size. Its length must be no less than the length of the sheet. Under no circumstances should sheets be allowed to hang down. Firstly, due to the thin metal, a sheet of metal tiles can be easily deformed, which can lead to loss of appearance and the impossibility of further use in roofing. Secondly, in this way it is very easy to damage the polyester coating of the metal.
Advice ! If the metal tiles will be stored for a long enough period before the roofing begins, lay the sheets with wooden slats with a cross-section of 15x100 mm.
Before starting work, it is necessary to draw up an estimate and assess what basic elements of a metal roof, and in what quantity, will be required for installation and installation. We take fasteners and sealing with a margin of 10%.
When calculating the needs for metal tile sheets, we remember that the roofing is carried out by covering one wave with an adjacent sheet. In some cases, the vertical edges of the sheets have special locks, as in the photo, so the calculation of the number of strips must be done based on the specific brand of metal tile from which the roofing is planned.

All lumber, boards for sheathing and slats under the counter-lattice must be treated with an antiseptic, preferably with an alkyd base. You should especially carefully choose the product option in the case of installing a cold roof made of metal tiles. In the warm version, a layer of thermal insulation is placed under the waterproofing, thereby reducing the space for contamination of the wooden frame elements.
The technology for installing a cold roof made of metal tiles involves laying thermal insulation on the ceiling beams; the attic remains uninsulated and is most often exposed to drafts, which increases the risk of infection. The installation of a cold roof roof is simpler, since it does not require additional work of laying mats directly on the rafters.
Metal roofing technology
The construction of the roof comes down to laying sheets of metal tiles and securing them to the supporting frame. The process of laying roofing material is carried out in several main stages:
- We fasten the waterproofing sheet to the rafters and hammer it in with counter-lattice and sheathing boards, and install fasteners under the gutters;
- If there is an internal fracture of the intersecting roof slopes, before laying the main layer of metal tiles, a valley drainage device is installed;
- We lay sheets of metal tiles according to the diagram and instructions;
- We install ridge, cornice and frontal protective strips, sew up the plane of the skylight and the lower part of the roof overhangs;
- We install ventilation elements, install corner trims in the area adjacent to the chimney and vents, assemble snow retention systems;
- We install thermal insulation and vapor barriers, and sew up the surface of the structure.
Advice ! Considering the huge amount of work with self-tapping screws when installing a roof, it will be most convenient to tighten the fasteners using a screwdriver with an attachment for adjustable screwing force of the head.
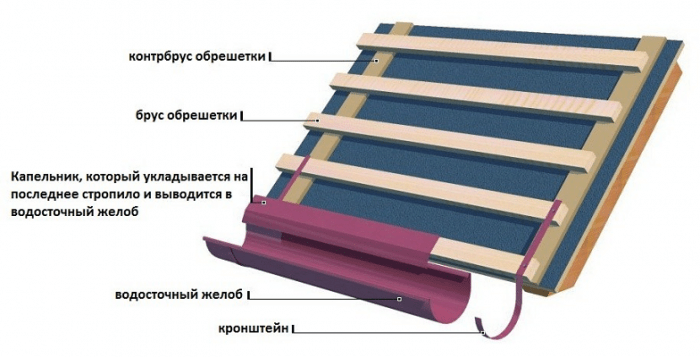
We install sheathing, waterproofing and valley elements
The installation of the roof involves laying metal tiles on the sheathing; the wider the board, the easier it is to attach the metal. We begin the installation by stuffing the strips onto the overhangs of the tension strip rafters. From there we begin to roll out the waterproofing panels; if the roof structure has a valley, then we lay the material from the wooden plank at the junction of the slopes. It is first necessary to lay one rolled sheet of waterproofing along the valley gutter, as in the diagram.

The membrane sheet must be laid with an overlap and must be glued with connecting adhesive tape SP-1. This will prevent the thermal insulation layer from absorbing condensing moisture. The waterproofing device must not have any sagging. We secure the laid sheets of waterproofing film to the counter-lattice strips with nails. Tikkurila-treated pine bars 50x60 mm are best suited for constructing a counter-lattice. We will install horizontal sheathing boards on top of the counter strips.

The design of the lathing directly depends on the wave period of the metal tile. The installation pitch of the boards must coincide with the horizontal rows of depressions on the sheets of roofing material. Sheets of metal tiles will need to be fastened without gaps to the sheathing wood using self-tapping screws with a head on a silicone gasket. This device will ensure a tight and airtight fit to the board.
Before proceeding to laying sheets of metal, it is necessary to install a roof valley. The corner connection is strengthened by two sheathing boards knocked down at an angle, on which an internal metal gutter is laid, through which rain and melt water will flow. The device is assembled from separate sections and sewn onto the sheathing boards with an overlap of 15-18 cm and the joints are filled with sealant. After installing both roof slopes with metal tiles, the top valley strip is installed on top of the metal sheets.

We install sheets of metal tiles, install the ends and ridge
Before installing the roofing material, a beam with a section of 100x100 mm or a pair of boards 100x50 mm are stuffed onto the eaves of the eaves. The lower edge of the first waterproofing sheet is pulled over the laid material and launched downwards. We attach hooks to the beam for hanging the gutters of the drainage system and hang a cornice strip that covers the beam and prevents water from flowing under the roof slope. We will paste adhesive tape onto the upper edge of the eaves strip and, pulling out the lower edge of the waterproofing material, install it on the tape.


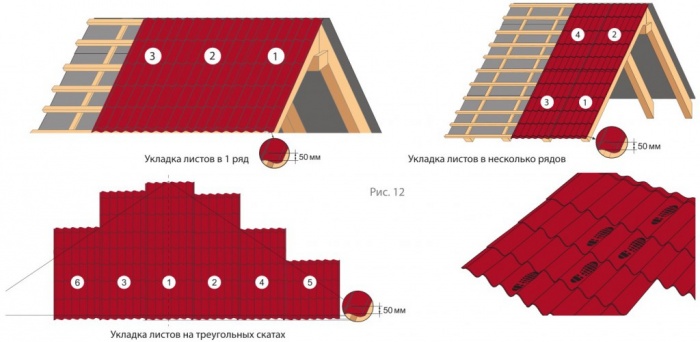
When installing a roof, metal tile sheets are most often laid according to a specific pattern provided for by the project. If you carry out laying and arrangement from left to right, each edge of the next sheet must be placed under the cut of the previous one. With the first three sheets laid out, they move on to arranging the top row, then to laying out the next four to five pieces. Often, in order to avoid distortion in the position of individual sections of metal tiles, a thin nylon cord is pulled along the sheathing, along which the device is made and the edges are aligned.
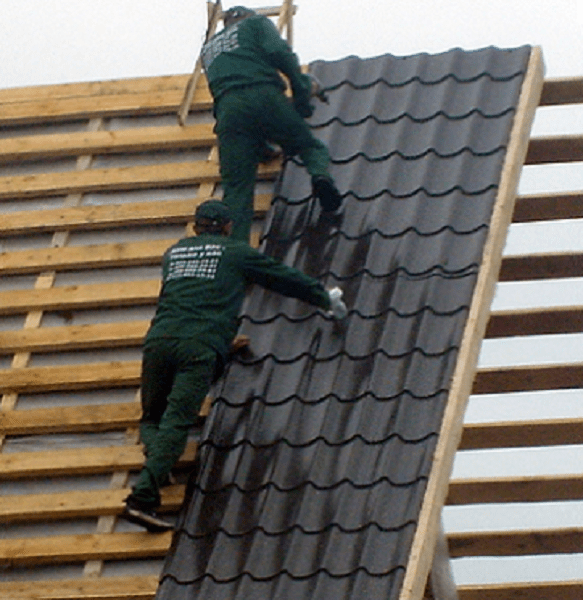
Advice ! If it becomes necessary to step on a fixed metal sheet while installing a roof, this can only be done in soft shoes, and carefully select the fulcrum point, most often this is a wave trough.

Fastening with self-tapping screws is carried out in a checkerboard pattern, the lower edge is attached to each wave of the roofing material. Next, the end strips are installed, which are “sewn” with self-tapping screws every 50-60 cm, the connection of the overlays is made with an overlap of 50-60 mm.
To install a ridge unit, you will need to hem the junction of the roof slopes above the purlin using two boards; a decorative overlay, usually round in shape with plugs, will rest on them. A plug is screwed onto the end of the lining with self-tapping screws and secured to a wooden beam. A seal with a wavy surface must be installed under the longitudinal edges of the ridge overlay, and the fasteners are made with self-tapping screws through one wave.

Arrangement of adjoining and ventilation zones
The space around the chimney requires special attention during installation, since the roof structure requires a fairly large gap between the pipe wall and the metal sheet through which moisture can leak. The gap is closed using corner pads. The first to install is the trim - an apron at the bottom of the chimney; a thin metal with flanges, also called a tie, is inserted under the bottom of the trim. The metal sheet with sides is designed to drain water, so it extends down to the very eaves of the roof. Similar overlays, but of a simpler shape, cover the side and top walls.

The assembly of ventilation systems can be done on a metal roof with your own hands, even without special experience in working with terminals. To do this, mark the exit point of the ventilation pipe and cut a hole in the roof using metal scissors. A rubber seal is placed on the hole and a flange mounting device is attached, onto which the outlet for ventilation of rooms, roof spaces or sewer channels is subsequently installed.
Do-it-yourself installation of metal roof insulation
At the final stage of roof construction, the roof is insulated from the inside of the covering. To do this, heat-insulating mats made of basalt or mineral fiber are cut to the size of the space between the rafter beams and carefully, without deformation, laid between the rafters. At the next stage, you will need to cover the thermal insulation with a vapor barrier membrane. Most often, the insulation sheet is straightened and sewn to the rafters using a stapler and the joints are glued using SP-1. The entire thermal insulation device is covered with sheets of waterproof 8 mm OSB. The joints between the sheets are also glued with connecting tape and coated with alkyd protective varnish to enhance the water resistance of the slab.
Conclusion
When installing a roof, most installation work requires increased care to reduce the risk of damage to the outer surface of the metal tile. All joints must be sealed with sealant, and the edges of the cut sheet must be treated with aerosol protective paint, otherwise intense corrosion and rusting will begin within a couple of months.
Today, in the construction of a residential building, various roofing design options are used, but the simplest is a cold roof. This device is perfect when the attic space is not used as additional living space. The very scheme of such a roof is very simple: load-bearing structures, waterproofing, sheathing and counter-lattice, plus roofing material.
The peculiarities of installing such a cold roof are that it is necessary to provide a ventilation gap for the removal of condensate in order to protect not only the supporting structures, but also the roof covering in the form of metal tiles from the negative effects of moisture.
The installation of such a roof itself is not difficult; the main thing is to correctly fasten the profiled metal sheet so that precipitation does not penetrate through the joints under its surface. Before starting construction, you should make all the required calculations, calculate the angle of inclination, the pitch of the sheathing, and decide on.
Features of a cold roof

A cold roof differs from a warm roof in its structure, although its design itself is extremely simple. The only thing that needs to be taken into account is the roofing option. When using metal tiles, a ventilation gap must be provided for proper removal of condensate from the under-roof space. This is done so that the steel sheet is not subject to corrosion.
The installation of a cold roof involves the installation of a rafter system on which a membrane or polyethylene film is laid for waterproofing. After this, the counter-lattice, sheathing and covering in the form of metal tiles are nailed.
The peculiarities of such a roof are the complete absence of a thermal insulation layer, the presence under the ridge and on the slopes to remove moisture. Design and installation are not difficult, the main thing is to correctly carry out all the preliminary calculations.
The installation itself includes the following features:
- If you plan to do so in the future, you need to be very careful when choosing a membrane to protect against excess moisture. For a future attic, only specialized waterproofing in the form of membranes made from PVC is suitable.
- If further insulation is not planned, then micro-perforated waterproofing is used, designed specifically for cold roofs. Such a film does not allow thermal insulation materials to be laid next to it, that is, with further insulation, you will have to spend money on a new membrane. If this condition is not met, then the roof will be virtually unprotected from moisture in the future, the insulation will be constantly wet, and the roof covering will be susceptible to corrosion.
Sequence of work

To install the waterproof membrane, you must remember that its installation is carried out with some sagging, approximately 20 mm. This device allows condensation to drain, that is, the rafters and other roof elements are protected from moisture. In order for water to effectively evaporate and not stagnate, creating an unfavorable atmosphere, it is necessary to ensure the presence of a ventilation gap, which is made between the waterproofing film and the roof ridge.
This gap allows air to circulate unhindered in the under-roof space, removing all traces of condensation. The membrane itself to protect the roof should not have ruptures or other defects; it should be secured using a construction stapler.
An overlap must be made; the edges of the film must be secured with tape.
Among the features that distinguish a cold roof, it should be noted that it can be constructed for any climatic region. Many people mistakenly believe that this type of roof is completely unsuitable for the northern region, but this is not the case. This is where a cold attic is a traditional solution for a residential building. The attic floor itself is insulated, that is, the use of a cold roof does not in any way affect the internal microclimate of the upper floors. The attic itself may not even be used, since installing a layer of insulation between the upper floor and the under-roof space solves all problems regarding heat loss.

When constructing a cold roof, one should not forget about such a stage of work as proper insulation of technological openings and exits. To do this, all ventilation shafts, chimneys, and entrances to the roof surface must be thermally insulated. This will avoid such troubles as icing, condensation, precipitation, and heat loss.
To cover a roof of this design, a wide variety of roofing materials can be used. Most often this is metal tiles, the installation of which does not pose any problems. This option is considered optimal, since all installation work is completed in the shortest possible time, no additional work is required. You can use other materials for coating, for example, flexible tiles. But here a number of technological difficulties already arise that can make installation more expensive and complex. Therefore, the use of metal profiled sheet in this case is preferable.
Roofing pie for metal tiles
Installing a cold roof under metal tiles is one of the simplest options. In addition to supporting structures, such a roof includes roofing material in the form of metal tiles, lathing, and a layer of waterproofing. Installation of such a roof is very simple: a waterproofing film is attached to the rafter system using a construction stapler or small galvanized nails. After this, it is pressed with wood screws, which will be used to attach the counter-lattice, the pitch of which depends on the type of metal tile sheet. The size of such boards should be 25 by 100 mm; in some cases, a continuous covering of sheets of plywood or chipboard is used.

The waterproofing film (this can be a special PVC membrane or polyethylene film) should be laid on the roof with slight sagging. At the same time, ruptures and other defects are unacceptable on it. The level of sagging of the roofing film should be from 15 to 25 mm. This will ensure proper ventilation of the underside of the waterproofing, drainage of condensate from it to the eaves strip, and then into the drainage tray. If this is not done, it will be subject to the negative influence of moisture, and this will lead to destruction.
When installing a cold roof made of metal tiles, it must be remembered that a metal sheet and a thin layer of waterproofing do not provide adequate protection from noise, which can occur during heavy rain. It is for this reason that cold roofs made of steel sheets are rarely made without insulation, which acts as an excellent sound insulator. The cold attic is therefore left unused.
The structure of such a roof includes the following mandatory layers:

- On the side of the living quarters, first there is a layer of vapor barrier with one-way permeability, that is, condensation is released from the room, but does not penetrate inside.
- The roof truss system, longitudinal purlins, that is, the supporting structure.
- Waterproofing. The film should sag slightly to allow condensation to escape.
- Counter-lattice, the installation of which is carried out parallel to the installed rafters. The counter-lattice boards press the waterproofing, providing its additional fastening.
- The sheathing of a cold roof is made of wooden beams, the cross-section of which is most often 50 by 50 mm. Its installation is carried out in increments of 35-45 cm along the slopes. The pitch may vary, as well as the material for the sheathing; it depends on what type of metal tile is used and what slope was chosen for the roof.
- Metal tile sheets.
What else is needed?
To install a roof with this design, you need to take the simplest tools and materials that are not very expensive. In addition to wooden boards for constructing the rafter system, sheathing and counter-lattens, you should prepare a vapor barrier, a waterproofing membrane, and the estimated number of sheets of metal tiles. Staples, galvanized nails, wood and metal screws are used as fastening elements. When calculating steel sheets, you must remember that various additional elements may be needed, for example, ridge tiles, valleys, cornices, etc.
The design of a cold roof differs from a warm one in that in this case a layer of insulation is not used, that is, there is no layer of insulation between the vapor barrier and the waterproofing membrane. Such roofs are applicable when the attic space underneath is not used.
The “Dachny Expert” portal expresses gratitude to the company “Spets.Krovlya” for its expert assistance in the preparation of this material.
Spets.Krovlya LLC is a reliable contractor for pitched roofs of any complexity. Guaranteed quality, clear deadlines and a fixed price, which is immediately specified in the contract and will not change!
Metal tiles are roofing materials in the form of profiled steel sheets coated with a polymer coating. It is used to cover roofs with an angle greater than 14 degrees.
Outwardly, it is similar to classic ceramic tiles, but surpasses it in reliability and ease of installation. In this article we looked at which is better, ?
Material stable to temperature changes and other negative climatic influences. Its main disadvantage is low sound insulation characteristics, but it can be eliminated if the work is carried out correctly.
In this article you will learn how to make a roof from metal tiles with your own hands, step by step from A to Z. If you don’t know how to choose metal tiles, then.
This stage of work should be given special attention, since it will be on the sheathing. This design also provides a natural interior roof space.
- Metal tile sheathing is made from wooden beam. The relative arrangement of the boards can be continuous or thinned out.
- Most often used sparse designs, while the distance between the boards () is strictly tied to the distance between the lower depressions of the tile waves, since in these places the material has the greatest strength.
- Distance between the first two beams on the slope side there should be approximately 70 centimeters less than the established pitch.
- The minimum thickness and width of the board for sheathing is 25 and 100 mm respectively.
- The width of the board for the counter-lattice can be half as large. The first board from the edge of the roof should be 15-20 mm thicker than all the others.
NOTE!
Pre-boards are calibrated one size at a time to avoid future distortions and unevenness in the location of the tiles.

Lathing step
Installation of the structure is carried out after completion . The main lathing is attached to the counter lath, which is connected to the rafter frame with self-tapping screws. At the ridge of the roof, additional support boards are laid under the metal tiles.
Calculation of metal tiles
Count the required amount of material for roof construction is done as follows (or use):

When counting the number of sheets in a row, you need to keep in mind the value overlap, which can reach 15-20 centimeters.
To ensure that there is no shortage of material, it is better to round all values up.

Roof calculation
Metal roofing: waterproofing and vapor barrier
Before you begin installing metal tiles with your own hands, you should take care isolation . Protection internal spaces from liquid provided with layers of vapor barrier and waterproofing.
The waterproofing is located between the rafters and the counter-lattice and prevents moisture from the environment from entering the interior of the roofing pie. The most common waterproof materials– these are polyethylene and reinforced films. They are stretched over the entire area of the slope with slight sagging. It is important to ensure that the waterproofing does not overlap with the thermal insulation.

Roofing pie
Vapor barrier is a protective layer does not allow moisture to penetrate into the interior of the roof, formed in the premises. This is the lowest layer of the roofing pie; it is located under the rafters (to which it is attached) and thermal insulation, thereby ensuring its protection from condensation.
An attic roof made of metal tiles must have a high-quality vapor barrier; in cold roofs without insulation, installing a vapor barrier is not necessary.
Required tools and equipment
Covering a roof with metal tiles begins with preparing the necessary tools. To install a metal tile roof you will need:
- Screwdriver.
- Rail.
- Tin snips or other metal cutting devices such as nibblers, circular saw, etc.
- Construction stapler.
- Tape measure and marker.
- Components of the roof and roofing pie: tile sheets, self-tapping screws, hydro-, steam- and heat-insulating materials, timber for sheathing and rafters.
NOTE!
When working with tiles you can't use a grinder and other abrasive cutting tools, as this disrupts the structure of the sheet.
Fastening and laying metal tiles - step by step
 How to cover a roof with metal tiles with your own hands? Self-tapping metal tiles with a gasket made of ethylene-propylene rubber, which provides waterproofing of the fastening areas.
If tiles with hidden fastening are installed, galvanized self-tapping screws with a press washer are used.
Self-tapping screws must be tightened with optimal force.
If the fastening force is insufficient, then moisture will get under the cap and cause its corrosion. If you tighten the screws too tightly, the gasket will be deformed, which will break its tightness.
- Before covering the roof with metal tiles, you should make sure that the sheathing is symmetrical and reliable.
- Self-tapping screws screwed into the lower deflection of the tiles, they must enter strictly perpendicular to the plane of the sheathing boards.
- When connecting two overlaps fastening is carried out in wave rises using shortened screws.
- Installation of tiles begins from the lower left corner of the slope, subsequent sheets are laid on top previous ones.
- Self-tapping screws screwed into each wave of tiles along the perimeter of the slope and in a checkerboard pattern in the interior areas. If a screwdriver is used for this, then its rotational effect on the material must be minimized.

Metal tiles - DIY installation + instructions
Now you know how to lay metal tiles correctly and we invite you to familiarize yourself with the most important thing - instructions for installation of metal tiles.
Installation of metal tiles - step-by-step instructions
How to properly cover a roof with metal tiles with your own hands? The first step is.
It is on it that all other roofing elements will be fixed.  The system is constructed from wooden beams, while their size exceeds the dimensions of the sheathing bars.
The most important elements of the rafters are:
- Mauerlat. This is the fulcrum of the structure.
- Rafter legs. They hold on themselves and rely on the Mauerlat.
- Racks. Strengthen the support of the rafter legs.
The rafters are fastened to the wall using so-called tavern. These are strips of metal that connect two structures with nails or screws.
Next are installed main insulating layers: insulation, vapor and waterproofing. A waterproofing film or membrane is applied to the rafter system and fastened to it with a stapler. Thermal insulation is placed in cells, formed by the intersections of the rafter beams, and is fixed with the help of cords drawn crosswise in the lower plane of the rafters.

Installation of rafters
After completing the installation of protective structures, you can begin installing the sheathing, on which we will subsequently lay the roofing. She applied over rafters and waterproofing layer and is attached with self-tapping screws to these structures.
Installing metal tiles with your own hands:
- A cornice strip is attached to the frontal board, providing roof protection from exposure to wind.
- When performing work, the need to ensure good natural ventilation of the space is always taken into account. To do this you need to leave gaps between all layers of the roofing cake. The basis of natural ventilation is the possibility of free air circulation under the roof ridge.
- The last step is installation of metal tiles. It must be taken into account that the sheets must protrude beyond the edges of the sheathing by 5 centimeters and aligned horizontally along the eaves line.
- Ridge strip attached to additional two boards, which are installed at the joints of two slopes when installing the sheathing. Such measures are necessary to ensure additional resistance of an important structural element to negative influences.

metal tile laying diagram
- . They loosen the snow masses falling from the roof, making their fall relatively safe for building structures and for humans.
- Junction strips. These products frame the joints between tiles and all important structures, such as chimneys and ventilation pipes.
- Corners and valleys. They protect all corner roof structures.
- Low tides. Used to redirect flows of rain and melt water.

Additional elements
- Distance between rafter frame beams should be no more 60-90 centimeters, otherwise the roof structure may sag.
- When performing work, you must wear shoes soft sole and move along the tiles, stepping into its lower deflections. This will prevent the material from being pressed through.
- The absence of contact between protective layers is important not only to ensure ventilation, but to prevent them mechanical damage during friction.
- To provide additional ventilation, you can arrange dormer windows in the attic.
- For level installation of all elongated additional elements need to pull the thread and secure it between two already installed structures.
This is what the technology for laying metal tiles on a roof looks like. This material has an approximate service life about 50 years, but without the need for repair work, operation will only take place if the installation is carried out correctly.
Useful video
Laying metal tiles with your own hands in video format:
Metal tiles are roofing materials based on galvanized steel with a wavy profile that imitates the shape of ceramic tiles. It is one of the most popular materials for roof construction. Construction stores offer a wide selection of all the accompanying elements for creating a roof made of metal tiles (ridge profiles, valleys, eaves, gable strips) to do the roofing work yourself. In this article we will tell you what the technology of installing a metal tile roof looks like.
Metal tiles are a roofing covering based on galvanized steel with a polymer or paint layer, used for the construction of cold or warm roofs. It is produced by cold rolling from steel billets. The strengths of metal tiles are:
- A light weight. One square meter of metal tiles weighs 5.5-6.5 kg, which makes it possible to install them on thin lathing without reinforcing the roof rafter frame.
- Long service life. High-quality metal tiles, as well as additional elements made of galvanized steel, have been in use for more than 20-25 years with proper maintenance and timely repairs.
- Corrosion resistance. The zinc layer and polymer coating reliably protect the steel from exposure to water, so the metal tiles are not subject to corrosion.
- High load-bearing capacity. Thanks to the wavy profile, metal tiles have high load-bearing capacity and do not deform under intense loads.
- Resistant to temperature changes. Temperature changes do not affect the strength properties and integrity of the material, so it is used in all climatic zones.
Important! It is recommended to lay metal profile coverings on single-pitched and multi-pitched roofs with a slope of at least 12 degrees. To install a cold roof, you will need the roofing material itself, as well as additional elements: valleys, ridges, eaves or gable strips, drainage elements, soffits for filing eaves, lightning protection, snow retainers. The design of a warm roof involves the additional use of insulation and vapor barrier.

Selecting elements
– multi-layer structure, the elements of which interact with each other, increasing its quality and service life. The structure of a cold roof consists of waterproofing, sheathing and roofing, while a warm roof also includes a vapor barrier and a layer of insulation. Experienced craftsmen recommend choosing materials for roofing in accordance with the following criteria:
- When choosing metal tiles, only 2 indicators play a role - the height of the corrugation and the thickness of the steel. The higher these indicators are, the greater the strength and load-bearing capacity of the roofing covering. The required number of sheets is calculated based on the area of the slopes and the usable area of the canvas.
- Additional elements, such as cornice and gable strips, are purchased depending on the footage of the overhangs, taking into account an overlap of 15-20 cm. They are selected to match the metal tiles.
- Valleys are used to equip joints between slopes in multi-slope, complex structures. They are steel strips in the form of a corner with a polymer coating.
- The ridge profile is used to equip the roof ridge. Ridge elements, like valleys, are corners with fastening shelves of 20-50 cm. The wider the shelves, the better the profile protects the gap between the sheets of material from moisture penetration.

Please note that the design of a warm roof is much simpler than a warm one, since it consists of only 3 layers. However, roofing components are used to construct any type of roof. High-quality additional elements help maintain the integrity of the roofing sheet when equipping junctions with vertical and horizontal surfaces, the passage of pipes and aerators through the slope, minimizing the risk of leaks.
Roofing pie
The basis for the durability and reliability of the roof is a well-composed roofing pie made from compatible materials, which provides an airtight and durable coating. The roof structure made of metal profiles has a multi-layer structure that performs 4 important functions: waterproofing, thermal insulation, vapor barrier, wind protection. The roofing pie for metal tiles consists of the following ingredients:
- Vapor barrier. It protects the rafter frame from the penetration of steam saturated with moisture from the heated rooms of the upper floor or attic. Vapor barrier is a diffuse membrane that allows air to pass through but does not allow water to pass through; it is attached to the lower surface of the rafters with a construction stapler.
- Thermal insulation. The insulation is installed between the rafters of the roof frame. The thermal insulation layer required to maintain optimal temperature conditions is calculated based on climatic conditions. The design of a cold roof does not include insulation.
- Waterproofing. Waterproofing material is laid over the rafters to protect the wooden frame elements from moisture penetration from the outside. Film or membranes are used as waterproofing. For the installation of a cold roof, the use of roofing material is allowed.
- Counter-lattice. Slats 2-3 cm thick, laid along the rafters, form a counter-lattice, which forms a ventilation gap between the layers of the roofing pie.
- Lathing. The metal tiles are mounted on a lattice sheathing, fixed perpendicular to the rafters. This structural element is responsible for distributing the weight of the roofing and imparting rigidity to the slopes.
Please note that the instructions require the use of auxiliary elements that form a sealed coating, protected from moisture penetration on all sides. If you install a metal tile roof using valleys, a ridge profile and various abutment strips, then there will be no leaks even during heavy rainfalls.


Lathing requirements
It is carried out on a solid base - lathing. Sheathing is a flooring made of wooden boards or bars laid with a gap to which the roofing material is attached. The sheathing elements must support the roofing sheet in 3 places to prevent deformation: on the sides of the sheet and in the center. The following requirements apply to the lathing:
- The instructions require installing lathing for metal tile flooring in increments of 30-50 cm, depending on the wavelength of the roofing covering.
- Wood for the manufacture of sheathing is treated with antiseptic and fire-blocking compounds to protect it from rotting and increase resistance to fire.
- In places where valleys, ridge profiles or snow retainers are attached, the sheathing is reinforced with an additional element. This is done because valleys and other valley elements are places where liquid and snow accumulate, so the load on the rafters is higher there.
Experienced craftsmen say: the flatter the roof slopes, the smaller the pitch of the sheathing should be. This instruction is explained by the fact that from roofs with a small slope, liquid and snow do not slide off on their own, but are retained, as a result of which the load on the rafters and sheathing increases.

Laying technology
The laying of metal tiles is carried out after the assembly of the rafter frame and sheathing is completed. To avoid getting the wooden frame elements wet, installation should be carried out in dry weather. For safety reasons, it is prohibited to carry out work at height in windy weather. To lay the metal profile with high quality. There is the following instruction:
- Waterproofing material is laid on top of the rafters, starting from the roof overhang. Laying is done with a slight sag so that the waterproofing does not burst under water pressure. The film is attached to the rafters with a stapler; an overlap between the strips is made of 10-15 cm, gluing it with adhesive tape.
- Counter-lattice slats are installed along the rafters directly on top of the waterproofing, which form a ventilation gap necessary to protect the roofing material from condensation.
- Then, perpendicular to the rafter legs of the frame, the lathing is fixed to the counter-lattice with a step equal to the wavelength of the metal profile.
- Metal tile sheets are cut to fit the dimensions of the slope. If you buy the material directly from the manufacturer, then the cutting is done at the factory, so there will be no horizontal joints between the sheets. You can cut metal profiles outside of production with a circular saw, jigsaw or hacksaw.
- Begin laying from the lower right edge of the slope. If laying is done in one row, then the sheets are attached one after another. If the installation is carried out in 2 rows, then first lay the outermost sheet at the bottom of the slope, then fix the sheet above it, then the 2nd sheet of the first row, and so on.
- The sheet is attached to the sheathing using roofing screws with a rubber press washer, which closes the fastening hole from water penetration. The screws are screwed in strictly at right angles to the surface of the roofing material, leaving a gap of 1-2 mm so as not to deform it. To fix 1 sheet, 10-15 screws are required.
- During installation, metal tiles overlap each other by 1 wave. The place where the sheets overlap is fixed with self-tapping screws through a capillary groove.
Note! When fixing metal tiles, it is important not to twist the self-tapping screw to avoid deformation of the material and chips on the polymer coating. To do this, it is better to use a screwdriver at low speeds.


Installation of additional elements
The installation of a metal roof does not end with laying the roofing material. To make the structure more durable, protected from atmospheric moisture and complete, it is necessary to install valleys, a ridge profile and cornice strips. The work is performed in the following order:
- Install the ridge profile. It is attached to the sheathing along the ridge connection with roofing screws. To protect the ends of the profile from water ingress, a special seal is used.
- Fix valleys and other valley elements. To protect the joints between the slopes and the junctions with vertical surfaces, special strips are installed.
- Eaves and equipped with special strips that protect from moisture and wind.
- The eaves and gable overhangs are covered with soffits. These perforated panels protect the lower surface of the slope, not protected by waterproofing, from contact with water.
- Install drainage, snow barriers and lightning protection.
Remember! Valleys, ridges, junction strips and gutters are not decorative elements of the roof. They perform the function of protecting the canvas from leaks, sealing it. Provided the roofing pie is properly equipped and auxiliary components are used, a metal tile roof will last 20-30 years.

Video instruction
In many ways it is superior to other types of roofing, such as slate, galvanized sheet, bitumen shingles, etc. Laying the material is usually trusted to specialists, but if you wish, you can install the metal tiles yourself.
Advantages of the material
The strengths of metal tiles include:

The only disadvantages include increased noise during precipitation, but this can be solved by installing a layer of glass wool.
Covering the roof with metal tiles begins with calculations.


Stage 1. Carrying out calculations
First, let's clarify one important point. Visually, a roof covered with this material consists of rows and waves (the first run across the slope). The distance between the rows is called the pitch. If a sheet of tile has a pitch of 35 cm and six waves, then it is called a module. The modern building materials market offers sheets for 1, 3, 6 and 10 modules.

Important! If you wish, you can order tiles in individual sizes, but this will cost much more. It should be remembered that the length of the sheet should not exceed 7 m and be less than 45 cm.
When calculating and laying out, the fact that joints and waves must form a solid coating along the entire length of the slope is taken into account. Having decided on the number of modules, the amount of material is calculated based on the roof area.


In addition to the metal tiles themselves, the kit also includes:
- steel strips 2 m long;
- steel sheets 200x125 cm, having the same color as the tiles.
Typically, the strips are intended for roofs made with a slope of 30ᵒ, although if desired, you can adjust them to 11-70ᵒ.
Important! The minimum slope at which the installation of tiles is allowed is 11ᵒ.
Stage 2. Preparing everything you need
To install tiles, you need the following equipment:
- metal scissors;
- ladder;
- electric drill;
- long rail;
- screwdriver;
- mounting tape;
- measuring device;
- hammer;
- marker;
- personal protective equipment (mittens, plastic glasses).
You will also need the following consumables:
- waterproofing;
- tiles;
- roofing strips;
- aero roller;
- trims for ends and ridge;
- decorative overlays;
- self-tapping screws, sealing washers and for them;
- boards 2.5x10 cm;
- guide board.
Stage 3. Foundation

As noted earlier, metal tiles weigh little, so they do not need a reinforced base - you will need a regular sheathing of wooden slats. The pitch of the sheathing should be calculated according to the dimensions of the tiles, so as not to drive the screws into the void during installation.


Stage 4. Thermal insulation

Thermal insulation is necessary not only to prevent heat loss, but also to protect against the noise of rain. First, the rafters are covered with a vapor barrier material (for example, Izospan or Yutafol). Next, an insulating layer (no more than 25 cm thick) is laid, covered with an antioxidant film and attached to the rafters with wooden blocks.
Important! The material between the bars should sag slightly (about 2 cm) so that the condensate flows only into the drain.
Stage 5. Installation of tiles. Basic Rules
- can be done in one of two ways. If the stacking of sheets begins on the right, then each new one is superimposed on the previous one. If it’s the other way around, then the previous sheets are superimposed.
- In order to ensure correct installation, four sheets of tiles, located overlapping relative to each other, are first grabbed, aligned, and only then finally connected with one self-tapping screw.
- Self-tapping screws must be of high quality, because the service life of the roofing largely depends on them. These must be galvanized screws with sealing heads made of propylene rubber, hermetically filling the hole when tightened.
- A thickening appears at the junction of the four sheets. It needs to be removed, for which part of the corner is cut off or the capillary ditch located under the stamping line is straightened.
Stage 6. Individual elements
Step 1. The end strips are fixed with an overlap (about 2 cm). The size of the wave is adjusted to the width of the slope, otherwise the crest may fit on the pediment.


Step 2. A roofing strip is added, then an additional sealant is placed between it and the sheet of material.
Step 3. When arranging pipes or windows that are located below the ridge, sheets with one module are taken - two pieces for each structural element.
Step 4. For sloping slopes, an aeroroller is installed between the material and the ridge strip, which will prevent precipitation from penetrating under the ridge.

Step 5. The ridge is fixed on the strips located at the ends of the structure. This must be done in such a way that it protrudes by 2-3 cm. In the case of a flat ridge, all elements are attached with an overlap, and if it is semicircular, then only according to the profile lines.


It is also worth noting that, if necessary, the ridge strips can be bent and unbent so that they follow the angle of the roof.
Stage 7. Arrangement of the valley

An additional board is attached to each valley. Installation in this case starts from the bottom and is carried out with an overlap of 25-30 cm. Below the level of the cornice, the bottom strip is cut off and flanging is made along it. A sealant is placed under each trim and ridge.

There is a gap between the axle and the sheets (at least 8-10 cm). Screws are screwed into the cut sheets one and a half centimeters from the stamping line. However, when fixing, the fasteners are made 25 cm from the axis of the valley. If everything was done correctly, then upon completion of the work the sheet at the fastening point will be in contact with the board where the valley is located.

Important! If mistakes were made, the fastening will be located in other places and, as a result, gaps will form on the surface through which the roof will leak.
To cover the cut sheets, decorative overlays are used, when installing which you need to remember some important points:

Often the beginning and end of the valleys are on the roof slope. Take, for example, the installation of a dormer window. Here a separate board is placed under the valley. For the window itself, a cutout is made in the sheet, and sealing material is laid along the walls. In this case, the eaves overhang is covered with a plank.
Then the valley strips, previously cut at the edges, are fixed. The released part should adhere extremely tightly to the tile sheet.
Prices for different types of tiles
Roof tiles
Video - Laying metal tiles


Slopes in the form of a trapezoid or triangle
If the roof slopes have a trapezoidal or triangular shape, then it is necessary to install additional bars.
Step 1. The bars are attached on both sides of the “ridge” along the fold line of the roof.
Step 2. The cornice board is installed and assembled.
Step 3. The cornice system is being constructed.


Step 4. The tiles are laid. This is done along the line of one of the edges or the axis. The first sheet is aligned with the cornice strip.
Important! It is unacceptable that the distance between the cut corner sheets installed near the “ridge” be more than 10 cm.
Step 5. To install the ridge assemblies, perform the following steps. The ridge strips are aligned to the angle of the “ridge”. If a straight ridge is used, then it is cut according to the corners, and if it is semicircular in shape, then the installation of an additional plug (preferably plastic) will be required.
Step 6. The ridge strip lies strictly along the axis of the “ridge”. This is quite simple to do if the angles of the slopes are the same, but if they are different, then it is correspondingly difficult. To control the junction of the slopes, bright-colored mounting tape is used.


Features of material care
As already mentioned, metal tiles are covered with a polymer layer that protects against corrosion. But constant exposure to ultraviolet radiation, precipitation and dust sooner or later causes the destruction of the protective layer. This is why metal roofing should be cleaned regularly.
- Dirt and dry leaves are washed off with a damp fluffy brush.
- To remove more complex stains, you can use special cleaning products for polymer surfaces.
- Do not use aggressive chemicals - they can destroy the protective layer.
- Gutters are cleaned with a stream of water under pressure. The jet must be directed from the ridge to the eaves.
- To clear the roof of snow, you can use only those tools that, in principle, are unable to damage the coating.
If all these rules are followed, it will last about 50 years.
 Blumen in German with translation
 Control of the verb helfen
 Lorelei heine in German