Circuits and other interesting homemade electronics. Useful and simple electronic devices and DIY projects. Circuit assembly methods
Schemes of homemade measuring instruments
A device circuit developed on the basis of a classic multivibrator, but instead of load resistors, transistors with opposite main conductivity are included in the collector circuits of the multivibrator.
It's good if you have an oscilloscope in your laboratory. Well, if it is not there and it is not possible to buy it for one reason or another, do not be upset. In most cases, it can be successfully replaced by a logic probe, which allows you to monitor the logical levels of signals at the inputs and outputs of digital integrated circuits, determine the presence of pulses in the controlled circuit and reflect the received information visually (light-color or digital) or audio (tone signals of various frequencies ) forms. When setting up and repairing structures based on digital integrated circuits, it is not always so necessary to know the characteristics of pulses or the exact values of voltage levels. Therefore, logic probes make the setup process easier, even if you have an oscilloscope.
A huge selection of different pulse generator circuits is presented. Some of them generate a single pulse at the output, the duration of which does not depend on the duration of the triggering (input) pulse. Such generators are used for a wide variety of purposes: simulating input signals of digital devices, when testing the performance of digital integrated circuits, the need to supply a certain number of pulses to a device with visual control of processes, etc. Others generate sawtooth and rectangular pulses of various frequencies and duty cycles and amplitudes
Repair of various components and devices of low-frequency electronic equipment and technology can be significantly simplified if you use a function generator as an assistant, which makes it possible to study the amplitude-frequency characteristics of any low-frequency device, transient processes and nonlinear characteristics of any analog devices, and also has the ability to generate rectangular pulses forms and simplification of the process of setting up digital circuits.
When setting up digital devices, you definitely need one more device - a pulse generator. An industrial generator is a rather expensive device and is rarely on sale, but its analogue, although not as accurate and stable, can be assembled from available radio elements at home
However, creating a sound generator that produces a sinusoidal signal is not easy and quite painstaking, especially in terms of setup. The fact is that any generator contains at least two elements: an amplifier and a frequency-dependent circuit that determines the oscillation frequency. It is usually connected between the output and input of the amplifier, creating positive feedback (POF). In the case of an RF generator, everything is simple - just an amplifier with one transistor and an oscillating circuit that determines the frequency. For the audio frequency range, it is difficult to wind a coil, and its quality factor is low. Therefore, in the audio frequency range, RC elements are used - resistors and capacitors. They filter the fundamental harmonics quite poorly, and therefore the sine wave signal turns out to be distorted, for example, limited by peaks. To eliminate distortion, amplitude stabilization circuits are used to maintain a low level of the generated signal when the distortion is not yet noticeable. It is the creation of a good stabilizing circuit that does not distort the sinusoidal signal that causes the main difficulties.
Often, after assembling the structure, the radio amateur sees that the device does not work. A person does not have sense organs that allow him to see electric current, electromagnetic field or processes occurring in electronic circuits. Radio measuring instruments - the eyes and ears of a radio amateur - help to do this.
Therefore, we need some means of testing and checking telephones and loudspeakers, audio amplifiers, and various sound recording and sound reproducing devices. Such a tool is amateur radio circuits of audio frequency signal generators, or, more simply, a sound generator. Traditionally, it produces a continuous sine wave whose frequency and amplitude can be varied. This allows you to check all ULF stages, find faults, determine the gain, take amplitude-frequency characteristics (AFC) and much more.
We consider a simple homemade amateur radio attachment that turns your multimeter into a universal device for testing zener diodes and dinistors. PCB drawings available
Many people consider themselves far from physics. But even with minimal knowledge (even what you got at school is enough) you can do something interesting and, most importantly, special. We are talking about electronic homemade products with your own hands. Their assembly schemes are usually not complicated. We will consider several simple options for beginning electronics engineers in this article.
Cat's house
Electronic homemade products are a flight of fancy combined with knowledge of electronics. So, for example, you can make an excellent house for a cat from an old computer monitor. To do this you just need to disassemble it. When the bottom and walls of the monitor are separated from the circuit boards, kinescope and all other parts, you just need to twist them back. To make the animal more comfortable, you need to make bedding inside.
Music Box
Electronic homemade items very often serve as objects that bring joy to their owners. A striking example of this is the music box. Moreover, it does not just play music. It completely preserves space for storing small items.

To work you will need:
- the box itself;
- music module with transistor;
- speaker (suitable for a phone or player);
- switch (can be from a wall telephone);
- compartment for AAA batteries (for example, from children's toys or a flashlight).
The first step is to solder the 8050 transistor to the music module (the circuit is shown in the figure above). Next, conductors are soldered to connect the power supply and speaker. It is important to maintain correct polarity when applying power. The speaker and board are attached using glue. The resulting design should fit into the lid of the box.
After this, the switch is installed. A loop is made from the lace and placed over the stem. It is necessary for management. The second end of the lace is glued to the inside of the box. Its length is selected in such a way that the music module is triggered exactly at the moment the lid is fully opened.

The electronic module is hidden with a cut out piece of cardboard or fabric.
Electronic fishing rod
Electronic homemade circuits offer fishermen to make an electronic fishing rod. It runs on a AA battery. It can be thrown to a depth of up to 5 meters. In this case, the operating time is up to 12 hours.
Electronic homemade products of this kind work on a multivibrator circuit. A piece of board 2x6 cm is enough, on which all the elements of the circuit will be attached. The relay is selected with a resistance of up to 2.4 ohms.
Homemade tattoo machine
Electronic homemade circuits in this case provide for the presence of an electric motor with a power of 12-18 W. As a rule, all such motors have a gear on the shaft. It is necessary to glue a medium-sized button with 4 holes to it (they must remain free).
Next, choose a suitable handle. It will be the body of the entire product and guide the needle. A mechanical pencil works well. To connect it to the motor, a bracket is made in the shape of the letter “G”. It can be made from the handle of a spoon (fork).
A needle is cut from a guitar string. Its length should be slightly longer than the pencil tube. It should be from the center of the motor to the tip of the tube. The needle must be boiled for 10 minutes.
We connect the handle and bracket using electrical tape. The long side of the staple runs along the handle. Fold the staple flush with the top end of the pencil. There shouldn't be any swaying. A motor with a button is attached to the smaller side of the bracket. We pass the handle through the pencil to the motor and insert it into the hole of the button. At the last stage, homemade electronic homemade products are connected to a power source.
Stationary lamp
For illuminating the workspace at the table, homemade electronic devices offer many options. One of them involves the use of a fluorescent lamp and a metal profile, which is used to fasten plasterboard sheets.

The profile has the shape of the letter “P” in cross-section. Thanks to this, it will serve not only as a holder, but also to direct (reflect) light from top to bottom.
The profile must be bent. To do this, two sides are cut. After bending, the edges are connected with self-tapping screws to add rigidity. The lamp has a switch. We make a hole in the profile for it. Next, the lamp is attached to the base. Its rectangular version will help increase the strength of the profile. To attach it to the table, screw a metal corner to one edge of the profile.
We do it for our loved ones
When you love, you always want to please your “other half.” And this desire intensifies on the eve of Valentine's Day. Electronic homemade products will help solve the problem of finding a gift. You can prepare a wonderful and amazing gift with your own hands. For example, an LED valentine.

It is assembled from ready-made elements included in a special set. It can be ordered in the online store. The set includes the following parts: transistors (3 pcs.), resistors (6 pcs.), LEDs (18 pcs.), electrolytic capacitor (3 pcs.), printed circuit board.
Assembling the product is easy. To do this, you only need a soldering iron with low power, which is also used to assemble other electronic homemade products with your own hands. Assembly diagrams are included in the kit. They are guided during work. In this case, several points must be observed:
- When installing capacitors, it is necessary to take into account the polarity of the electrodes. The required electrode is marked on the body of the part.
- When installed, resistors must correspond to the specified ratings. They are marked on the body with a color code.
- Next, LEDs are installed.
- For mounting transistors there is a key in the form of a form on the case.
When working, it is important to solder parts quickly, avoiding overheating. The board will be powered by a 3 V battery. There are two wires from the board to the battery compartment, which, by the way, fits from any electronic toy. The battery compartment is attached to the bottom of the back of the board using glue. This will allow the board to be installed in a vertical position.
For those just starting to take their first steps into electronics, it is important to start somewhere. Well, we invite you to familiarize yourself with ideas that may come in handy in the future and at the same time give you an idea of how something should be done. What to choose if you want to make simple ones with your own hands? Here are options that can be used in everyday life.
Simple power regulator for smooth switching of lamps
This type of device has found wide application. The simplest is a regular diode, which is connected in series with the load. Such regulation can be used to extend the life of an incandescent lamp, as well as to prevent overheating of the soldering iron. They can also be used to change power over a wide range of values. First, there will be the simplest DIY electronic crafts. You can see the diagrams here.
How to protect yourself from mains voltage fluctuations

This device turns off the load if the mains voltage is outside the permissible limits. As a rule, a deviation of up to 10% from the norm is considered normal. But due to the peculiarities of the energy supply system in our country, such limits are not always observed. So, the voltage can be 1.5 times higher, or much lower than necessary. The result is often unpleasant - the equipment fails. Therefore, there is a need for a device that will turn off the load before something has time to burn out. But when creating such a homemade product, you need to be careful, since the work will be carried out with considerable stress.
How to make a safety transformer
Transformerless power supplies are often used in various electronic designs. Typically, such devices have low power, and to avoid electrical injury, they are placed in an insulating plastic case. But sometimes they need to be configured, and then the security is broken. To avoid possible injury, use an isolating safety transformer. It will also be useful when repairing such devices. Structurally, they consist of two identical windings, each of which is designed for the network. As a rule, the power of transformers of this type ranges from 60-100 W, these are the optimal parameters for setting up various electronics.
Simple emergency lighting source

What should you do if you need to ensure that some area remains illuminated in the event of a power outage? The answer to such calls can be an emergency lamp made on the basis of a standard energy-saving lamp, the power of which does not exceed 11 Watts. So if you need light somewhere in the corridor, utility room or workplace, this homemade product will come in handy. Usually, if there is voltage, they operate directly from the mains. When it disappears, the lamp begins to function on battery power. When the mains voltage is restored, the lamp will work and the battery will automatically charge. The best electronic DIY projects have been left for the end of the article.
Boost power regulator for soldering iron

In cases where it is necessary to solder massive parts or the mains voltage often drops, using a soldering iron becomes problematic. And a step-up power regulator can help out of this situation. In these cases, the load (i.e., the soldering iron) is powered using rectified mains voltage. The change is carried out using an electrolytic capacitor, the capacitance of which allows you to obtain a voltage greater than 1.41 network voltage. So, with a standard voltage value of 220 V, it will give 310 V. And if there is a drop, say, to 160 V, then it will turn out that 160 * 1.41 = 225.6 V, which will allow for optimal operation. But this is just an example. You have the opportunity to make a scheme that is suitable specifically for your conditions.
The simplest twilight switch (photo relay)

As new parts are created, fewer components are now needed to make a device. So, for a regular twilight switch, only 3 of them are needed. Moreover, thanks to the versatility of the design, multi-purpose use is possible: in an apartment building; for lighting the porch or courtyard of a private home, or even a separate room. Pointing out the features of such a design as a twilight switch, it is also called a “photo relay”. You can find many implementation schemes that were made either by amateurs or industrialists. They have their own set of positive and negative properties. Negative properties are usually either the need for a constant voltage source or the complexity of the circuit itself. Also, when buying cheap and simple parts or entire sets, people often complain that they simply burn. The functionality of the scheme is based on three components:
- Photocell. It is usually understood as photoresistors, phototransistors and photodiodes.
- Comparator.
- Triac or relay.
When there is daylight, the resistance of the photocell is low and does not exceed the response threshold. But as soon as it gets dark, the structure will be turned on at that very moment.
Conclusion
Here are some interesting electronic crafts you can make with your own hands. The main thing in cases where something doesn’t work out is to keep trying, and then everything will work out. And once you gain experience, you can move on to more complex schemes.
Every day there are more and more, many new articles appear, it is quite difficult for new visitors to immediately find their bearings and review at once everything that has already been written and previously posted.
I would really like to draw the attention of all visitors to individual articles that were posted on the site earlier. In order to avoid having to search for the necessary information for a long time, I will make several “entrance pages” with links to the most interesting and useful articles on individual topics.
Let's call the first such page "Useful electronic homemade products." Here we consider simple electronic circuits that can be implemented by people of any skill level. The circuits are built using a modern electronic base.
All information in the articles is presented in a very accessible form and to the extent necessary for practical work. Naturally, to implement such schemes you need to understand at least the basics of electronics.
So, a selection of the most interesting articles on the site on the topic "Useful electronic homemade products". The author of the articles is Boris Aladyshkin.
Modern electronics components greatly simplify circuit design. Even a regular twilight switch can now be assembled from just three parts.
The article describes a simple and reliable electric pump control circuit. Despite the extreme simplicity of the circuit, the device can operate in two modes: water lifting and drainage.
The article provides several diagrams of spot welding machines.
Using the described design, you can determine whether a mechanism located in another room or building is working or not. Information about the operation is the vibration of the mechanism itself.
A story about what a safety transformer is, why it is needed and how you can make it yourself.
Description of a simple device that turns off the load if the mains voltage exceeds acceptable limits.
The article discusses the circuit of a simple thermostat using an adjustable zener diode TL431.
An article about how to make a device for smoothly switching on lamps using the KR1182PM1 microcircuit.
Sometimes, when the voltage in the network is low or when soldering massive parts, it becomes simply impossible to use a soldering iron. This is where a boost power regulator for a soldering iron can come to the rescue.
An article about how you can replace a mechanical thermostat for an oil heating radiator.
Description of a simple and reliable thermostat circuit for a heating system.
The article describes a converter circuit made on a modern element base, containing a minimum number of parts and allowing to obtain significant power in the load.
An article about various ways to connect a load to a control unit on microcircuits using relays and thyristors.
Description of a simple control circuit for LED garlands.
The design of a simple timer that allows you to turn the load on and off at specified intervals. Working time and pause time do not depend on each other.
Description of the circuit and operating principle of a simple emergency lamp based on an energy-saving lamp.
A detailed story about the popular “laser-ironing” technology for manufacturing printed circuit boards, its features and nuances.
DIY motion sensor connection diagram
It happens that you need to install lighting in your dacha or in your home. will be triggered by movement or a person or someone else.
A motion sensor, which I ordered from Aliexpress, works well with this function. The link to which will be below. By connecting light through a motion sensor, when a person passes through his field of vision, the light turns on and stays on for 1 minute. and turns off again.
In this article I’ll tell you how to connect such a sensor if it doesn’t have 3 contacts, but 4 like this one.
DIY power supply from an energy-saving light bulb
 When to get 12 Volts for LED strip, or for some other purpose, there is an option to make such a power supply with your own hands.
DIY fan speed controller

This regulator allows for smooth adjustment variable resistor fan speed.
The circuit of the floor fan speed controller turned out to be the simplest. To fit into the case from an old Nokia phone charger. The terminals from a regular electrical outlet also fit in there.
The installation is quite tight, but this was due to the size of the case..
DIY plant lighting
DIY plant lighting

There may be a problem with lack of lighting plants, flowers or seedlings, and there is a need for artificial light for them, and this is the kind of light we can provide on LEDs with your own hands.
DIY brightness control
DIY brightness control

It all started after I installed halogen lamps for lighting at home. When turned on, they often burned out. Sometimes even 1 light bulb a day. Therefore, I decided to make a smooth switching on of the lighting based on a brightness control with my own hands, and I am attaching a diagram of the brightness control.
DIY refrigerator thermostat
DIY refrigerator thermostat

It all started when I returned from work and opened the refrigerator to find it warm. Turning the thermostat control did not help - the cold did not appear. Therefore, I decided not to buy a new unit, which is also rare, but to make an electronic thermostat myself using the ATtiny85. The difference with the original thermostat is that the temperature sensor is on the shelf and not hidden in the wall. In addition, 2 LEDs appeared - they signal that the unit is turned on or the temperature is above the upper threshold.
DIY soil moisture sensor
DIY soil moisture sensor

This device can be used for automatic watering in greenhouses, flower greenhouses, flower beds and indoor plants. Below is a diagram on which you can make a simple sensor (detector) of soil moisture (or dryness) with your own hands. When the soil dries out, voltage is applied with a current of up to 90 mA, which is quite enough, turn on the relay.
It is also suitable for automatically turning on drip irrigation to avoid excess moisture.
Fluorescent lamp power supply circuit
Power supply circuit for a fluorescent lamp.

Often when energy-saving lamps fail, it is the power supply circuit that burns out, and not the lamp itself. As is known, LDS with burnt filaments, it is necessary to supply the network with rectified current using a starterless starting device. In this case, the filaments of the lamp are bridged by a jumper and a high voltage is applied to it to turn on the lamp. There is an instantaneous cold ignition of the lamp, with a sharp increase in voltage across it, upon start-up without preheating the electrodes. In this article we will look at starting an LDS lamp with your own hands.
USB keyboard for tablet
USB keyboard for tablet

Somehow, suddenly, I took something and decided to buy a new keyboard for my PC. The desire for novelty is irresistible. Changed the background color from white to black, and the letter color from red-black to white. A week later, the desire for novelty naturally disappeared like water into sand (an old friend is better than two new ones) and the new thing was sent to the closet for storage - until better times. And now they came for her, she didn’t even imagine that it would happen so quickly. And therefore the name would be even better suited not which is, but how to connect a usb keyboard to a tablet.
DIY clock with IN-14 lamps
DIY clock with IN-14 lamps

I have long wanted to post an article on making DIY watches with IN-14 lamps, or as they say, a watch in the steam punk style.
I will try to present only the most important things step by step and focusing on key points. The clock indication is clearly visible both day and night, and they themselves look very nice, especially in a good wooden case. Anyway, let's get started.
 DIY brick foundation: strip and columnar
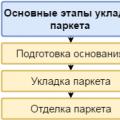 How to lay parquet: methods, necessary tools and step-by-step process for proper installation
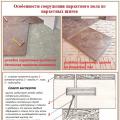 How to lay parquet: methods, necessary tools and step-by-step process for proper installation