The walls of the frame house with their own hands. The device of the walls of a frame house: description, diagram and recommendations How to build the walls of a frame house
The walls of a frame house are erected like a constructor. They consist of several layers of different materials, each of which performs its function. Building a wall of a frame house with your own hands does not require much building experience. You need the ability to work with a saw, hammer, level, screw in screws, cut insulation, mount and adjust wall sheathing panels.
In addition, the construction of frame walls is not associated with the so-called "wet" processes, mixing adhesive mixtures or concrete. Therefore, they can be performed at any outdoor temperature, build your frame house at any time of the year. How should a frame wall be arranged? Where to start work and what is important to know in order for the frame house to turn out to be reliable and warm?
Mounting the power frame
The device of the wall of a frame house begins with the construction of the frame. This is the basis on which all other components of the wall will be attached - insulation, vapor barrier, wind protection, external and internal wall cladding. Like any support or skeleton, the frame must be reliable and strong enough. Therefore, the main requirement that is placed on the frame load-bearing structure is the correct choice of the dimensions of the bearing racks and beams, the correct determination of their cross section, as well as reliable fastening to each other.
Frame box.
Racks are vertical frame elements. Horizontal load-bearing elements are called beams. Connecting elements - jibs. Vertical posts and horizontal beams support the weight of the house. Jambs - ensure the reliability of the connection of vertical and horizontal elements of the frame house. How to mount racks, beams and jibs?
The installation of the frame is carried out on the finished foundation. Foundation pouring is the only construction operation that uses "wet" processes. Therefore, for winter construction, the foundation of a frame house is built in advance. If they are building in the summer, then they wait a week after the pouring is completed, and proceed to further assembly of the frame house. Frame walls are relatively “light”, so for their construction there is no need to wait a month until the concrete gains full structural strength.
Correct walls
- Mount the bed on a concrete foundation with waterproofing.
- In a horizontal position, the walls of a frame house are assembled.
- Lay out vertical support racks.
- Fasten with nails the vertical racks of the upper and lower strapping.
- They cut into the diagonal of the jib between the uprights and the lower harness.
- Under the upper harness, a crossbar is cut into all racks.
- Raise the walls of the frame house and fasten them together.
- Tie the inner and outer walls with the second upper strapping.
- Floor beams are mounted on top of the strapping.
Frame house wall
The outer walls of the frame house must provide high-quality thermal insulation of the inner living space. Therefore, consider what the wall of a frame house consists of, the wall device consists of a heater that limits heat loss. The layer of insulating material of the frame house should be sufficient to keep warm even in the most severe frosts.
 Sectional wall.
 As a rule, porous materials are used as heaters, which in themselves are short-lived. For their long-term use, protection from atmospheric moisture, rain, dew, internal steam, ground dampness, as well as from mechanical action (shocks, punctures, crushing, compression, etc.) is necessary. In addition, some heaters need wind protection.
Due to the need to protect the insulating material, the wall of the frame house in the section is equipped with several layers, namely:
- From the outside, the heat insulator for the walls is covered with a protective membrane. Membrane - a special film that limits the penetration of moisture from the outside, but is able to pass it out. Thus, the heat insulator material is protected from moisture. Such protection is especially necessary for wool insulation, mineral wool, glass wool.
- On the inside, the heat insulator is protected from moisture with a vapor barrier film.
On a note
When damp, building mineral wool loses its heat-saving properties.
- As for foam insulation, for them protection from moisture is the key to durability. When freezing, raw foam is destroyed, covered with cracks, and in two winter seasons it turns into crumbs.
- On both sides of the closed insulation, wall cladding is hung. This material protects the heat-insulating layer from mechanical destruction - shock, compression, as well as from wind. In addition, sheathing forms the surface of the inner and outer walls and is a decor.
The outer and inner sides work at different temperatures, so different materials are used for the manufacture of facing plates. The requirements for moisture and wind resistance are imposed on the outer skin panels. To the internal panels - environmental friendliness and decorativeness.
 Finishing with DSP boards.
 As external wall panels use:
- Metal profile.
- plastic siding.
- It can be a tree - clapboard or block house.
- Use OSB boards (OSB). In this case, additional protection of their surface from moisture will be required. The walls of the frame house from OSB require subsequent painting, plastering.
The correct walls of a frame house have at least 4 layers - outer and inner cladding, a heat insulator and a vapor barrier. They are arranged in a certain order, which ensures the protection of the internal space of a residential building from rain and cold at any time of the year.
Internal walls
Internal walls in a frame house should provide good sound insulation. Therefore, a soundproof layer is placed in the middle of the wall. What is the difference between heat and sound insulation materials?
Often the same insulator can limit heat loss and stop sound propagation. For example, mineral basalt wool is the basis for the manufacture of heat-insulating and sound-insulating boards. These plates are identical in structure and differ in trade characteristics. Sound absorption boards and mats have a decibel characteristic, while insulation mats provide a thermal conductivity characteristic.
 The device of internal walls.
 Unlike exterior walls, interior walls are often sheathed on both sides with the same material. Both sides of the wall are located inside the house, so they are subject to the same requirements - to form the basis for further interior decoration, not to create harmful fumes, to decorate the interior space. Wall panels are used as internal wall cladding:
- Drywall - common for living quarters and moisture resistant for the bathroom.
- Plywood can be used in various thicknesses.
- OSB is best used in non-residential premises.
Frame house walls
The method of laying the insulation is determined by its shape. If it is compressible mineral wool, then it is laid between the frame supports without additional fastening. Mats or slabs are slightly compressed, after which they are placed between the supports "by surprise".
Styrofoam or Styrofoam
Styrofoam or foamed plastic, polystyrene foam. The listed terms are different designations of the same material, which is airtight, blocks natural air exchange, and makes it necessary to arrange supply and exhaust ventilation.
 The walls of the frame house are insulated with foam.
 Despite the low environmental friendliness, polystyrene foam is very popular as a frame insulation, since it is the most budgetary and affordable insulating material.
Rigid foam boards are incompressible. Therefore, when laying the plates, they are shortened to the size of the distance between the frame supports, and then the gaps between the foam and the support are blown out with mounting foam.
Polyurethane foam or polyurethane foam
Polyurethane foam or PPU - is also a completely impervious, waterproof insulating material. It differs in that it creates a seamless, even coating on which further interior finishing can be performed. The application of polyurethane foam requires the work of expensive equipment and specialists, which affects the cost of construction. Therefore, this insulation option is rarely used in budget frame construction.
 Application of polyurethane foam.
 If PPU spraying is used, then first the frame is sheathed with external panels, after that the distance between the frame supports is blown with PPU, and after that, internal wall decoration is performed on the finished even surface of the insulation.
Vapor barrier membrane
The frame house provides for the presence of a vapor barrier layer - a special membrane that looks like polyethylene, but differs from it in physical properties. The membrane is a porous material in which the shape of the pores allows the passage of vapor molecules in one direction and not in the other. Thus, the membrane restricts the movement of wet steam from one side only.
On a note
Membrane fabric is placed on the outside of the insulation in order to limit the ingress of moisture into the pores of the insulating material.
Wind protection
Wind protection material is a layer that is not blown by the wind. The best wind protection for the walls of a frame house is the outer wall cladding and vapor barrier membrane. Plastic siding, DSP, block house work as a panel external wind protection.
These materials also function as waterproofing agents. They protect the inner layers of the wall "pie" from getting wet during rain, snowfall. In the correct design of the wall, there must be a ventilation space under the outer skin. It has the appearance of a gap, which will ensure the free movement of air and the removal of moisture.
The simplest and fastest technology for building walls at home is frame. Frame walls and buildings are distinguished by excellent thermal insulation characteristics, seismic resistance, and durability. And of course it is impossible not to note the financial side of the issue. A frame house is a cost-effective solution due to its special design and the use of inexpensive materials.
Frame walls are a technically simple, but effective structure that includes:
The device of the frame wall may have its own distinctive features, for example, the use of metal racks, but the design itself remains unchanged.
Frame walls and stages of their construction
It is noteworthy that anyone can build a frame wall on their own and this will not cause any special problems. Moreover, for work there is no need to have a special education or extensive experience in this field.

The lower harness and logs must be treated with an antiseptic!


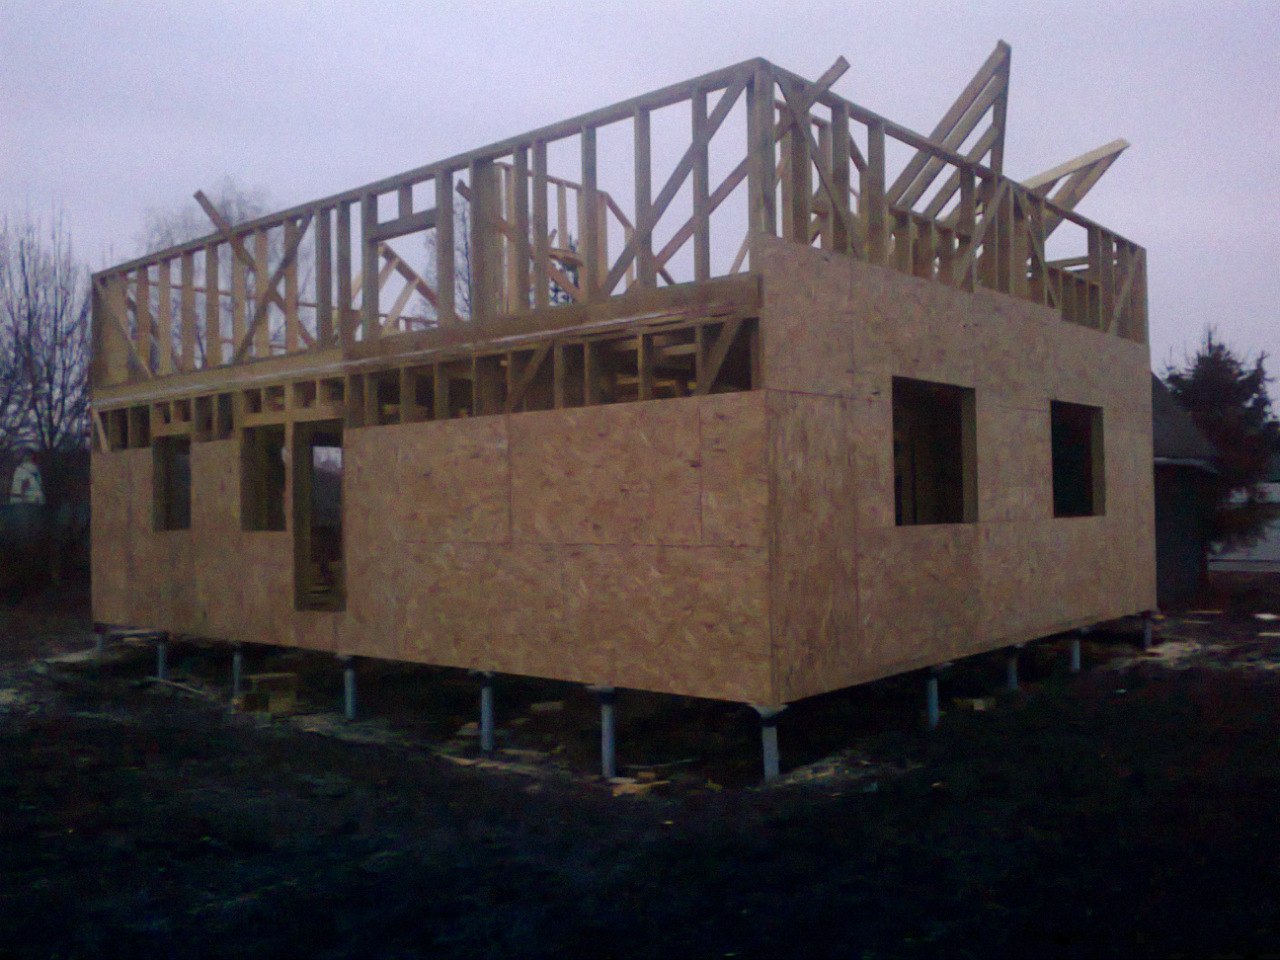
The walls can be built from piece elements, that is, by installing each load-bearing beam in turn or as a prefabricated structure. In other words, fragments of the frame are prepared in advance, which are then attached to the beam of the lower trim. 
Also, one of the types of frame construction is the construction of a house from prefabricated panels (shields). They are produced in the workshop according to a pre-agreed project. Such panels are delivered to the site assembled, that is, they have window openings, places for installing doors, etc. It remains only to fix the shields to the frame and the walls are ready. This technology can significantly reduce the time of work, but has limitations on the variability of execution. In addition, the panels can be heavy and may require a crane to install them. 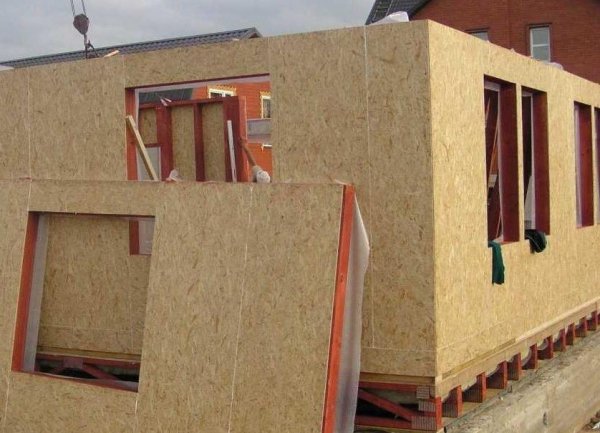
wall structure
When the installation of the frame is completed, then you can proceed to the device of a multilayer wall structure. Here, each of the constituent elements plays a specific function, so it is necessary to observe a special construction technology.
Exterior finishing options
Of course, the outer walls of the frame structure can hardly be called aesthetically attractive. However, after finishing, they cannot be distinguished from more expensive wooden or brick counterparts.
Traditionally, walls are decorated in two ways:

Exterior decoration in the form of decorative brickwork is also practiced. This design option will give the frame building elegance, sophistication and a unique appearance.
The construction of a frame house is a popular technology for winter or summer country houses. This technology is distinguished by simplicity, budgetary cost, efficiency, comparative ease of assembly, and the ability to quickly complete all work. It is important to design and calculate the labor intensity of work, the amount of materials, taking into account the climate and individual budget.
At the heart of a frame house are walls, their proper construction is one of the factors for successful construction. Frame houses can be built with your own hands.
Whether you will do the work yourself or prefer to turn to contractors, knowledge about the correct arrangement of the wall of a frame house will be useful, it will allow you to calculate the cost of work, determine the amount of materials needed and choose the best option.
Do-it-yourself construction requires a lot of free time: people with full employment will not be able to quickly cope with the volume of work.
The frame house is based on a rigid structure in which vertical posts are connected by horizontal lintels.

 Frame house wall device (pie)
 Insulation is placed in free cells, then the surface of the walls is finished inside and out. The frame is installed directly on the foundation, but during construction, you must first assemble each wall as a separate frame on a flat area next to the foundation. The walls of the frame house form a kind of “pie”, assembled according to strict rules.
- The calculation of the thickness of the walls is carried out taking into account the peculiarities of the climate and the purpose of the building;
- When choosing a heater, it is important to achieve good sound insulation, as well as thermal insulation, while calculating its quantity and optimal cost;
- It is important to protect the insulation from moisture and other adverse effects with the help of special films;
- Proper insulation laying technology will prevent heat loss, and energy savings also require calculation and planning.
Builders seek to reduce the cost of heating due to better building insulation. The calculation of the dimensions of the walls and the selection of insulation is the key to success.
 Calculation of wall dimensions and selection of insulation
 For this, the frame racks must be made of timber with a thickness of 200 mm or more. A cross frame is also allowed, knocked down from bars measuring 50x50 mm.
The wall thickness calculation depends on the climate: in warm areas, with hot summers and mild winters, the wall thickness can be reduced.
The calculation of indicators for a country house, which is visited only in the summer, will be simple: a wall thickness of 40 mm is enough, and a cut board about 15 cm wide, called “forty”, is suitable for the frame.
Foam plastic, mineral wool, as well as ecowool and polyurethane are used as heaters. Styrofoam is one of the cheapest materials, but it is fragile, insufficient in terms of sound insulation, combustible, and can be damaged by rodents. Mineral wool is popular in modern practice.
 Insulation of a frame house with ecowool
 Ecowool and polyurethane foam are quite expensive, but they have the best protective properties, their use will allow you not to worry about vapor barrier, but during the construction process it will require special equipment for their application.
Since the surface of a frame house, as a rule, for rigidity and strength, is sheathed with sheets of plywood or chipboard during construction, insulation can be attached directly to these sheets. Of great importance is the calculation of the amount of materials: it is recommended to use a double layer of insulation. Mineral wool sheets and sheathing material are separated by a windproof film. The insulation is attached with special glue, a stronger fixation can be achieved with the help of dish-shaped dowels.
For the external protection of the wall “pie”, a vapor barrier is needed inside the building and its waterproofing from the outside.
 Vapor barrier inside the building and its waterproofing from the outside
 Vapor barrier is necessary to avoid the condensation of wet vapors inside the walls and their entry into the insulation. With the penetration of moisture, mineral wool will significantly lose its thermal insulation qualities, and large energy costs will be required for additional heating of the building. The waterproofing film is laid outside, from the side of the facade, this allows you to protect the wall structure from wind and precipitation. For vapor barrier, foil materials are used, for example, penofol, for waterproofing, glassine is required, membrane boards can be used. During construction, such boards are fastened with an overlap construction stapler, and the nodes must be carefully glued at the joints with a special tape.
Vinyl siding
Vinyl siding is used in country houses.
 Vinyl siding
 Its cost is inexpensive, it is not subject to rotting, rodents, it is characterized by ease of work and convenience in subsequent operation (easy to clean, looks neat), long service life. It is often used for sheathing country houses or, if the developer wishes, to reduce the cost of finishing.
metal siding
It is used for facade cladding and metal siding, it is durable, resistant to impacts and attractive design - an image of a fabulous hut is created.  metal siding
Galvanized steel with a polymer coating does not rust, tolerates temperature extremes well.
Clapboard sheathing is distinguished by a number of disadvantages inherent in wooden materials - a tendency to dry out (swell), the effects of bark beetles. Modern impregnations are used that reduce the effects of harmful effects and the fire hazard of the building, making possible fires self-extinguishing.

Among the wooden materials for facade cladding is a blockhouse that imitates timber, which is used for both interior decoration and exterior cladding. This material is stronger than round logs, it is attractive in design, but over time it still changes its shape, since it is a modified lining.
Sheathing should not be attached directly to the frame during construction.
 Block house installation scheme
 For summer houses, such a solution is possible, but if you need to spend even a few days in such a house in winter, steam condensates will begin to destroy the wood and moisten the insulation. For the construction of a winter house, pay attention to the good ventilation of the facade: for this, bars are nailed over the entire surface, 30-40 mm thick, then they are engaged in wall cladding. It is important to calculate the load on the foundation and accurately fill it, then the air circulation in the ventilation gaps will allow the condensate to erode naturally.
Brick
It is possible to cover the facade with facing bricks, but careful calculation of the load on the foundation and walls, which is significant in this case, is necessary so that the structures can withstand its weight.
 Scheme of facade cladding with facing bricks
 This material protects well from harmful effects, but the cost of such a cladding is among the most expensive.
Tile
The tiled cladding of the facade is distinguished by its reliability and long service life, but it is impossible to attach tiles to wooden elements with glue.
 Tiled facade cladding
 The technology of attaching tiles using self-tapping screws is expensive and time-consuming, if you choose this material, an accurate calculation will be required: it is necessary to determine both the amount of materials and the cost of work.
Plaster
Wall plaster is also not very popular in Russia due to its fragility.

 Wall plaster
 It is recommended to use plaster technology in three layers. For plastering in one layer, it is best to use a mixture of Portland cement, white cement (lime) and sand. To avoid cracks, it is better to add fiberglass.
Fake diamond
Facade cladding with artificial stone has an attractive design, such material is quite light in weight and convenient in the process of laying, does not create a significant load on the foundation.
 Facade cladding with artificial stone
 The house, lined with artificial stone, looks very attractive.
Thermal panels
Sheathing the facade of wooden houses with thermal panels is recommended in regions where the temperature in winter drops below -25 degrees.
 Sheathing the facade of wooden houses with thermal panels
For interior decoration, lining, wood-fiber boards are used, drywall is possible, but it does not tolerate temperatures below zero.

 Finishing wagon
 It is impossible to use it for finishing work on summer houses, which are not planned to be heated in winter.
As you can see, frame construction technology optimally combines quality and cost. The device of the walls of a frame house is excellent for high-quality insulation of a living space.
It is necessary to carefully design a frame house, perform an accurate calculation of work for the durability and reliability of the house.
This technology is characterized by simplicity of work and will ensure their low cost.
Video
In this video, you can learn a lot of interesting and new things about how to avoid mistakes and build the right frame walls.
Competent erection of the walls of a frame house guarantees the necessary level of thermal insulation and ensures comfortable living for residents.
The frame wall is essentially racks and strapping and sheathed with sheet material or molded. However, these are only the main structural elements. Insulation is placed between the posts. On the inside, it needs a vapor barrier to protect the material from moisture released from the inside of the house to the outside. From the outside - wind or waterproofing with a membrane that protects the insulation from moisture from the street, but brings out the internal steam.
The design of frame walls, regardless of the specific building materials used, looks like this (in order from the street to the room):
- exterior finish;
- additional thermal insulation (if necessary);
- bar;
- wind insulation;
- sheathing;
- structural wood (pillars);
- insulation;
- vapor barrier;
- sheathing;
- interior decoration.
In this scheme, depending on the climatic conditions and the wishes of the owner of the house, adjustments or clarifications are made related to the features and technical characteristics of the building materials used. For example, if reinforced is needed, then foam boards or other similar material can be installed under the exterior finish, which contribute to both insulation and leveling the walls under. The sheathing can be sheets of waterproof plywood, cement particle board, gypsum board, chipboard, etc.
Scheme of wall insulation of a frame house
Particular attention should be paid to the arrangement of ventilation gaps. They play an important role in ensuring the proper level of thermal insulation of the house. Ventilation ducts are formed due to the fact that the external finish or external additional heat-insulating material is attached to the bars. That is, there is a space between the membrane wind insulation and the outer layer of the frame wall, the size of which is equal to the height of the bar. Air moves in this space, so excess moisture successfully evaporates.
Ventilation due to the crate

How are the walls of a frame house erected?
A frame wall pie or frame sandwich starts with the bottom trim. In order to perform the lower strapping, a beam is used, the section of which is 100X150. At the corners, the beam, previously cut down to half the height, is superimposed on each other and connected with a metal dowel. The dowel must be chosen in such a size that it not only fastens the beam, but also remains 8-10 cm above the surface.
After the lower trim is installed, grooves are cut along its entire perimeter at a distance of a maximum of 50 cm from each other. Internal vertical racks are inserted into these grooves, which are fixed with steel corners and self-tapping screws. End posts are installed on protruding dowels. To do this, a hole is made in the center of the lower part of the rack, 8-10 cm deep, so the beam is put on the dowels.
Additionally, the racks are reinforced with slopes. In order for the walls to cope with the pressure of the wind, struts are installed: small rigid ones at the base of the racks or large ones going obliquely from corner to corner. After the wall frame is installed, proceed to the installation of ceiling and floor beams.
The location of the jibs in the photo

Unlike wooden log houses, frame houses do not shrink, therefore, immediately after the construction of the building, you can start external and internal finishing work. However, this advantage is guaranteed only if absolutely dry timber is used.
Insulation of the walls of frame houses
The frame is the "skeleton" of the walls of the house, on which all other structural elements are "built up". The "core" of the frame cake remains a heater.
- the most expensive part of the construction of a frame house, since the amount of heat-insulating material required significantly exceeds the amount of timber used. The thickness of the frame wall depends on which insulation is chosen and how much of it (only the inner layer or plus an additional outer one).
The constant task that everyone solves in the process of building a frame house in their own way is to optimize the cost of insulation, while ensuring a sufficient level of thermal insulation. And if we take into account that the frame house generally consists of 70-80% of insulation, then the task is more than serious.
What thermal insulation to choose?
Each of the heaters has its own advantages, which are taken into account during construction.
- Stone wool is an easy material to transport and install. To install it, no special tools are required, only a special knife for cutting sheets. Stone wool mats are tightly laid between the racks, they must fill the entire space so that there are no even the slightest gaps, “cold bridges”. This insulation is essentially different types of stone, which, when exposed to ultra-high temperature, turned into thin fibers. Rodents and insects do not start in the stone, it does not burn, and is exposed to the influence of fungi and bacteria. The only condition is that stone wool cannot be rammed and compressed. Even a compression of only 10% is considered an irreversible deformation of the material.
- Glass wool or staple fiberglass is a cheaper material than stone wool, but it also absorbs moisture more intensively. Therefore, during the construction of frame walls, glass wool should be carefully protected from moisture from outside and inside the premises of the house through the micro-slits of the skin, as well as from the soil through the foundation. In addition, glass wool is not the most comfortable material for work, since it is difficult and inconvenient to lay it.
- Ecowool is a new 100% environmentally friendly material. The manufacturer of the insulation claims that, due to the technical properties of the raw materials, when using ecowool, it is possible to do without hydro and vapor barrier films. This is especially important for those who believe that the construction of frame walls involves only natural materials. There are two ways to install ecowool cellulose: dry - by conventional tamping and wet - by spraying on the walls, when the fibers stick to the surface and form a dense layer.
- Styrofoam (in the form of plates and non-pressed) is a material that is easy to install, does not shrink and does not require hydro and vapor barrier, as it does not absorb moisture. The only thing that holds back consumers from the mass use of this material is the strong love of rodents for it and the statements of some experts about its insufficient environmental friendliness. There is no scientific evidence of the possibility of "harmful fumes" of polystyrene, however, each owner has the right to independently weigh all the "pluses" and "minuses" of the thermal insulation material.
- Expanded polystyrene is a "relative" of polystyrene with an additional layer of aluminum. The material is produced both in the form of plates and in the form of rolls. Expanded polystyrene is thinner than polystyrene, while its thermal insulation performance is higher. The provided self-adhesive film allows to make installation extremely quickly.
- Wood chips or cereal husks are the cheapest way to insulate frame walls. According to conservative estimates of the craftsmen, this material is capable of reducing construction costs by 60-70 thousand rubles, compared with cases where stone wool is used. The disadvantages of this heater are few, but significant. Firstly, since sawdust will be compacted over time, it is impossible to guarantee a uniform layer of insulation after 10-15 years of operation. Secondly, sawdust is hygroscopic, so special attention will have to be paid to the hydro and vapor barrier system. Thirdly, no one canceled the fire hazard of the material.
- Sprayed polyurethane foam insulation - materials similar in composition and appearance to mounting foam. Liquid components are mixed and sprayed onto the surface of the walls. Under the action of air, the formed foam solidifies, turning into a monolithic layer of insulation. Excess tubercles are cut off, leveling the surface. The advantages of this material are that all cracks are carefully sealed, and vapor and waterproofing is not required, since the hardened layer is waterproof.
- Straw + clay + sawdust - insulation of the first houses built using frame technology. It is an absolutely natural material made from almost free raw materials. In a house with such insulation it will be very comfortable both in winter and in summer. The only disadvantage of preparing such thermal insulation is the complexity of the process. The mixture is prepared by hand and tightly fits between the frames of the frame. In one working day, one person can prepare no more than a few cubic meters of solution. Therefore, for example, a house with an area of 54 m2 will have to be insulated by one person within two months.


How to correctly calculate the thickness of the insulation layer?

In order to correctly calculate the consumption of material, not to overpay for too much and not to make purchases in a hurry in case of a shortage, it is necessary to immediately determine the required thickness of the insulation. Accurate calculations can be made using an electronic calculator on the Internet or using a special formula. The formula assumes data on the heat resistance (resistance to heat transfer) of the walls of the house when using the selected material. Thermal resistance depends on the climatic conditions in which the house will be used, and is specified in the "Thermal protection of buildings" standards.
Another indicator that must be entered into the formula is the thermal conductivity of the material. It is usually indicated on the packaging. If the manufacturer has not provided data, then they can easily be found on the network or in special directories.
The thickness of the insulation layer is the product of thermal resistance and thermal conductivity. For example, if you build a frame house in the Moscow region and choose stone wool as a heater, then after calculations using the formula, you get an indicator of 14 cm. Since the thickness of stone wool is standard - 5 cm or 10 cm, you will have to lay the insulation in two layers.
Wall insulation from the inside
An alternative to external insulation of a frame wall is the installation of thermal insulation from the side of the room. Materials for internal insulation can be chosen the same as for external. However, the installation of thermal insulation from the inside is regarded by experts as more of a forced measure than planned in advance during the design of a frame house. Internal insulation has its significant drawbacks. Firstly, it "steals" the useful space of the premises of the house. Secondly, and even more seriously, the supporting structure of the house with such insulation remains in the zone of alternating temperatures, therefore, favorable conditions are created for the formation of condensate inside, in the space of the structure itself. Excess moisture leads to the formation of mold and the spread of fungus.
The device of the internal walls of the frame house
For the frame of the internal walls, you can use a beam with a section of 100X50. Between the vertical posts of the partitions, insulation is laid, the thickness of which can be 1/3 less than the thickness of the insulation in the outer walls of the building. That is, for example, one 10 cm layer of stone wool can be used. Indoors, they prefer to use glass wool instead of stone wool, since fiberglass absorbs sounds more efficiently. Partitions on both sides are covered with a membrane vapor barrier film, on which gypsum boards or other finishing material can be directly mounted. Sometimes it is more expedient to use ready-made SIP panels for the internal walls of a frame house. They are cheaper, and the monolithic structure of the panels makes it easy to make holes in the walls if necessary.
What does the frame wall pie consist of in the photo

Silent frame house: dream or reality?
The “Achilles heel” of all frame houses, as well as any wooden buildings, remains insufficient sound insulation. It is widely believed that in a frame house you will have to put up with sounds constantly coming from neighboring rooms, with an audible clatter on the second floor. As experts prove, soundproofing in a frame structure is only a matter of competent design and reasonable costs without saving on high-quality soundproofing materials.
Noises in the home can be airborne and structural in nature. Airborne noise is mostly heard from the outside and vibrations are transmitted inside the premises. Internal air noises include the sounds of voices and musical instruments. Since wood absorbs this type of noise well, door and window openings remain the “weak link”. The rule is simple - the more windows in the house, the larger their area, the more noise there will be. The choice of high-quality double-glazed windows will solve this issue to some extent. Compliance with all norms and construction technologies and accurate adjustment of all structural elements are of cardinal importance.
Laying soundproof panels

The second type of noise is structural, that is, noise from steps, blows, etc. The fight against this type of noise is especially relevant in frame houses. It is solved by the right choice of finishing materials. For finishing floors, it is necessary to use materials that reflect sounds, and for finishing ceilings - sound-absorbing materials. If you use only one type of insulation, for example, only drywall as a sound absorber, then even the opposite effect is possible - there will be more noise.
What materials can be used to insulate floors and ceilings?
For the floor, several materials are suitable for the choice of the owner.
- Heaters (mineral wool, expanded polystyrene, fiberglass).
- Vibration suspensions.
- Cork coating.
- Special sealants.
- Foam tracks.
It is a mistake to use foam or polyurethane as sound insulators, since they consist of closed cells that are not capable of reflecting noise. Ceilings in a frame house can be insulated with drywall or special acoustic boards.
Insulation of the floor of a frame house

It is very important to avoid any gaps in the structure. The space between the floor lags can be closed with basalt insulation, small gaps in the floor can be sealed with sealant, and it is better to lay a layer of mineral wool between the finishing floor material and the walls. Thus, you can ensure the most comfortable living in a frame house.
Our step by step instructions We will divide the construction of a frame house into several stages:
It is worth noting that each stage of the construction of a frame house deserves a separate article, in addition to everything, if you describe all the possible options for foundations, roofs, etc., you can get a whole book. In this regard, to improve readability, some steps in construction are described in detail in separate articles, but here - only what concerns the features specifically. frame house.
Step number 1: Preparatory work for the construction of a frame house
The preparatory work for the construction of any house is the same and includes:
- Site preparation
- House layout
Site preparation
First you need to clear the site of vegetation, if not all, then at least the place where the house will be built. This will greatly facilitate the markup and make it more accurate.
If the construction site has a large slope, then, depending on the type of foundation and desire, it can be pre-leveled on the horizon using special equipment.
Attention! Do not neglect this procedure, spending 1-2 hours on clearing, in the future you will greatly facilitate your work, and measurements in the grass can be with a large error.
House layout
 Marking is a very important stage, because the layout and evenness of the corners of the walls depend on it. With inaccurate markup, it will be very difficult to correct this error in the next steps.
Marking the foundation of a frame house, as well as any other, as a rule, includes a preliminary placement of pegs (all external walls are marked), as well as marking all internal walls.
If you want to know how to properly mark the foundation for a house with your own hands, and so that all walls and corners are even and in line with the project, I advise you to read my article about this. Given the large amount of information, I had to take it out separately.
Step number 2: Do-it-yourself foundation for a frame house
The great advantage of a frame house is that almost any type of foundation is suitable for its construction. The only limitation is the type of soil on the site and your capabilities.
It is worth saying that laying the foundation for a frame house with your own hands deserves separate topics of discussion and is included in separate articles. Moreover, there are several types of suitable foundations, and which one to choose is up to you.
Here I will briefly talk about suitable foundations for a frame house, and about the cases in which each of them is used, as well as give links to their detailed description.
 The most common type of foundation for a frame house is a pile-screw. This is practically the easiest and cheapest option for such a house, especially since it is not difficult to install a pile-screw foundation with your own hands.
Such a foundation is suitable for almost any soil, except for rocky ones. Particularly well suited for swampy soils, where dense soil rocks are deep and other types are very expensive.
In general, all the pros and cons of pile-screw foundations are discussed in another topic that will help you decide on the choice of support for your home.
Shallow strip foundation
 Shallow strip foundation, also used for construction quite often. This is due to the relatively low cost of laying it, as well as the possibility of using concrete floors in the house.
Such a foundation, due to its relative fragility, requires precise adherence to the laying technology.
As a rule, a shallow strip foundation is used in good soils, and is strictly contraindicated on soil with a very high level of groundwater and swampy soils.
Slab foundation for a frame house
 Recently, a slab foundation is gaining more and more popularity for the construction of a frame house with their own hands. Despite its low cost, it has obvious advantages, such as versatility, reliability, durability, and it can also be used as a subfloor in the house and not be spent on it separately.
Often, instead of a classic monolithic slab, a slab foundation with stiffeners is used. This allows you to save a little on laying, and also strengthens the entire structure as a whole.
Step number 3: Do-it-yourself frame house flooring
The floors in a frame house are not much different from the floors of other types of houses and can be wooden or concrete. The choice depends entirely on the type of foundation, capabilities and desires. 
In this step-by-step instruction, we will consider in detail only a wooden floor, concrete - in a nutshell, since it is used less often, and it is not possible to fit everything in one article.
Concrete floor installation
 It is worth noting that the concrete floor in the frame house is arranged, in cases of a slab foundation, or a strip one. Everything is clear with the slab - the slab itself will be the floor of the first floor.
But if the foundation is strip - the concrete floor is made of lightweight concrete, such as expanded clay concrete, for example.
Wooden floor installation
Let's look at the device of a wooden floor using the example of a pile-screw foundation. For a tape, in principle, everything is done in exactly the same way, with the exception of the lower trim, it can be from a thinner beam. But first things first.
Tying the foundation of a frame house
The device of a wooden floor begins with the binding of the foundation. As a rule, the strapping is made of timber 150x150 or 150x200, depending on the thickness of the wall and the distance between the piles. The greater the distance, the thicker the beam must be to avoid sagging. 
The strapping is necessary, firstly, in order to give rigidity to the foundation, and secondly, to evenly distribute the load on the foundation, and thirdly, it will serve as a support for the future floor of the frame house.
In order to easily carry out the strapping process with your own hands, we divide it into several stages:
- The beam is laid out along the perimeter of the foundation, the length of the walls and diagonals are checked. At this stage, the final and accurate marking of the walls is carried out, according to the project. By the way, do not forget about the waterproofing, which we put under the harness in the form of roofing material.

- The next step is to outline the points of joining the timber, they should be located on the pile, as these will be the weakest points that should not “hang”. This applies to houses whose walls are longer than the length of the purchased beams.

- The beam is joined with an overlap of 20-30 cm, as shown in the photo. To do this, the so-called "locks" are cut out from the end.

- The corners are joined in almost exactly the same way. This is clearly visible in the photo.

- The beam is attached to the foundation with bolts or studs. To do this, it is necessary to drill holes, both in the head of the foundation and in the beam itself. For ease of further installation, protruding parts - bolt heads or nuts with studs - must be deepened. The joints are additionally punched with nails of 150 mm or 200 mm, depending on the size of the beam.

- Once the perimeter is ready, we move on to the final step - tying the foundation under the inner walls of the frame house. This bar, to the already installed outer one, is attached in the same way. For reinforcement, you can additionally apply mounting metal corners.

When the binding of the foundation of the frame house is ready, we proceed to the next step in our instructions - the construction of the floor frame.
Floor frame in the house
It is worth noting that already at this stage it is desirable to provide for all communications entering the house, such as water and sewerage. Electricity and gas can be supplied later, but if everything is foreseen in advance, there will be much less problems later.
The next step is to install the lag, on top of the harness. If the distance between the supports is about 4 meters, then it would be better to use a beam measuring 100x200mm or 100x150mm. You can use a board 50x200mm or 50x150mm, stitching them in two. 
If the distance is less than 3 meters, you can use a board with a size of 50x150mm or better 50x200mm.
Installing a log is a simple step in assembling a frame house, but there are some nuances that need to be provided for in this manual:

Do-it-yourself waterproofing and insulation of the floor of a frame house

It should be noted that waterproofing, as well as vapor barrier, must be installed with an overlap, according to the instructions for the material, while eliminating the ingress of moisture into the insulation, both from the outside and from the inside. And the insulation itself fits tightly, without cracks.
So we reviewed the instructions for arranging the floor of a frame house, now it's time to start on the walls.
Step number 4: Arranging the walls of a frame house
The next step of our instructions will install the walls with your own hands. Just like with the floor, we will fasten all boards and beams with nails and (or) mounting metal corners, some fastenings can be made with studs.
It should be noted that almost the entire frame is assembled from a board measuring 50x150mm or 50x200mm, depending on the required wall thickness and the required thickness of the insulation. 
Some people think that it would be better to install a beam at the corners of a frame house, but this is not entirely correct, and why - a little later, during the installation process, I will tell you about everything.
So, let's start assembling the frame of the walls of the future house.
For a better understanding and assimilation, we will divide our instructions for arranging the walls of a frame house into several stages:
- Assembling the walls of a frame house. Windows and doors
- Installation and fastening of walls vertically in place
Assembling the walls of a frame house with your own hands. Windows and doors
We will assemble the walls on the finished floor of the frame house, this is the most convenient option. But it must be taken into account that in this case, it is necessary that all dimensions are accurate so that the walls do not turn out to be longer or shorter than the already arranged floor.
To understand what I'm talking about, first look at sectional wall of a frame house and then I'll talk about everything in order.

Now we will analyze step by step how to assemble all the walls of a frame house with our own hands:
- First of all, we need to decide on the height of the ceiling in the house. Let's say that the height of the draft ceiling will be 280cm. This means that the vertical racks of the frame walls should be 280-15 = 265cm. The diagram shows where 15 cm came from.

- The distance between the uprights, as a rule, is chosen based on the width of the insulation sheet, as a rule, its width is 60 cm. If the insulation is on a cotton basis, then the distance is 2 cm less for closer contact.

- The top and bottom boards of the wall are laid out on the floor and the places where the vertical posts will be nailed are marked. Then the racks themselves are laid out and pierced with nails 120-150mm. You can additionally fasten them with corners.

- It is worth noting that each wall will be less than the thickness of the wall than the length of the floor. This is clearly visible on the diagram.

- If the length of the wall is greater than the length of the board, then the wall is assembled from several parts. This is also done in cases where there are few helpers, because the whole assembled wall will have a lot of weight.

- As a rule, jumpers are mounted between the racks to stiffen the entire structure. There are no strict rules on the number and frequency of installation, it all depends on the length and height of the walls, but usually they break through one or two per gap between the racks. The second option is better and is visible in the photo, in the case when they break through one at a time - they are mounted in a checkerboard pattern (one at the bottom, the next at the top). This can be done later, when the walls are installed. Most often, jumpers are made with the expectation that they will serve as a joint for plywood or osb-boards, depending on further work.

- Window and door openings in the wall of the frame house are arranged as shown in the diagram.

- This is what it looks like in real life.

The most common mistake when assembling the walls of a frame house is that many people forget to take into account the thickness of the board in the calculations, thus the wall is not as long as we would like.
Putting the walls in place


It is worth noting that when assembling the walls, it is necessary to use a cord, pulling it from one corner to another, otherwise, the corners will be even, but the walls will not.
Upper harness and structural reinforcement
So, the wall frame is assembled, now it is necessary to make the upper trim from the same board as the walls.
The upper trim is necessary, first of all, for a stronger adhesion of the corners, and also gives unity to all parts of the frame walls and distributes the load between them. 
To do this, it is necessary to pierce the board with 120-150 mm nails over the walls, around the entire perimeter, including internal bearings, so that all joints are blocked with an overlap of at least 25-30 cm. Except for corners where the overlap will be equal to the wall thickness. 
The next step in our instructions will be to strengthen the entire structure as a whole. There are several options, the most common is reinforcement with plywood or OSB-plate. 
As a rule, having broken one side around the entire perimeter (internal or external) with sheets of OSB-plate, the frame of the house already becomes very rigid.
Internal partitions of a frame house
The device of internal partitions is almost no different from the device of external walls, except that they have softer requirements in terms of thickness and insulation. 
- Internal partitions, unlike external walls, can be made thinner. Everything will depend on preferences and comfort for soundproofing.
- The insulation, inside the partitions, will serve, first of all, as a sound-absorbing material, rather than as thermal insulation.
- It is allowed to insulate internal partitions without waterproofing and vapor barrier materials.
These are all the main differences between the internal walls and the external ones, otherwise they are arranged in exactly the same way.
Step #5: Frame House Roof
The roof of a frame house is practically no different from the roof for other houses, be it concrete, brick or any other. I will even say more, the installation of a roof for a frame house will be less laborious than, for example, for a block or brick house, because its fastening to the walls will be much easier. 
It is worth noting that the construction of the roof is a very responsible process, but if you do not have a complicated layout of the house, then you can easily do it yourself.
Building the roof of any house, including a frame house, is a very big topic, where there are many nuances. Firstly, there are many types of roofs, and it is not possible to describe everything in detail in one article. And secondly, in order not to confuse you, I, perhaps, will transfer this topic to a separate article.
Step number 6: Warming the frame house
So we got to the final stage of building a frame house - its insulation. Everything needs to be insulated - the floor, walls and ceiling.
You can read more about insulating a frame house with your own hands in another step-by-step instruction, here we will discuss only general points.
When choosing a heater for the walls of a frame house, it is necessary to take into account not only the characteristics of the heater itself, but also the features of the tree, with which not all types of insulation will interact well.
Here is a small instruction for warming a frame house with your own hands:
- Outside, over the OSB sheets, a special waterproofing membrane is stretched. Which side - should be in the instructions for it.
- Inside the house, between the racks, insulation is laid, in several layers, depending on the requirements for the house and the thickness of the wall. Each layer is laid with an overlap on the joint of the previous one in order to avoid cold bridges.
- Floor insulation works in the same way.
- It is better to insulate the ceiling from the attic, after filling the vapor barrier film from below onto the ceiling beams and hemming them with a board or plywood.
- After laying the insulation, it is necessary to fill a vapor barrier film on top of it, it will protect the insulation from moisture from the inside.
- Depending on the needs and further finishing work, sheathing material is stuffed on top of the film on the walls - a board or slats, but most often - OSB sheets, on top of which, in the future, a fine finish is carried out.
As you can see, there is a lot of text. But, I believe, all stages of construction have been described in detail here. do-it-yourself frame house, despite the fact that some points have been moved to separate topics, but this is only for your convenience.
I hope that by following this step-by-step instruction, you will be able to acquire a warm, cozy and reliable home without much difficulty and at minimal cost.
 Blood thinning products: recommendations and prohibitions
 Tank legend, fighters and equipment for the Arctic: what will be shown at the Victory Parade How is the Victory Parade
 Helba yellow tea: properties and reviews