Canadian cup, log cabin with a spike. Canadian felling technology - features of the preparation of bowls, the process of laying crowns Log houses Canadian bowl
Technology Benefits
In this article, we continue to explore the secrets of hand-cutting wooden houses. The main difference between the Canadian cup and the Russian cup is the presence of a clasp. The log cabin built using these two technologies is easy to distinguish even visually by the fences in the overcut area. The situation is more complicated with an improved Canadian cup, which additionally includes a spike. It plays a crucial role in insulating the corners of the house and ensuring that the walls are windproof, but we will talk about the spike a little lower.
So, let's analyze the processes of cutting Russian and Canadian cups. For your convenience, below are diagrams that reflect the three stages in the life of a log cabin for the Canadian and Russian bowls. Let's consider in order.
Stage 1 (upper row of figures). The log house has just been made and is on the site of a construction company. The appearance of both options is beautiful, the gaps are minimal.
Stage 2 (middle row). It's been 2-3 years. During this time, in the log house, or rather, already in the wooden house on your site, there have been serious changes associated with the shrinkage of wooden structures. For information: depending on the initial moisture content of the logs, during the drying process, their diameter decreases by 5-10%. Accordingly, the shape of the bowls, the gaps in the cups and grooves change. Of course, both types of cups are subject to shrinkage. Both in the Russian cup and in the Canadian cup additional gaps appear, the log cabins settle, filling the resulting spaces.
Stage 3 (bottom row of figures). Of course, the logs cannot “hang” in the air, as shown in the previous figures (the second stage was introduced artificially to make the drying process more visual) - they will settle, occupying the vacated space. But here the Russian and Canadian cups will behave differently. If in the Russian one, after the shrinkage of the upper log, rather large gaps are formed that will have to be plugged with flax jute or tow, then in the Canadian cup, due to its triangular shape and the presence of notches, the formed gaps will jam, and a heat-saving and, importantly, beautiful cut will remain.

The dotted line in the lower left figure shows a spike, which will be discussed in the next section.
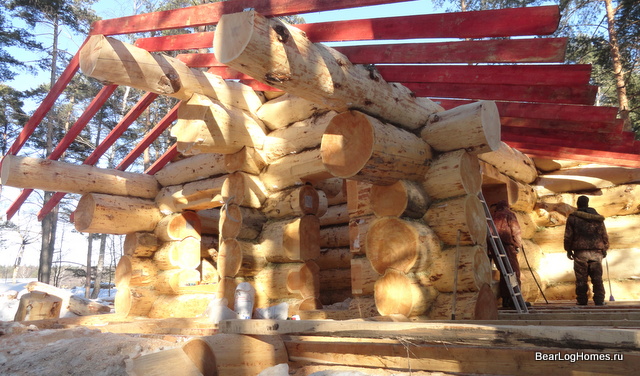
Below are a few photos to give you an idea of what it actually looks like.
The first photo shows a log with characteristic seams on both sides (the second seam is not visible). Pay attention to the groove at the top of the log - it is intended for the spike mentioned earlier. In addition, note two cuts in the upper parts of the lower log - this is also an important element of modern technology - a relief cut, we will talk about it below.
The following figure shows the resulting wall with characteristic notches in the corners.

The following photo shows the use of a modern tool: the master masterfully carves a spike in a Canadian cup. Having good skills and using modern chainsaws along with the classic trait and an ax, you can quickly perform very complex operations on fitting cleats and spikes for Canadian and Norwegian cups. It is difficult to do this with one ax.

The use of a special spike ("tail tail") when cutting a log house into a Canadian cup
As a matter of fact, cutting into a Canadian cup involves only the use of cleats. But modern cutters went further and added a special spike, sometimes called a fat tail, to the heel. In fairness, it should be noted that the spike is sometimes used when cutting into a Russian cup, but the best effect is achieved when the spike is combined with a notch.
Advice
An integrated approach in the manufacture of log cabins allows you to get strong and warm houses and baths. Be sure to formulate for yourself the technical conditions that you will later present to the builders. If you do not want to have gaps in the corners of the house, then it is necessary to use notches and spikes in the manufacture of cups, as well as metal ties when end-joining logs. If you do not want to have gaps between the logs in the walls, apply the technology of hanging external corners, use the “undercut” gap, set the minimum value of the longitudinal grooves in the covering crowns (usually at least 8-10 cm). The formation of large side cracks on round logs will prevent the use of vertical relief cuts.
What is a cup with a notch, a spike and a groove for a spike, shown in the photo. As we can see, the spike is located in the lower part of the log, and in the upper part there is a groove for the spike of another log located higher in the cut (of course, perpendicular to the log shown in the photo, so the groove is directed perpendicular to the spike).


So what is the spike for? In fact, despite the simple form, this is a rather difficult element to manufacture, therefore, not all construction companies in St. Petersburg, not to mention the outback of Russia, undertake such work.
The spike is designed to insulate the corners of the house and eliminate their blowing after shrinkage and shrinkage of the log crowns. Here you need mathematical accuracy, a high-quality instrument and virtuoso possession of it.
The following photos show the basic operations for making a spike, including its antiseptic treatment.
A little lower is the next step in cutting the cup - creating a groove for the spike shown earlier.
The following material is valid not only for Canadian cup cutting, but also for other manual cutting technologies.


Using a special clearance along the axis of the logs (undercut)
Of course, a newly made frame, in which the logs lie "one to one", without cracks and gaps, looks very beautiful on the construction site. Especially if you look from the side of the ends of the logs in the corners of the cuts, in window and door openings.
But the problem is that in this case, after 2-3 years, rather large gaps form between the crowns, which will not only spoil the appearance of your wooden house or bath, but, most importantly, will negatively affect the thermal conductivity of log walls. This will require constant caulking, and in the most difficult cases, even special wall insulation.
Why is this happening? This is not an idle question: unfortunately, in many construction companies, even the masters themselves do not know about this - and even more so they cannot explain it to customers.
To prevent the formation of cracks after shrinkage and shrinkage of the log house, the technique of creating an undercut is used, i.e. vertical gap along the axis of the logs. This gap is selected in the lower part of the log along its entire length, and from the ends it is slightly less (5-8mm along with the height of the "hanging" of the outer corners), and in the invisible parts of the crown - a little more (10-15mm).

Note that the features of creating an undercut for the gun carriage were considered in the previous article.
The first figure shows the forces acting on the log during shrinkage and shrinkage. Due to the impact of these forces, first of all, a crack appears in the lower part of the log. Over time, it increases, as shown in the second figure.
If initially there was no gap under consideration between the upper and lower logs, then the edges of the groove of the upper log would open like wings, forming significant longitudinal slots along the lines of contact between the logs.
In our case, the “wings” also open, but due to the presence of a gap, a “soft landing” of the upper log onto the lower one occurs, and the edges of the groove, even after expansion, are quite tightly adjacent to the surface of the lower log.
Advice
The use of a longitudinal groove in the lower part of the crowns, called "undercut", eliminates the need for regular caulking of the log house or bath. Please note that in order to prevent moisture from entering between the crowns, at the ends of the cuts, this gap is reduced from 10 ... 15 to 5 mm. The presence of an "undercut" gap can be easily checked at the ends of the crowns that form door and window openings.
Denis Migachev, General Director of the construction company "Rus Log"
How it looks in practice is shown in the following photos.


And don't be afraid of crescent-shaped gaps between logs, especially in window and door openings (unlike the ends of cuts, these openings will be closed with joinery in the future). Now you know that this is a specially thought-out step that will protect the walls of your house from the negative effects of shrinkage.
Decoration of door and window openings
To date, there are three main ways to design openings:
1. First, a log house is made without windows and doors, and then openings are cut in the walls, as a rule, without trims for trim. The disadvantage of this method is the excessive consumption of materials and the lower rigidity of the structure of the log house with a wall length of more than 6 meters (that is, when end-joining of logs is necessary in special cuts). This method is rarely used, but, nevertheless, it takes place.
2. Window and door openings are created immediately, but trims for platbands and other joinery are not made. This is a well-known and now the most common method of installing windows and doors, especially in companies operating in the periphery.
Installation of a window frame for the first two options includes the following steps: a groove is cut with an ax under the ridge (an analogue of a cranial bar); the ends of the logs are cut with a hacksaw; elements of the window frame are mounted on the comb. The main disadvantages of this design of windows and doors are the problems that arise when attaching joinery. The platbands, if they can be installed, are far from the wall surface, not very beautiful gaps are formed, especially if you look at the window at an angle, along the wall. The window itself, as a rule, turns out to be colder, as the window unit's airflow increases.

3. On the openings created during the felling process for windows and doors, clasps are immediately made for joinery. As a rule, the thickness of the wall in the part remaining after the cladding is 20-25cm. Vertical grooves are made at the ends of the walls. They will be inserted (exactly inserted, without fixing) cranial bars, which serve as guides for the logs during the shrinkage of the log house. The advantages of this method are a more modern and neat look of window blocks with platbands; convenient installation of wooden and metal-plastic double-glazed windows in them; no gaps and, as a result, warmer windows and doors. The disadvantages of the method are its laboriousness and increased requirements for the training of cutters.
There is an intermediate option between methods 2 and 3. This is the case when the openings for the openings are not cut immediately during the felling process, but later, after the house is assembled. But this is a more time-consuming, expensive procedure, and we do not recommend it to you.
For walls made of gun carriage, it is not necessary to cut openings for carpentry. However, the groove and cranial bar are also used here.
By the way, in your house from a round log, you can make all or part of the internal walls from a gun carriage. It looks quite stylish and interesting. Despite the fact that the carriage is more labor-intensive, in this case, as a rule, you do not spend extra money, since the increased costs for sawing the carriage will be offset by the absence of the need to make door openings.

How your windows and doors will look, you can see in the two photos above.
Application of a technological cut to remove the load and control the formation of cracks in the log
Don't be surprised to see a cut in the upper surfaces of a round log or gun carriage. This is a special technological cut that allows you to control the process of cracking in a log.
What is the essence of the methodology?
If it is impossible to avoid the formation of cracks in drying logs (and they really cannot be avoided even when using a winter forest), then the problem of controlling the occurrence of these cracks arises. It is better if the cracks (especially deep ones) are directed upwards - there they will be covered by the groove of the upper log. At the same time, moisture will not get into them, “cold bridges” will not form and other processes negative for the tree and the house will occur.
To set the direction of crack formation, a relief cut is made in the upper part of the log, about a third of the diameter deep. The cut allows you to remove the load (internal and external stresses) from the log and indicate the required direction of concentration of internal forces that inevitably arise in the log as a result of shrinkage and pressure of the upper rims.

The cut is made along the entire surface of the log, with the exception of visible areas (near the ends, overcuts, etc.).
The following photo shows the result of using relief cuts to control the occurrence of vertical cracks.
Unfortunately, there are still construction companies that will shrug their shoulders in surprise at your question about relief cuts, although this technology has already become widespread.

According to the materials of the journal Landowner of the North-West.
We express our gratitude to Marat Ismagilov
Many will agree with the statement that a magical atmosphere reigns in a wooden house. Such a “hut” seems to have come out of a fairy tale, and looks quite harmonious both in the forest and in the suburbs of the metropolis. If you want to create just such a home, you should use the Canadian felling method. About a decade ago, few people heard about this method, but today Canadian felling is quite common. It is noteworthy that in Canada this method has been used since the 70s of the last century, and, therefore, the technology has been time-tested.
Material selection
Canadian felling of houses involves the use of logs that meet specific standards. Experts insist on the use of logs with a diameter of at least 30 cm at the top. This condition must be met in connection with the specifics of shrinkage and shrinkage of the entire log structure. A larger diameter can be used at the request of the customer - the thicker the log, the fewer crowns are needed for the log structure, which, of course, will have a positive effect on the preservation of heat in the future house. The thick log guarantees thermal insulation of the corner cups.
The length of the logs used can be 14m. In the process of erecting walls that exceed this parameter in length or according to design needs, docking can be carried out using screw ties. In addition, the docking site must be closed with a transverse wall of the cut. It turns out that for wide-area projects, with the help of different lengths of harvested logs, it is possible to erect buildings of any shape and size. It is important to choose the right logs for quality, diameter and length.
In the process of building wooden cottages with Canadian felling, only coniferous wood is used. This is due to the high resistance of coniferous wood to environmental humidity. Such a house will not be destroyed either in wet weather, or in rain or snow. Such wood contains many resins, in addition, it has a high density.
Can be used:
- pine. It is traditionally used for the construction of log cabins. The level of its resinousness and high density guarantee the durability of the structure, and the attractive amber shade of timber makes it possible to leave the cottage without cladding.
- larch. Its strength is 30% higher than that of pine. The resin content is also higher, so it is more resistant to microbial attack. This wood is a good option for baths
- cedar (cedar pine) is a natural antiseptic. Since ancient times, people have noticed that this wood heals those who live in the house.
- red Canadian cedar.
Technology
Canadian felling, the technology of which is excellent when you need a log cabin with a round log, perfectly protects against drafts. Also, this type of felling makes it possible not to think about the constant refilling of the log house. After all, the technology itself assumes the absence of gaps.
The Canadian log house is built using the tongue-and-groove technology. The groove is a Canadian cup, it faces downwards, as a result of which additional protection against drafts and moisture is guaranteed. The groove is trapezoidal in shape, and the spike coinciding with it is wedge-shaped. This is what prevents the cups from opening during shrinkage with the formation of cracks (as in the case of Russian felling), but “wedged” the logs one on top of the other. It is worth noting that neither moisture nor air comes into contact with the insulation in the bowl, which means that it retains all its properties.
In the process of forming the Canadian cup, a two-sided log cut is used at an angle of 45-50 degrees. However, the accuracy of the angle is determined by a specialist for specific logs and adjusted manually. Two diameters of the log itself (often 60 cm) are taken as the length of the notch. It is very important to align the lines of the notches with the line of pairing of the cups, to ensure the integrity of the logs.
As a guarantee of perfect abutment and “jamming” of the log in the groove and cups during shrinkage, it is worth leaving a special saddle gap of approximately 25 mm. This process is called hanging logs - underscribing or drawing with magnification.
Experts distinguish two types of bowl (lock):
- classic with two veneers at the top
- diamond or diamond notch, which has four notches, two on top and two on the bottom. Quite similar to a Norwegian castle, only on a round log.
 In the Canadian felling, there are log releases at the places of corner joints, which are called “corners”. Such issues are designed in different ways: a flat end, along the radius, in a run, figured / curvilinear. The use of logs in the corners of the butt "skirts" allows you to give an attractive style to log houses, which emphasizes the uniqueness and natural beauty of natural architecture.
Why it is worth building according to the Canadian felling
There are a number of reasons why it is worth building buildings using Canadian technology:
- this method obliges builders to pick and process each log by hand. Even the planing and skinning of logs has to be done by specialists, not by machines, which makes it possible to choose the highest quality material and achieve its best condition for construction. Thus, a log prepared for a Canadian felling compares favorably with a rounded one.
- heat saving is the main concept for this technology. For this reason, even cups for insulation and grooves are selected manually to ensure the most accurate fit.
- due to the peculiarities of fitting logs, it is possible to erect a log house in such a way that it looks like a continuous array without joints, gaps, gaps. The insulation is not visible either from the outside or from the inside, and the second “caulk” is not needed
- Canadian log cutting assumes that during the formation of walls, the outer layer of the tree is not removed, this guarantees the building additional bioprotection and protection against freezing
- the wood layer is an obstacle to damage by microorganisms, and also saves the material from destruction from ultraviolet radiation, burnout. This means that the tree does not change its color under the sun and its properties over time.
- the log retains natural curves, the natural shape and structure of the surface, thus some artificiality is removed from the log house
- using this technology, a special microclimate is formed in the house, as a result of which the level of comfort and coziness increases. The bathhouse looks very advantageous - Canadian felling makes it possible to save the maximum number of properties of the original tree for this room.
Disadvantages of Canadian felling
Of the shortcomings, it is worth highlighting:
- possible errors arising from the fact that the crowns are selected by eye without special measurements
- inexperienced craftsmen may not symmetrically mount horizontal crowns
- only experienced craftsmen can build using Canadian technology
- high price.
For residents of the northern regions, log cabins have always been a priority when building their own houses, but recently wooden architecture has been experiencing a real boom. The intention to live in nature outside the city is reinforced by the desire to build the main building or bath from real logs. Such projects are quite often implemented by developers with material wealth slightly above the average. Differences in the methods of erecting log cabins are, first of all, in the form of connecting crown nodes. In particular, the technology of Canadian felling provides for the design of the lock, which has a kind of spike and groove, as well as a specific shape of the bowl and notches.
Characteristics
The Canadian log house is different:
- technological complexity of sawing and punching out butt joints;
- high estimated cost;
- the absence of external intervention gaps that require additional caulking after shrinkage of the box walls.
Due to the complexity of assembling a log house using Canadian technology, marking the bowl, battens, countersunk tenon and reciprocal groove should be done by professionals using a special compass. Wood is sampled using an electric or chainsaw. Finishing is done by hand using carpentry tools. Thanks to the spike located in the lower part of the log, the element is pushed onto the groove located in the upper zone of the underlying element. At the same time, the crowns, thanks to the notches, are pressed against each other as tightly as possible, and in the process of shrinkage, the locks are completely wedged. A similar technique is not found in other methods of assembling log houses. The Canadian frame is not blown through even in the corners, not to mention the interventional joints that do not form cracks on the surface of the walls.
The material and labor costs of felling according to Canadian technology are more than compensated by its advantages over simpler methods of building log houses.

Among the advantages of the Canadian log house are:
- excellent thermal insulation, ensured by the accuracy of fit and the original shape of the bowl;
- high quality of the used winter wood;
- aesthetics of processed logs, allowing you to abandon the external and internal decoration of the house;
- insulation invisible from the outside, laid along the crown in a specially cut groove;
- tight fit of logs adjacent in height to each other;
- the most accurate docking of corners with careful fitting of the connecting bowls;
- the presence of a longitudinal compensation cut, relieving stress in the wood during shrinkage and shrinkage.
In fact, the technology of the Canadian felling is an improved method of assembling the traditional Russian felling into a bowl. "Huts" migrated to the expanses of Canada, where they first gained popularity, and then got their current name. In the process of introducing the method, the geometry of the butt joints was qualitatively improved, but the essence remained the same - many consider Canadian felling to be one of the varieties of Russian technology.

The disadvantage of the considered method of erecting a log house, however, is available. These are deep end cuts formed during the design of the connecting bowl. The isthmus remaining after processing in the narrowest place is only 30 percent of the log cross-sectional area. Unfortunately, the "weak link" can break in the event of unsuccessful transportation or an accidental impact already at the construction site.
Canadian felling process
The concepts of "Canadian house" and "Canadian felling" should not be confused. The first is a light frame-shield structure, and the second is a full-fledged, traditional log house, which has the forms of connecting bowls characteristic only for it with the presence of self-jamming locks and notches.
After shrinkage of the walls assembled using the Canadian felling technology, the house becomes even stronger and warmer.

The prepared trunks are dried in compliance with all technological requirements, after which the material is rejected according to the principle of manifested defects. Further processing is carried out at the production site or directly at the site of the construction of the log house. The first step is to remove the bark. This is done by hand to avoid damage to the underlying layer of sapwood. Next happens:
- cutting logs in accordance with the design length;
- sanding the surface of wood;
- marking and sawing out trapezoidal bowls and notches;
- design of spikes and reciprocal recesses;
- longitudinal compensation cut;
- longitudinal laying groove;
- grinding cut areas.
After processing the logs, the surfaces are impregnated with antiseptics and fire retardants. Then they proceed to the control assembly of the log house and fitting the elements in place. They are numbered, disassembled and transported to the construction site (when manufactured at the factory).
The final laying of the crowns using the Canadian felling technology is carried out on a pre-constructed foundation. Under the first row of logs, two layers of rolled waterproofing are laid to prevent capillary moisture from rising along the wooden walls of the finished log house. The elements are mounted in tiers according to pre-applied markings. Between the crowns and in the docking bowls, a heater is placed in such a way that it sinks into the grooves intended for it and is not visible from the outside.
After the walls are erected, the surfaces and ends of the logs are once again treated with antiseptics, applying the compositions in two layers. Impregnation will help get rid of the appearance of mold and pests during the operation of the building.
A finished log house, just built by professionals, can upset an owner who is not familiar with Canadian felling technology. Seeing the crescent-shaped gaps on the front side of the crowns, he would probably think that he had contacted inexperienced covens. But in fact, such a "oversight" is not accidental. The grooves formed during the assembly of the logs are intended to minimize the effects of shrinkage of the walls, as well as to prevent the appearance of external woody cracks during the drying period of the wood. Literally in a year, the upper rows of logs will lie quite tightly on the lower rows, so caulking will never be needed. A house built using the Canadian felling technology will surely turn out to be solid, warm and durable.
On the one hand, the design seems to be not the most complicated. On the other hand, few people work with the Canadian bowl. Why?
Because it’s not enough to just make a trapezoidal bowl shape, cut a spike on the top log and a groove on the bottom one. It is necessary to optimally calculate all dimensions so that the parts of the castle fit as tightly as possible to each other. Otherwise, all the advantages of such a bowl will come to naught.
And only real professionals who have been working with hand-cut logs for years can cope with this task. At the same time, such a high-quality connection can be made only with the help of an excellent professional tool, which is quite expensive and not everyone has it.
What is the main plus of felling a log house into a Canadian bowl?
In the tightness of corner joints after shrinkage of the house. Unlike the classic Russian bowl, such a connection of logs does not dry out after shrinkage. It is still tight!
It turns out that the joints of logs in the Canadian bowl do not need repeated caulking? This is partly true. But not really!
It is impossible to predict how a tree will behave when it dries out. Therefore, it cannot be guaranteed that the Canadian bowl completely eliminates the need for subsequent caulking.
But it can be guaranteed that the amount of work on caulking after the shrinkage of the house will be minimal and experienced craftsmen will cope with the task very quickly.
Logging technologies - from Canadian felling to Post and Beam houses.
In wooden housing construction, there are two main technologies for felling a log house - this is cutting into a bowl, it is divided into Canadian and Russian cutting, as well as frame-log technology - the so-called Post and Beam, from the English words Post and Beam (pillar and beam).
Thanks to manual cutting the highest quality is achieved, which cannot be obtained by processing logs in other ways. It is during manual processing that the log ideally retains its qualities - warmth, durability, natural beauty and resistance to environmental influences. The technology of manual felling affects not only the style and appearance, but also the thermal conductivity and manufacturability of the chopped log. The ability to use various materials for finishing and building a house. We will try to explain to you what the differences are.
Cutting a log house into a bowl
Cutting a log house into a bowl is the most common type of felling. The walls in this case consist of logs arranged horizontally. At the junction or intersection of walls (cuts), bowls are cut in the log during cutting. The over-cutting technology can be performed according to the Russian technology with a round bowl or the Canadian felling can be used, which is also divided into two types - traditional Canadian or diamond bowl.
|
Cutting a log house into a Russian bowl has long been the most common type of felling in Russia. In the cut, all logs and bowls are round. Disadvantages of the technology of felling a log house into a Russian bowl.In the process of drying, the logs decrease in size and at the corner joints of the logs, gaps are formed, which are larger, the thicker the diameter of the log. For example, if you used logs with a diameter of 30 cm in your log house, then gaps of about 7 mm may form, and if the log is 40 cm, then gaps can be up to 10 mm. Advantages of felling a log house into a Russian bowl.This type of felling has taken root in cold Russia for a reason. Typically, the width of the groove in the log (thermal lock) is about half the diameter of the log. |
Canadian felling
Canadian felling is the most logical technology in wooden housing construction using logs with a diameter of 36 cm or more.
The main advantage in the Canadian bowl during the cutting of the corner joint on top of the log is the notches, which give the log at the place of the cut not a round, but a saddle shape. Due to this, the top log during the drying process does not form a gap in the cut, but slides down along the made notches and prevents the appearance of gaps between the logs.
Cutting a log house into a Canadian bowl
|
In the cut in the log, upper notches are formed to improve shrinkage processes. Advantages of the log cabin technology into the Canadian bowl.The processes of shrinkage of a wooden house for residents are more imperceptible. Cons of felling a log house into a Canadian bowl.When forming the notches, due to which the drying process in the Canadian bowl is more favorable, the width of the thermal groove between the logs decreases. When cutting a log house into a Canadian bowl from a log with a diameter of 30 cm, the width of the groove will be about 10 cm, and from a log with a diameter of 40 cm, about 15 cm. |

Logging into a Canadian diamond bowl
|
A wooden house or bath house cut into a diamond Canadian bowl is considered aerobatics. A chic appearance is achieved not only by the upper notches in the cut, but also by the lower ones. Thanks to the repeated intersection of the edges (notches) in the cut, this type of felling got its name - diamond. Advantages of the technology of felling log cabins into a diamond Canadian bowl.The same as the traditional Canadian bowl - favorable processes for felling during the period of log shrinkage. Disadvantages of felling a log house into a diamond Canadian bowl.Small width of the thermal groove. It can be even narrower than a house cut into a traditional Canadian bowl, as the log has notches at the top and bottom of the log. We recommend building houses in a diamond Canadian bowl from a log with a diameter of at least 46 cm. |

Log cabin in hybrid style.
|
Benefits of logging in a hybrid styleIf you have a complex (not double-pitched roof), then it is not possible to use chopped gables. The rafter system rigidly fastened with a sheathing, counter-sheathing, roofing will not allow gables located perpendicular to each other during the drying process to naturally change the angle of the roof slope using traditional sliding supports for rafters. On the gables between the logs, gaps are necessarily formed equal to the size of the logs. Disadvantages of logging in a hybrid stylemissing |
 Everything is very simple and clear! The first floor is chopped, the attic floor is Post and Beam, log rafters and the roof angle is 33.5 degrees - Characteristic Canadian style!
Logging using Post and Beam technology
|
Post & Beam felling technology, when the frame - the basis of the house consists of beams and pillars made of logs, allows you to use a variety of materials to fill the walls - horizontal logs without cuts, stone, glass. As a rule, frame walls are made with cladding of various types of sheathing boards - log siding, shingles, imitation of timber or unedged boards. Also, on the frame wall, you can easily lay tiles or stick wallpaper. Frame-log houses allow the use of completely different finishing and building materials in the design Benefits of post and beam fellingThe frame-log construction is very stable and practically does not shrink. Disadvantages of felling a log house using Post & Beam technologyThe disadvantage of the frame-beam construction may be the filling of the walls with chopped logs. The height of the pillars and beams in Post & Beam houses remains unchanged over time, while the chopped walls are subject to shrinkage. More information about Post and Beam technology on the page building a house Post and Beam |

The rich experience and knowledge of the carpenters of the Medvezhy log company allow the construction of a wooden log house by any known method of beam felling
 Blood thinning products: recommendations and prohibitions
 Tank legend, fighters and equipment for the Arctic: what will be shown at the Victory Parade How is the Victory Parade
 Helba yellow tea: properties and reviews